Diagnostic Procedures
- Turn ignition switch to ON position. Depress cruise control on/off switch to ON position. If cruise control on/off switch CRUISE CTRL indicator illuminates, go to next step. If cruise control on/off switch indicator does not illuminate, go to step 12).
- Drive vehicle at a speed greater than 25 MPH. Rotate COAST/SET switch counterclockwise one time and release. See Figure
. If cruise control engages and CRUISE indicator located in instrument cluster illuminates, go to next step. If cruise control engages and CRUISE indicator does not illuminate, go to step 14).
- Remove foot from accelerator pedal. If cruise control remains engaged and vehicle maintains set speed, go to next step. If cruise control does not remain engaged, go to step 16).
- Rotate RESUME/ACCEL switch clockwise and hold until vehicle speed increases 4-5 MPH. See Figure
. Release switch. If vehicle accelerates and maintains a new higher set speed, go to next step. If vehicle speed does not increase, go to step 41).
- Rotate COAST/SET switch counterclockwise and hold until vehicle speed decreases 4-5 MPH. See Figure
. Release switch. If vehicle speed decreases and vehicle maintains a new lower set speed (greater than 25 MPH), go to next step. If vehicle speed does not decrease, go to step 43).
- Slightly depress brake pedal. If cruise control disengages and set speed memory is unchanged, go to next step. If cruise control does not disengage, go to step 45).
- Rotate RESUME/ACCEL switch clockwise one time and release. See Figure
. If vehicle accelerates to and maintains previous set speed, go to next step. If vehicle will not accelerate to and/or maintain previously set speed, go to step 49).
- Momentarily rotate RESUME/ACCEL switch clockwise (tap-up) and release within 3/4 of a second. See Figure
. If vehicle speed increases one MPH and maintains a new set speed, go to next step. If vehicle speed does not increase, replace CCM.
- Momentarily rotate COAST/SET switch counterclockwise (tap-down) and release within 3/8 of a second. See Figure
. If vehicle speed decreases one MPH and maintains a new set speed, go to next step. If vehicle speed does not decrease, replace CCM.
- Depress CANCEL switch. See Figure
. If cruise control disengages and CRUISE indicator goes out, go to next step. If cruise control does not disengage, go to step 23).
- Push cruise control on/off switch to OFF position. If cruise control on/off switch CRUISE CTRL indicator goes out and cruise control set speed memory is erased, cruise control system is operating properly. If CRUISE CTRL indicator does not go out, replace cruise control on/off switch.
- Disconnect cruise control on/off switch 6-pin connector. Cruise control on/off switch is located in instrument panel. Connect voltmeter between 6-pin connector terminal No. 3 (Black/White wire) and ground. Turn ignition switch to ON position and measure voltage. If voltage is more than 10 volts, go to next step. If voltage is 10 volts or less, repair open in Black/White wire between fuse block No. 2 and cruise control on/off switch. Fuse block No. 2 is located under left side of instrument panel.
- Turn ignition switch to LOCK position. Using ohmmeter, measure resistance between cruise control on/off switch 6-pin connector terminal No. 2 (Black/Yellow wire) and ground. If resistance is less than 0.5 ohm, replace cruise control on/off switch. If resistance is 0.5 ohm or more, repair open in Black wire between cruise control on/off switch and ground connection. Ground connection is located behind instrument panel, above fuse block No. 2.
- Stop vehicle and turn ignition switch to LOCK position. Disconnect CCM 18-pin connector. CCM is located behind left side of instrument panel, mounted to Electronic Brake Control Module (EBCM). Connect a fused jumper wire between CCM 18-pin connector terminal No. 10 (Gray wire) and ground. Turn ignition switch to ON position. If CRUISE indicator does not illuminate, go to next step. If CRUISE indicator illuminates, replace CCM.
- Turn ignition switch to LOCK position. Disconnect instrument cluster 16-pin connector. Using ohmmeter, measure resistance between instrument cluster 16-pin connector terminal No. 4 (Gray wire) and CCM 18-pin connector terminal No. 10 (Gray wire). If resistance is less than 0.5 ohm, repair or replace instrument cluster printed circuit board. If resistance is 0.5 ohm or more, repair Gray wire.
- Stop vehicle and turn ignition switch to LOCK position. Disconnect CCM 18-pin connector. CCM is located behind left side of instrument panel, mounted to Electronic Brake Control Module (EBCM). Connect voltmeter between CCM 18-pin connector terminal No. 11 (Light Green wire) and ground. Turn ignition switch to ON position, push cruise control on/off switch to ON position and measure voltage. If voltage is less than 10 volts, go to next step. If voltage is 10 volts or more, go to step 18).
- Turn ignition switch to LOCK position. Disconnect cruise control on/off switch 6-pin connector. Connect ohmmeter between cruise control on/off switch 6-pin connector terminal No. 1 (Light Green wire) and CCM 18-pin connector terminal No. 11 (Light Green wire). If resistance is less than 0.5 ohm, replace cruise control on/off switch. If resistance is 0.5 ohm or more, repair open in Light Green wire.
- Turn ignition switch to LOCK position. Connect ohmmeter between CCM 18-pin connector terminal No. 4 (Black wire) and ground. If resistance is less than 0.5 ohm, go to next step. If resistance is 0.5 ohm or more, repair open in Black wire between CCM and ground connection. Ground connection is located behind center of instrument panel, on firewall.
- Turn ignition switch to LOCK position. Connect ohmmeter between CCM 18-pin connector terminal No. 18 (Black wire) and ground. If resistance is less than 0.5 ohm, go to next step. If resistance is 0.5 ohm or more, repair open in Black wire between CCM and ground connection. Ground connection is located behind center of instrument panel, on firewall.
- Turn ignition switch to LOCK position. Connect ohmmeter between CCM 18-pin connector terminal No. 15 (Light Green/Red wire) and ground. Rotate COAST/SET switch counterclockwise and hold. See Figure
. If resistance is more than 0.5 ohm, go to next step. If resistance is 0.5 ohm or less, go to step 23).
- Turn ignition switch to LOCK position. Disconnect cruise control mode switch located on combination switch. Connect ohmmeter between CCM 18-pin connector terminal No. 15 (Light Green/Red wire) and cruise control mode switch connector terminal No. 1 (Light Green/Red wire). If resistance is less than 0.5 ohm, go to next step. If resistance is 0.5 ohm or more, repair open in Light Green/Red wire.
- Turn ignition switch to LOCK position. Connect ohmmeter between cruise control mode switch connector terminal No. 4 (Black wire) and ground. If resistance is less than 0.5 ohm, replace cruise control mode switch. If resistance is 0.5 ohm or more, repair open in Black wire between cruise control mode switch and ground connection. Ground connection is located under instrument panel, near blower assembly.
- Connect ohmmeter between CCM 18-pin connector terminal No. 8 (Light Green/Yellow wire) and ground. If resistance is 0.5 ohm or less, go to next step. If resistance is more than 0.5 ohm, go to step 25).
- With ohmmeter still connected from previous step, disconnect cruise control mode switch connector. If resistance is less than 0.5 ohm, repair short to ground in Light Green/Yellow wire between CCM and cruise control mode switch. If resistance is 0.5 ohm or more, replace cruise control mode switch.
- Connect ohmmeter between CCM 18-pin connector terminal No. 14 (Light Green/Black wire) and ground. If resistance is less than 0.5 ohm, go to next step. If resistance is 0.5 ohm or more, go to step 27).
- With ohmmeter still connected from previous step, disconnect cruise control mode switch connector. If resistance is less than 0.5 ohm, repair short to ground in Light Green/Black wire. If resistance is 0.5 ohm or more, replace cruise control mode switch.
- Connect voltmeter between CCM 18-pin connector terminal No. 5 (Green/White wire) and ground. If voltage is more than 0.5 volt, go to next step. If voltage is 0.5 volt or less, go to step 29) if equipped with M/T, or to step 31) if equipped with A/T.
- With voltmeter still connected between CCM 18-pin connector terminal No. 5 (Green/White wire) and ground, disconnect stoplight switch. Measure voltage. If voltage is more than 0.5 volt, repair short to voltage in Green/White wire between CCM and stoplight switch. If voltage is 0.5 volt or less, ensure stoplight switch is correctly adjusted. If adjustment is okay, replace stoplight switch.
- Connect voltmeter between CCM 18-pin connector terminal No. 3 (Blue wire) and ground. Measure voltage. If voltage is more than 0.5 volt, go to next step. If voltage is 0.5 volt or less, go to step 31).
- With voltmeter still connected between CCM 18-pin connector terminal No. 3 (Blue wire) and ground, measure voltage. If voltage is 0.5 volt or more, repair short to voltage in Blue wire between CCM and Clutch Pedal Position (CPP) interrupt switch. If voltage is less than 0.5 volt, ensure CPP interrupt switch is adjusted correctly. If adjustment is okay, replace CPP interrupt switch.
- Connect ohmmeter between CCM 18-pin connector terminals No. 6 (Yellow/Green wire) and No. 12 (Blue/Green wire). If resistance is less than 0.5 ohm, go to step 34). If resistance is 0.5 ohm or more, go to next step.
- Disconnect stoplight switch. Connect ohmmeter between CCM 18-pin connector terminal No. 6 (Yellow/Green wire) and stoplight switch connector terminal No. 4 (Yellow/Green wire). If resistance is less than 0.5 ohm, go to next step. If resistance is 0.5 ohm or more, repair open in Yellow/Green wire.
- Connect ohmmeter between CCM 18-pin connector terminal No. 12 (Blue/Green wire) and stoplight switch connector terminal No. 2 (Blue/Green wire). If resistance is less than 0.5 ohm, ensure stoplight switch adjustment is correct. If adjustment is okay, replace stoplight switch. If resistance is 0.5 ohm or more, repair open in Blue/Green wire.
- Disconnect CCM 18-pin connector. Raise and support vehicle. Connect ohmmeter between CCM 18-pin connector terminal No. 16 (Yellow wire) and ground. Start engine, place transaxle in a forward gear and allow wheels to rotate slowly. If resistance is a toggling on (continuity) and off (no continuity) signal, go to next step. If signal does not change or is very erratic, problem is with Vehicle Speed Sensor (VSS). See TESTS W/CODES
article in the ENGINE PERFORMANCE section.
- Stop engine and turn ignition switch to OFF position. Connect ohmmeter between CCM 18-pin connector terminals No. 2 (Yellow/White wire) and No. 6 (Yellow/Green wire). If resistance is not 11-19 ohms, go to next step. If resistance is 11-19 ohms, go to step 38).
- Disconnect cruise control actuator connector. Connect ohmmeter between cruise control actuator connector terminals No. 2 (Yellow/Red wire) and No. 4 (Yellow/Blue wire). If resistance is not 11-19 ohms, replace cruise control actuator. If resistance is 11-19 ohms, go to next step.
- Connect ohmmeter between CCM 18-pin connector terminal No. 2 (Yellow/White wire) and cruise control actuator connector terminal No. 2 (Yellow/Red wire). If resistance is less than 0.5 ohm, repair open in Yellow/Green wire between cruise control actuator and splice located on main harness. If resistance is 0.5 ohm or more, repair open in Yellow/White wire.
- Connect ohmmeter between CCM 18-pin connector terminals No. 1 (Yellow/Black wire) and No. 9 (Yellow/Red wire). If resistance is more than 5 ohms, go to next step. If resistance is 0-5 ohms, replace CCM.
- Disconnect cruise control actuator connector. Connect ohmmeter between cruise control actuator connector terminals No. 1 (Blue/Red wire) and No. 3 (Blue/White wire). If resistance is 0-5 ohms, go to next step. If resistance is more than 5 ohms, replace cruise control actuator.
- Connect ohmmeter between CCM 18-pin connector terminal No. 9 (Yellow/Red wire) and cruise control actuator connector terminal No. 1 (Blue/Red wire). If resistance is less than 0.5 ohm, repair open in Yellow/Black wire. If resistance is 0.5 ohm or more, repair open in Yellow/Red wire.
- Stop vehicle and turn ignition switch to LOCK position. Disconnect CCM 18-pin connector. Connect ohmmeter between CCM 18-pin connector terminal No. 14 (Light Green/Black wire) and ground. Rotate RESUME/ACCEL switch clockwise, hold and measure resistance. See Figure
. If resistance is more than 0.5 ohm, go to next step. If resistance is 0.5 ohm or less, replace CCM.
- With ignition switch in LOCK position disconnect cruise control mode switch. Connect ohmmeter between CCM 18-pin connector terminal No. 14 (Light Green/Black wire) and cruise control mode switch connector terminal No. 2 (Light Green/Black wire). If resistance is less than 0.5 ohm, replace cruise control mode switch. If resistance is 0.5 ohm or more, repair open in Light Green/Black wire between CCM and cruise control mode switch.
- Stop vehicle and turn ignition switch to LOCK position. Disconnect CCM 18-pin connector. Connect ohmmeter between CCM 18-pin connector terminal No. 15 (Light Green/Red wire) and ground. Rotate COAST/SET switch counterclockwise, hold and measure resistance. See Figure
. If resistance is more than 0.5 ohm, go to next step. If resistance is 0.5 ohm or less, replace cruise control mode switch.
- With ignition switch in LOCK position, disconnect cruise control mode switch connector. Connect ohmmeter between CCM connector terminal No. 15 (Light Green/Red wire) and cruise control mode switch connector terminal No. 1 (Light Green/Red wire). If resistance is 0.5 ohm or less, replace cruise control mode switch. If resistance is more than 0.5 ohm, repair open in Light Green/Red wire.
- Stop vehicle and turn ignition switch to LOCK position. Disconnect CCM 18-pin connector. Connect voltmeter between CCM 18-pin connector terminal No. 5 (Green/White wire) and ground. Depress and hold brake pedal. If voltage is more than 10 volts, go to next step. If voltage is 10 volts or less, repair open in Green/White wire.
- Release brake pedal. Connect ohmmeter between CCM 18-pin connector terminal No. 6 (Yellow/Green wire) and terminal No. 12 (Blue/Green wire). If resistance is more than 0.5 ohm, go to next step. If resistance is 0.5 ohm or less, replace CCM.
- Disconnect stoplight switch. Connect ohmmeter between CCM 18-pin connector terminal No. 6 (Yellow/Green wire) and stoplight switch connector terminal No. 4 (Yellow/Green wire). If resistance is less than 0.5 ohm, go to next step. If resistance is 0.5 ohm or more, repair open in Yellow/Green wire.
- Connect ohmmeter between CCM 18-pin connector terminal No. 12 (Blue/Green wire) and stoplight switch connector terminal No. 2 (Blue/Green wire). If resistance is less than 0.5 ohm, ensure stoplight switch is adjusted properly. If okay, replace stoplight switch. If resistance is 0.5 ohm or more, repair open in Blue/Green wire.
- Stop vehicle and turn ignition switch to LOCK position. Disconnect CCM 18-pin connector. Connect ohmmeter between CCM 18-pin connector terminal No. 14 (Light Green/Black wire) and ground. Rotate RESUME/ACCEL switch clockwise and hold. See Figure
. If resistance is more than 0.5 ohm, go to next step. If resistance is 0.5 ohm or less, replace CCM.
- With ignition switch in LOCK position, disconnect cruise control mode switch. Connect ohmmeter between CCM 18-pin connector terminal No. 14 (Light Green/Black wire) and cruise control mode switch connector terminal No. 2 (Light Green/Black wire). If resistance is less than 0.5 ohm, replace cruise control mode switch. If resistance is 0.5 ohm or more, repair open in Light Green/Black wire.
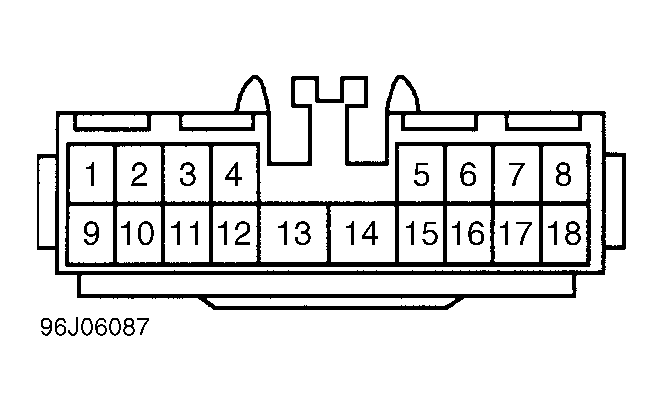
CCM CONNECTOR TERMINAL IDENTIFICATION
| Terminal No. (Wire Color) |
Circuit Function |
| 1 (YEL/BLK) |
DC Servo Motor Control |
| 2 (YEL/WHT) |
Actuator Clutch Control |
| 3 (BLU) |
Clutch Pedal Depressed Signal - M/T |
| 4 (BLK) |
Ground |
| 5 (GRN/WHT) |
Stoplight Signal |
| 6 (YEL/GRN) |
Brake Control |
| 7 (PNK/BLU) |
TP Sensor Signal |
| 8 (LT GRN/YEL) |
Cancel Signal |
| 9 (YEL/RED) |
DC Servo Motor Control |
| 10 (GRY) |
CRUISE indicator Control |
| 11 (LT GRN) |
Cruise ON/OFF Switch Signal |
| 12 (BLU/GRN) |
Actuator Clutch Power Supply |
| 13 (BLK/RED) |
Ignition Start Signal |
| 14 (LT GRN/BLK) |
RES/ACC Switch Signal |
| 15 (LT GRN/RED) |
SET/COAST Switch Signal |
| 16 (YEL) |
Vehicle Speed Sensor (VSS) |
| 17 (PNK/GRN) |
Overdrive Cut Control |
| 18 (BLK) |
Ground |