Test B: Wipers Do Not Operate Properly
- Turn ignition switch to LOCK position. Connect New Generation Star (NGS) tester to Data Link Connector (DLC). DLC is located below driver's side of instrument panel, right of steering column. Depress clutch pedal (M/T). Observe GEM PIDs IGN_S, IGN_R, IGN_A and IGN_KEY while turning ignition switch through all positions. If GEM PID values agree with ignition switch positions, go to next step. If GEM PID values do not agree with ignition switch positions, go to TEST D: KEY-IN-IGNITION CIRCUIT
.
- Turn ignition switch to RUN position. Observe PID WPMODE while turning wiper/washer switch through all positions. If GEM PID values agree with wiper/washer switch positions, go to next step. If GEM PID values do not agree with wiper/washer switch positions, go to step 6
.
- Using NGS tester, trigger GEM active command WIPER RLY to ON and OFF. If the wipers turn on and off, go to next step. If wipers do not turn on and off, go to step 10
.
- Trigger GEM active command WIPER RLY to ON. Trigger GEM active command SPEED RLY to ON and OFF. If wiper speed changes on activation and deactivation of SPEED RLY, go to next step. If wiper speed does not change on activation and deactivation of SPEED RLY, go to step 16
.
- Observe GEM PID WPPRKSW while turning wipers on using multifunction switch. If PID values agree with wiper position, replace GEM. See REMOVAL & INSTALLATION
. If PID values do not agree with wiper position, go to step 27
.
- Turn ignition switch to LOCK position. Disconnect multifunction switch 7-pin harness connector C240. Test wiper/washer switch portion of multifunction switch. See WIPER/WASHER SWITCH
under COMPONENT TESTS. If wiper/washer switch tests okay, go to next step. If wiper/washer switch tests faulty, replace multifunction switch. See REMOVAL & INSTALLATION
.
- Disconnect GEM 26-pin harness connector C352. GEM is located behind left side of instrument panel, next to central junction box. Turn ignition switch to RUN position. Measure voltage between ground and GEM harness connector C352 terminals No. 5 (Dark Blue wire), No. 18 (Pink/Yellow wire), then No. 19 (Light Blue/Orange wire). See Figure
. If battery voltage does not exist on any circuit, go to next step. If battery voltage exists on any circuit, repair short to voltage in appropriate wire(s). See WIRING DIAGRAMS
.
- Turn ignition switch to LOCK position. Measure resistance between ground and GEM harness connector C352 terminals No. 5 (Dark Blue wire), No. 18 (Pink/Yellow wire), then No. 19 (Light Blue/Orange wire). See Figure
. If each resistance is 10 k/ohms or more, go to next step. If resistance on any circuit tested is less than 10 k/ohms, repair short to ground in appropriate wire(s). See WIRING DIAGRAMS
.
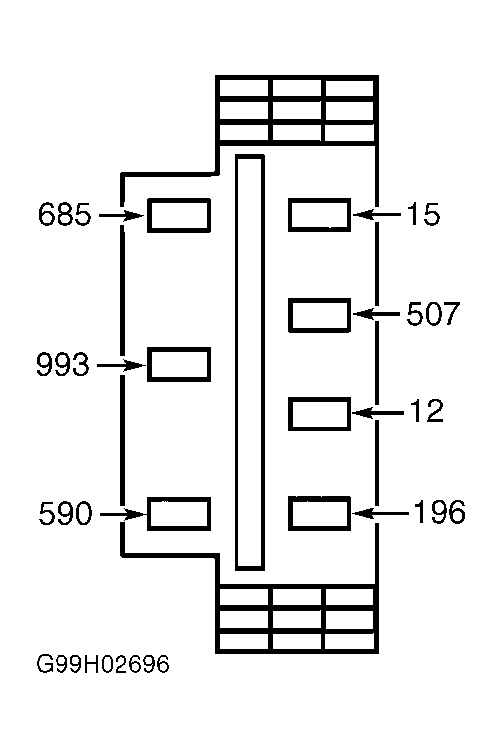
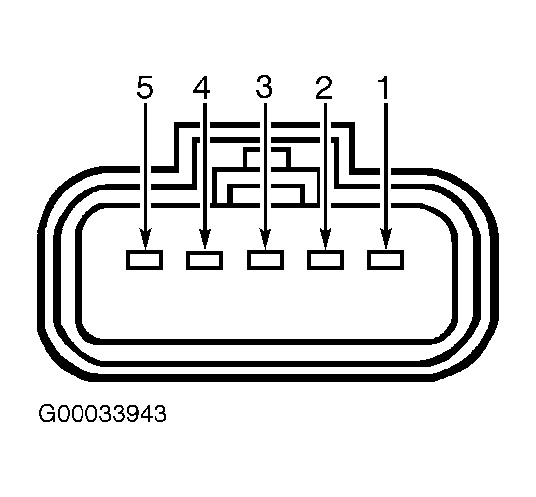
- Measure resistance in Dark Blue wire between GEM harness connector C352 terminal No. 5 and multifunction switch harness connector C240 terminal No. 685. See Figure
and Fig 1
. Measure resistance in Pink/Yellow wire between GEM harness connector C352 terminal No. 18 and multifunction switch harness connector C240 terminal No. 590. Measure resistance in Light Blue/Orange wire between GEM harness connector C352 terminal No. 19 and multifunction switch harness connector C240 terminal No. 993. If resistance on any circuit is more than 5 ohms, repair open in appropriate wire(s). If resistance is 5 ohms or less on all circuits, replace GEM. See REMOVAL & INSTALLATION
.
- Remove wiper on/off relay from Battery Junction Box (BJB). BJB is located in left side of engine compartment, forward of strut tower. Measure voltage between ground and wiper on/off relay socket Dark Green wire terminals. If battery voltage exists at both terminals, go to next step. If battery voltage does not exist at both terminals, repair open in appropriate Dark Green wire(s) between wiper on/off relay and fuse No. 26 (30-amp) in central junction box. See WIRING DIAGRAMS
.
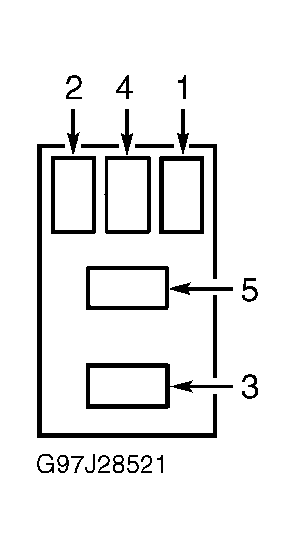
- Turn ignition switch to LOCK position. Attach 30-amp fused jumper wire between wiper on/off relay socket terminals No. 3 and 5. See Fig 2
. Turn ignition switch to RUN position. If wiper motor runs, go to next step. If wiper motor does not run, go to step 22
.
- Test wiper on/off relay. See MICRO RELAYS
under COMPONENT TESTS. If relay tests okay, go to next step. If relay tests faulty, replace relay.
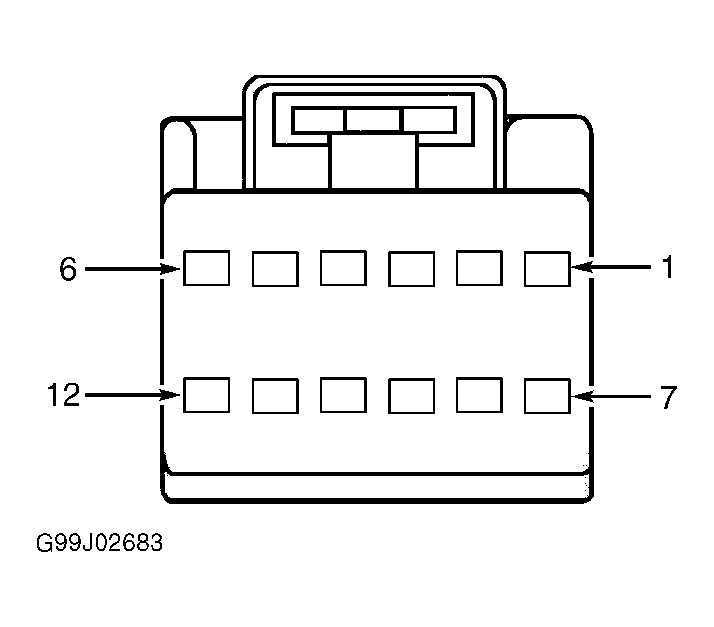
- Disconnect GEM 12-pin harness connector C293. Measure voltage between ground and GEM harness connector C293 terminal No. 12 (Yellow/White wire). See Fig 3
. If battery voltage does not exist, go to next step. If battery voltage exists, repair short to power in Yellow/White wire between GEM and wiper on/off relay. See WIRING DIAGRAMS
.
- Measure resistance between ground and GEM harness connector C293 terminal No. 12 (Yellow/White wire). See Fig 3
. If resistance is more than 10 k/ohms, go to next step. If resistance is 10 k/ohms or less, repair short to ground in Yellow/White wire between GEM and wiper on/off relay. See WIRING DIAGRAMS
.
- Measure resistance in Yellow/White wire between GEM harness connector C293 terminal No. 12 and wiper on/off relay socket terminal No. 1. See Fig 3
. If resistance is 5 ohms or less, replace GEM. See REMOVAL & INSTALLATION
. If resistance is more than 5 ohms, repair open in Yellow/White wire between GEM and wiper on/off relay. See WIRING DIAGRAMS
.
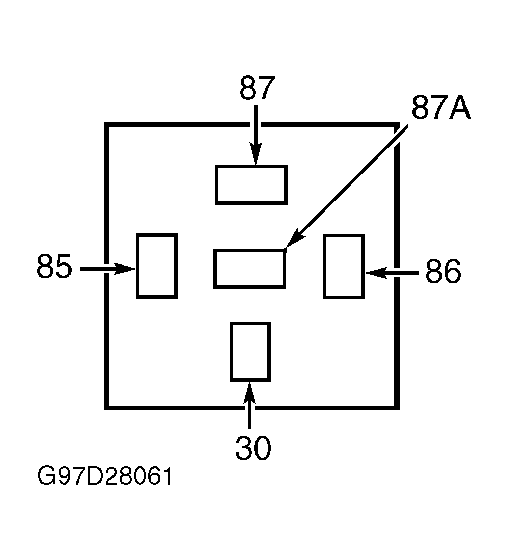
- Turn ignition switch to LOCK position. Remove wiper high/low relay from Battery Junction Box (BJB). BJB is located in left side of engine compartment, forward of strut tower. Turn ignition switch to RUN position. Using NGS tester, trigger GEM active command WIPER RLY to ON. Measure voltage between ground and wiper high/low relay socket terminal No. 30 (Yellow/Red wire), then No. 86 (Dark Green wire). See Fig 4
. If battery voltage exists on both circuits, go to next step. If battery voltage does not exist on either circuit, repair open in appropriate wire(s). See WIRING DIAGRAMS
.
- Using NGS tester, trigger GEM active command WIPER RLY to ON. Connect 30-amp fused jumper wire between wiper high/low relay socket terminals No. 30 (Yellow/Red wire) and No. 87A (Dark Blue/Orange wire). See Fig 4
. Wipers should run at low speed. Disconnect end of jumper wire connected to wiper high/low relay socket terminal No. 87A (Dark Blue/Orange wire) and connect it to wiper high/low relay socket terminal No. 87 (White wire). Wipers should now run at high speed. If wipers operate as indicated, go to next step. If wipers do not operate as indicated, go to step 26
.
- Test wiper high/low relay. See MINI RELAYS
under COMPONENT TESTS. If relay tests okay, go to next step. If relay tests faulty, replace relay.
- Turn ignition switch to LOCK position. Disconnect GEM 12-pin harness connector C293. Measure voltage between ground and GEM harness connector C293 terminal No. 5 (Gray/Light Blue wire). See Fig 3
. If battery voltage does not exist, go to next step. If battery voltage exists, repair short to voltage in Gray/Light Blue wire between GEM and wiper high/low relay. See WIRING DIAGRAMS
.
- Measure resistance between ground and GEM harness connector C293 terminal No. 5 (Gray/Light Blue wire). See Fig 3
. If resistance is more than 10 k/ohms, go to next step. If resistance is 10 k/ohms or less, repair short to ground in Gray/Light Blue wire between GEM and wiper high/low relay. See WIRING DIAGRAMS
.
- Measure resistance in Gray/Light Blue wire between GEM harness connector C293 terminal No. 5 and wiper high/low relay socket terminal No. 85. See Fig 3
and Fig 4
. If resistance is 5 ohms or less, replace GEM. See REMOVAL & INSTALLATION
. If resistance is more than 5 ohms, repair open in Gray/Light Blue wire between GEM and wiper high/low relay. See WIRING DIAGRAMS
.
- Remove wiper high/low relay from BJB. Measure resistance in Yellow/Red wire between wiper on/off relay socket terminal No. 3 and wiper high/low relay socket terminal No. 30. See Fig 2
and Fig 4
. If resistance is 5 ohms or less, go to next step. If resistance is more than 5 ohms, repair open in Yellow/Red wire between wiper high/low relay and wiper on/off relay. See WIRING DIAGRAMS
.
- Test wiper high/low relay. See MINI RELAYS
under COMPONENT TESTS. If relay tests okay, go to next step. If relay tests faulty, replace relay.
- Disconnect wiper motor Green 5-pin harness connector C151. Measure resistance in Dark Blue/Orange wire between wiper high/low relay socket terminal No. 87A and wiper motor harness connector C151 terminal No. 4. See Fig 4
and Fig 5
. If resistance is 5 ohms or less, go to next step. If resistance is more than 5 ohms, repair open in Dark Blue/Orange wire between wiper motor and wiper high/low relay. See WIRING DIAGRAMS
.
- Measure resistance between ground and wiper motor harness connector C151 terminal No. 3 (Black wire). If resistance is 5 ohms or less, test wiper motor. See WIPER MOTOR
under COMPONENT TESTS. If resistance is more than 5 ohms, repair open in Black wire between wiper motor and ground connection located in left rear corner of vehicle. See WIRING DIAGRAMS
.
- Disconnect wiper motor Green 5-pin harness connector C151. Measure resistance in White wire between wiper motor harness connector C151 terminal No. 5 and wiper high/low relay socket terminal No. 87. See Fig 4
and Fig 5
. If resistance is 5 ohms or less, test wiper motor. See WIPER MOTOR
under COMPONENT TESTS. If resistance is more than 5 ohms, repair open in White wire between wiper motor and wiper high/low relay.See WIRING DIAGRAMS
.
- Disconnect wiper motor Green 5-pin harness connector C151. Disconnect GEM 12-pin harness connector C293. Measure resistance in Black/Pink wire between wiper motor harness connector C151 terminal No. 1 and GEM harness connector C293 terminal No. 1. See Fig 3
and Fig 5
. If resistance is 5 ohms or less, replace wiper motor. See REMOVAL & INSTALLATION
. If resistance is more than 5 ohms, repair open in Black/Pink wire between wiper motor and GEM. See WIRING DIAGRAMS
.
 Courtesy of FORD MOTOR CO.
 Courtesy of FORD MOTOR CO.
 Courtesy of FORD MOTOR CO.
 Courtesy of FORD MOTOR CO.
 Courtesy of FORD MOTOR CO.