- Raise vehicle.
(Refer toHOISTING
in LUBRICATION & MAINTENANCE article).
- Remove tire and wheel assembly.
NOTE:
Removing the outer tie rod from the steering knuckle allows the steering knuckle to be turned further. This allows better access to the steering knuckle when striking it to remove the ball joint stud from the steering knuckle.
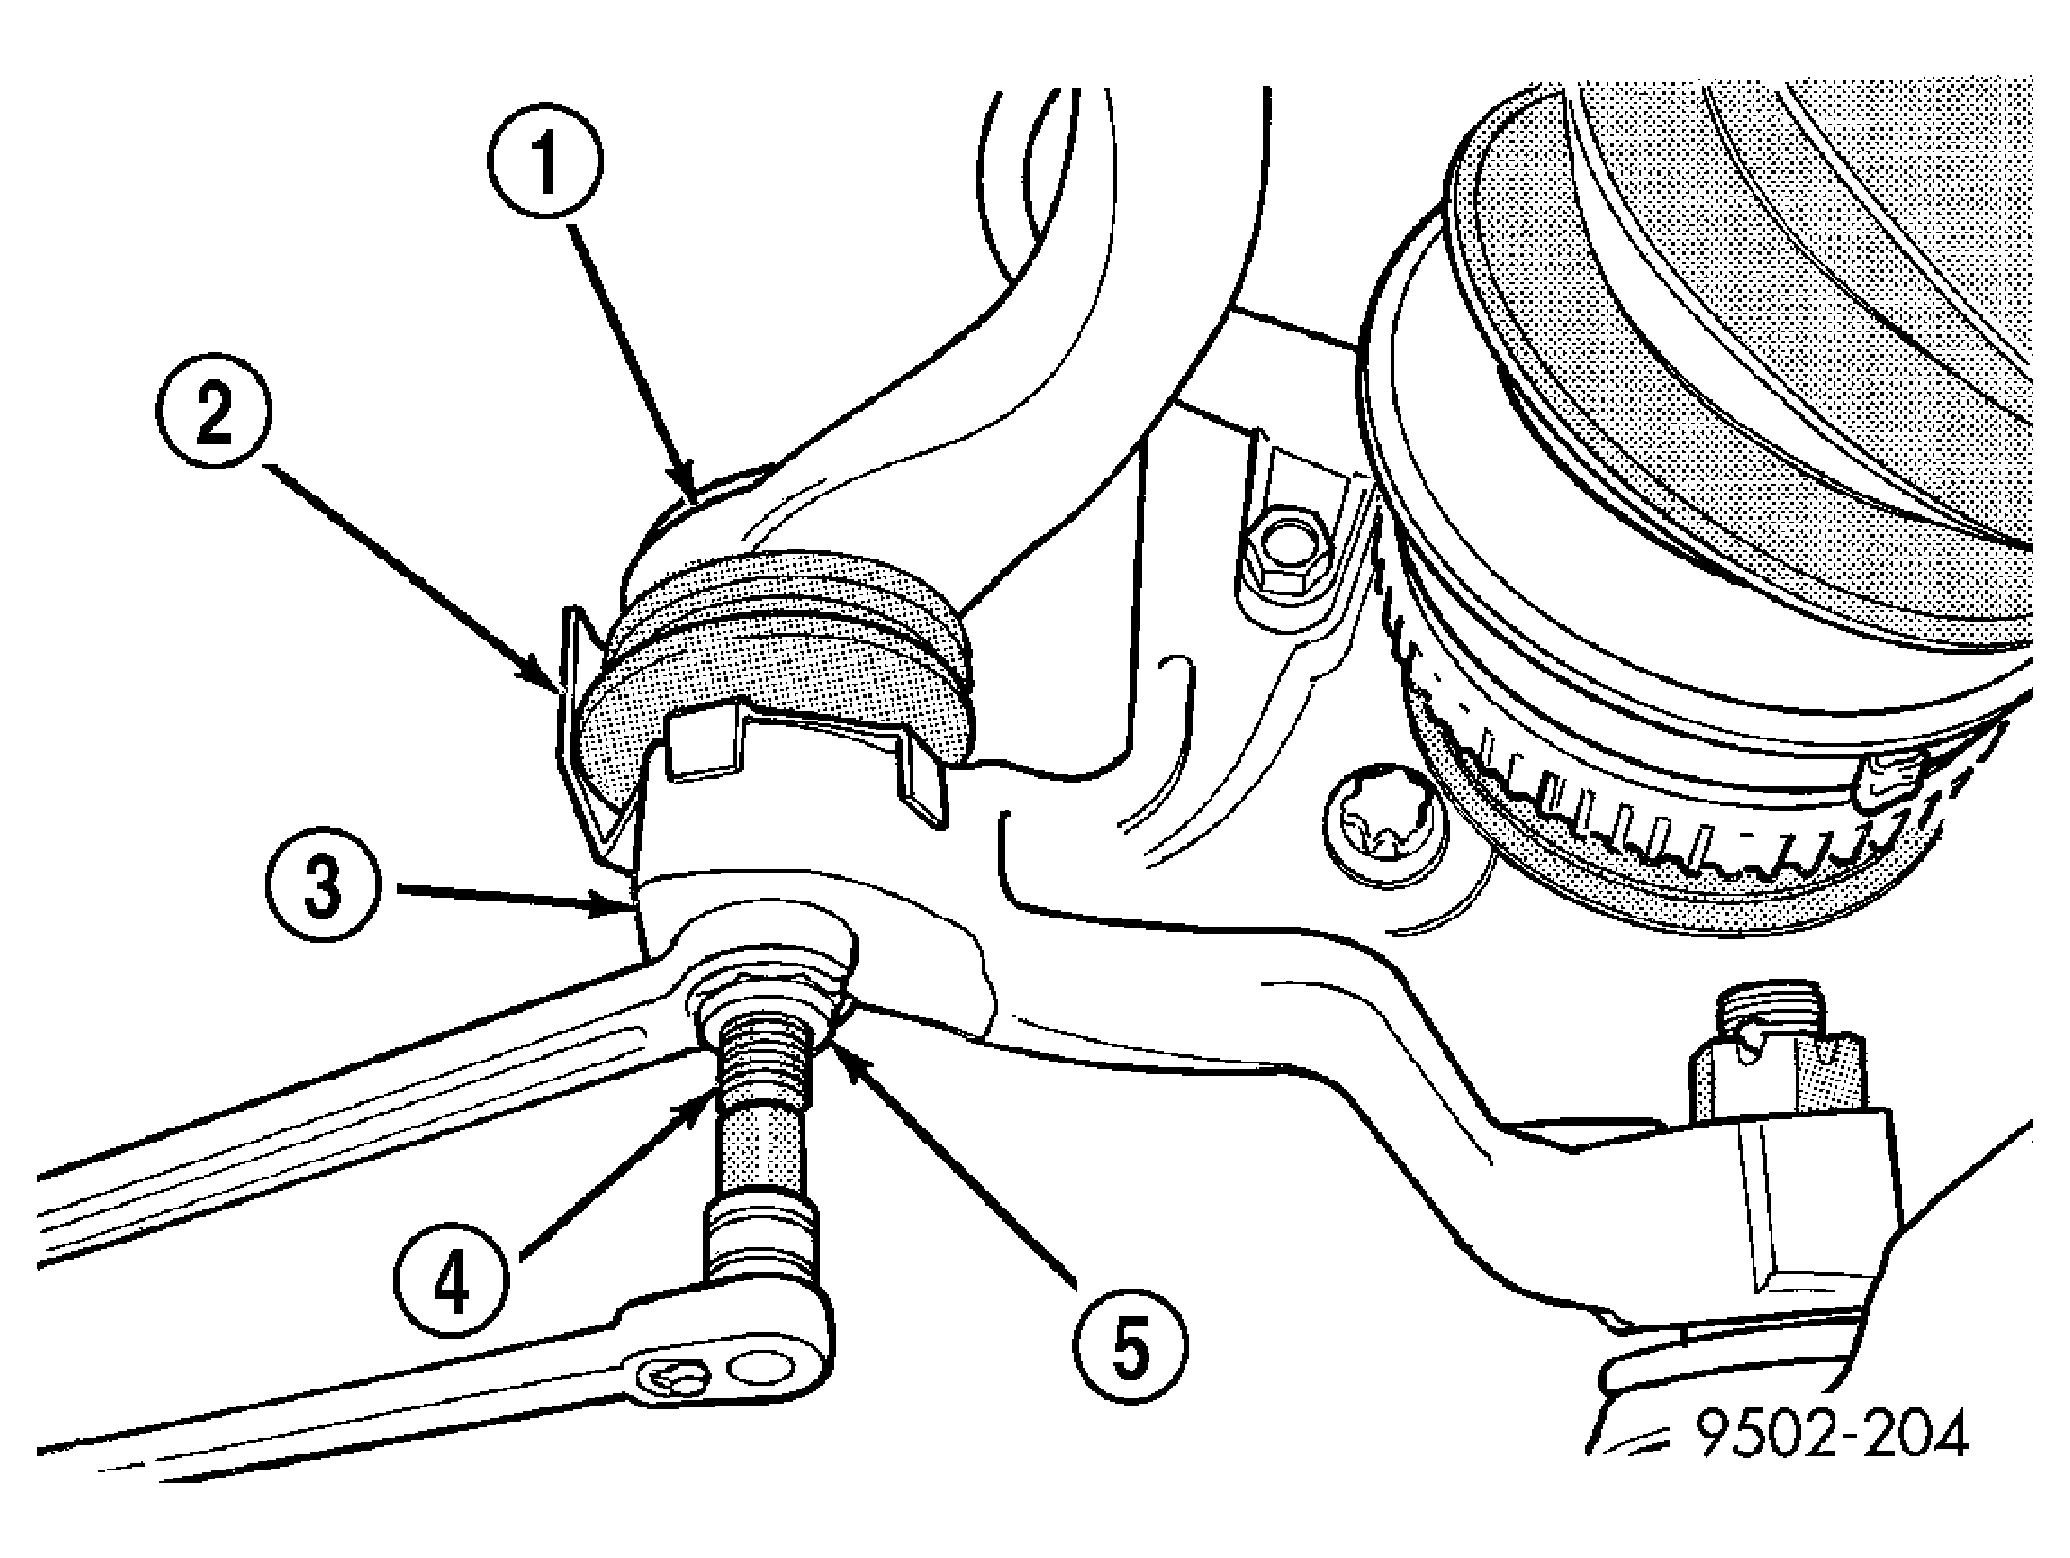
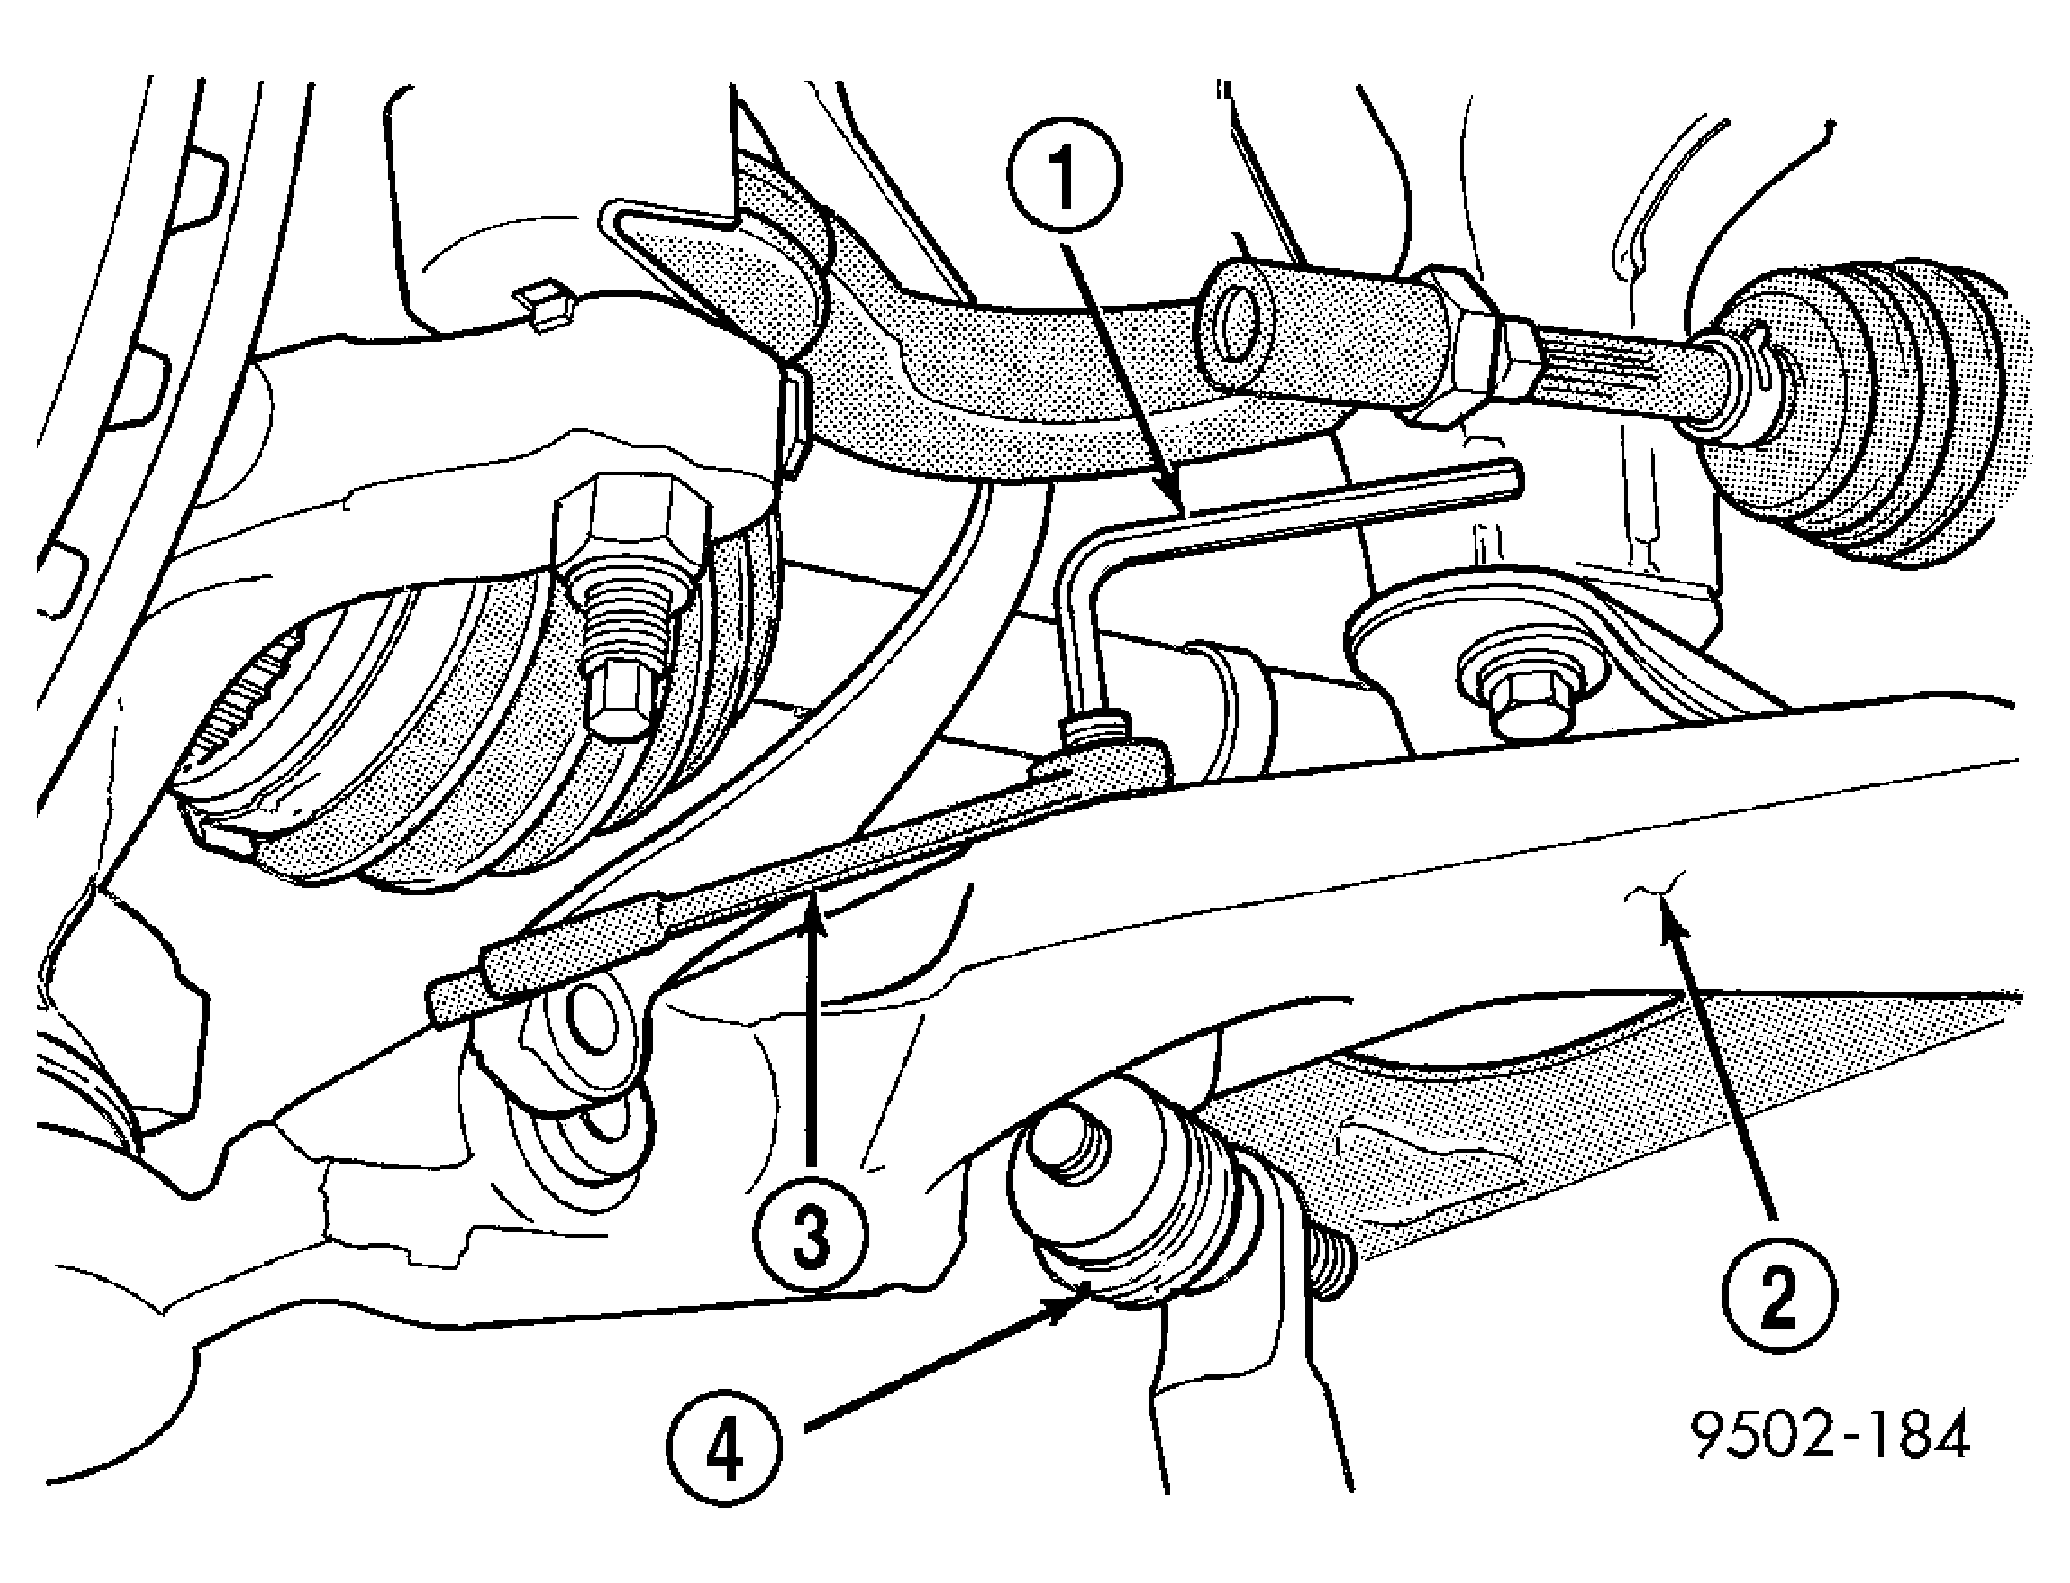
- Remove nut attaching the outer tie rod to steering knuckle. See Fig 1. Remove nut from tie rod end by holding tie rod stud with a socket while loosening and removing nut with wrench. See Fig 1 .
 Courtesy of DAIMLERCHRYSLER CORP.
| 1 - TIE ROD |
| 2 - HEAT SHIELD |
| 3 - STEERING KNUCKLE |
| 4 - TIE ROD STUD |
| 5 - NUT |
- Remove outer tie rod from steering knuckle using Remover, Special Tool C-3894-A.
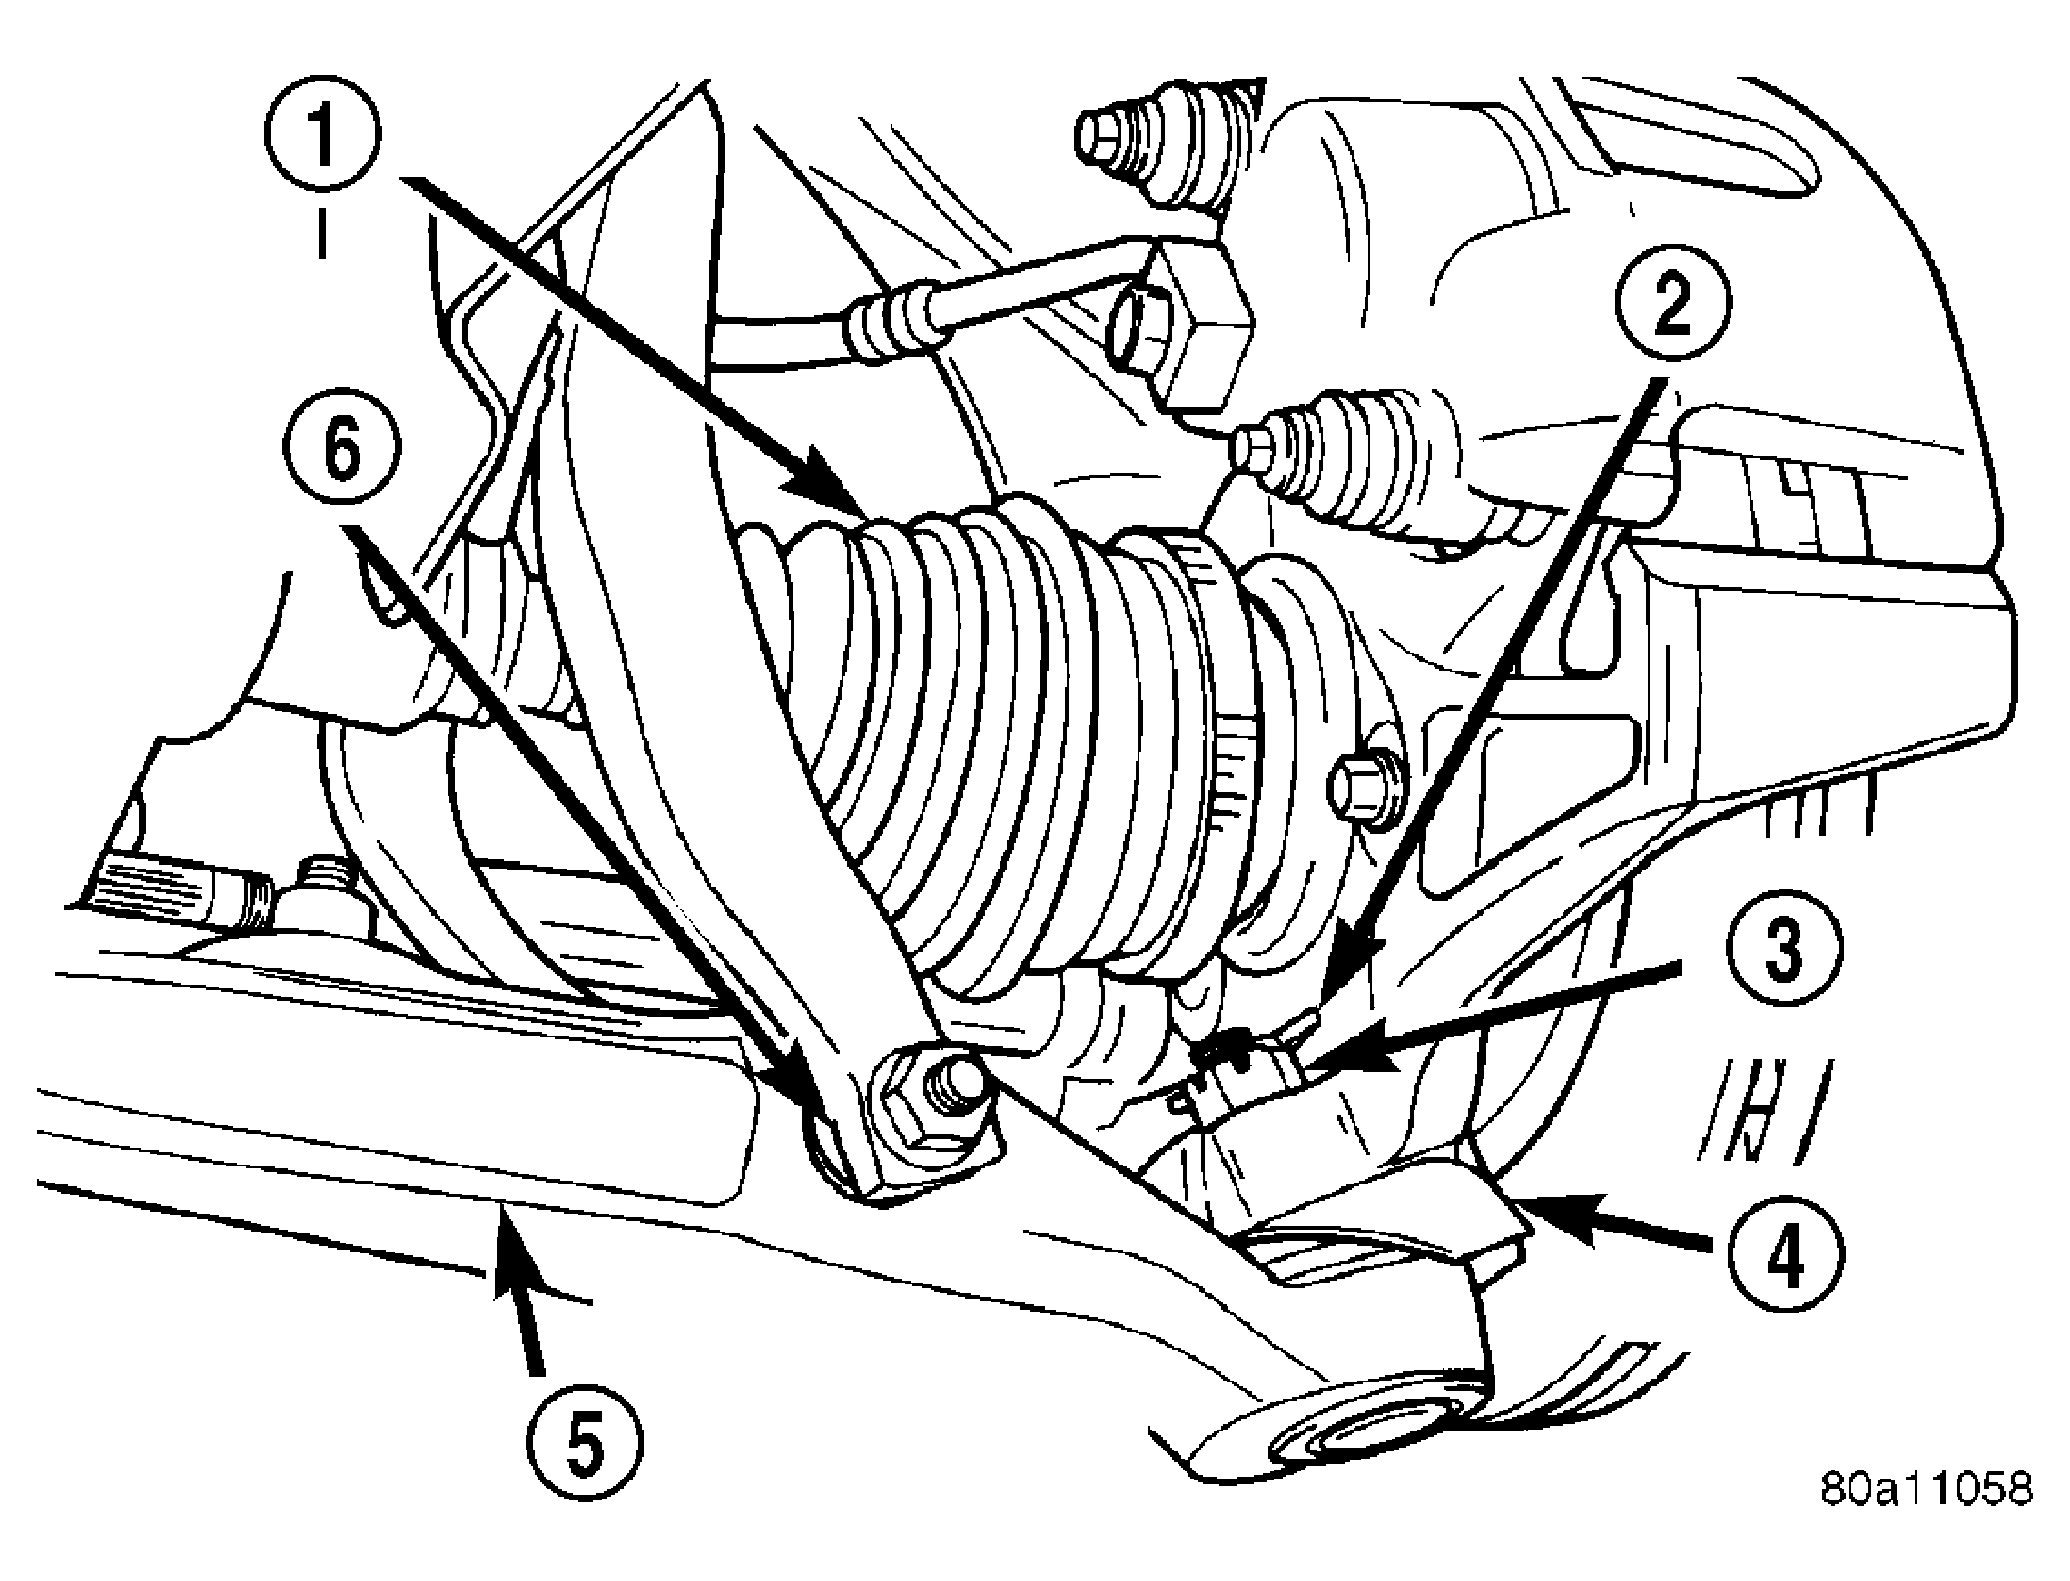
- Remove cotter pin and castle nut from lower ball joint stud. See Fig 2.
 Courtesy of DAIMLERCHRYSLER CORP.
| 1 - DRIVESHAFT |
| 2 - COTTER PIN |
| 3 - CASTLE NUT |
| 4 - HEAT SHIELD |
| 5 - LOWER CONTROL ARM |
| 6 - SHOCK ABSORBER CLEVIS |
CAUTION:
No tool is to be inserted between the steering knuckle and the lower ball joint to separate the lower ball joint from the steering knuckle. The steering knuckle is to be separated from the ball joint only using the procedure as described in step 6 below.
CAUTION:
When striking the steering knuckle, do not hit the heat shield covering the ball joint grease seal. Bending the heat shield against the ball joint grease seal will cause the grease seal to fail.
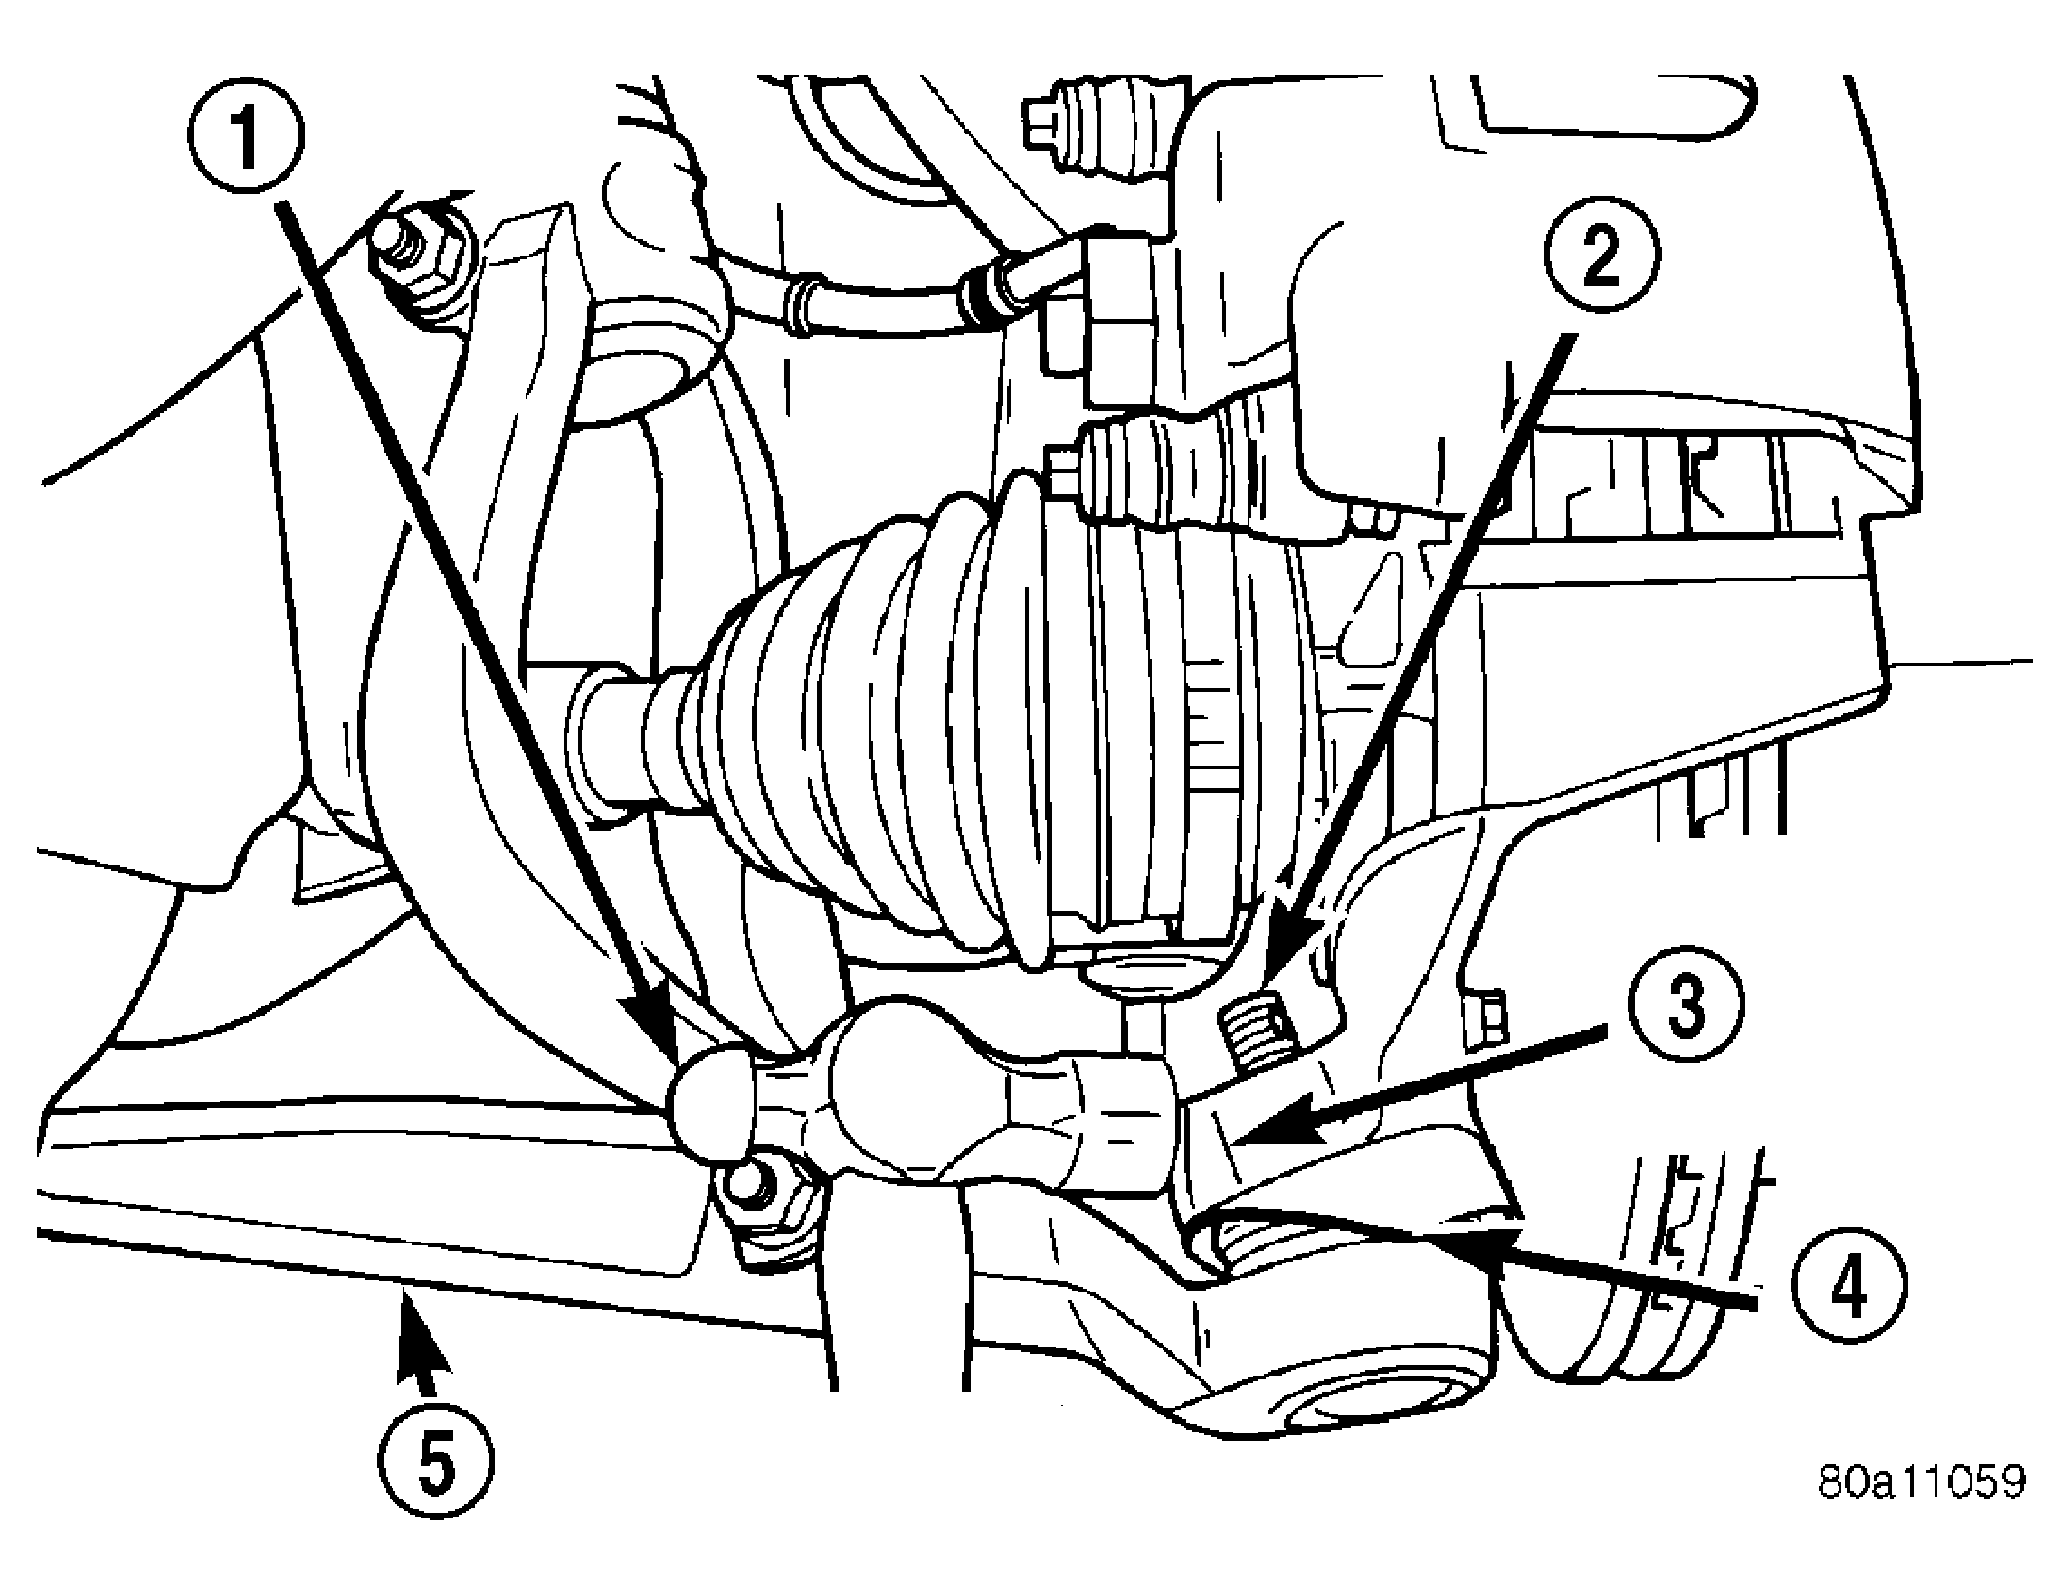
- Turn steering knuckle so front of steering knuckle is facing as far outboard in the wheel opening as possible. Using a hammer, strike steering knuckle boss until steering knuckle separates from lower ball joint. See Fig 3. When striking steering knuckle, care MUST be taken not to hit lower control arm or ball joint grease seal.
 Courtesy of DAIMLERCHRYSLER CORP.
| 1 - HAMMER |
| 2 - BALL JOINT STUD |
| 3 - STEERING KNUCKLE BOSS |
| 4 - HEAT SHIELD |
| 5 - LOWER CONTROL ARM |
CAUTION:
Pulling the steering knuckle outward from the vehicle after releasing it from the ball joint, can separate driveshaft inner C/V joint, thus damaging it. (Refer to DIFFERENTIAL & DRIVELINE
).
- Remove shock absorber clevis to lower control arm bushing, nut and thru-bolt. Separate clevis from lower control arm. See Fig 4.
 Courtesy of DAIMLERCHRYSLER CORP.
| 1 - TIE ROD |
| 2 - LOWER CONTROL ARM |
| 3 - SHOCK ABSORBER CLEVIS |
| 4 - THRU-BOLT |
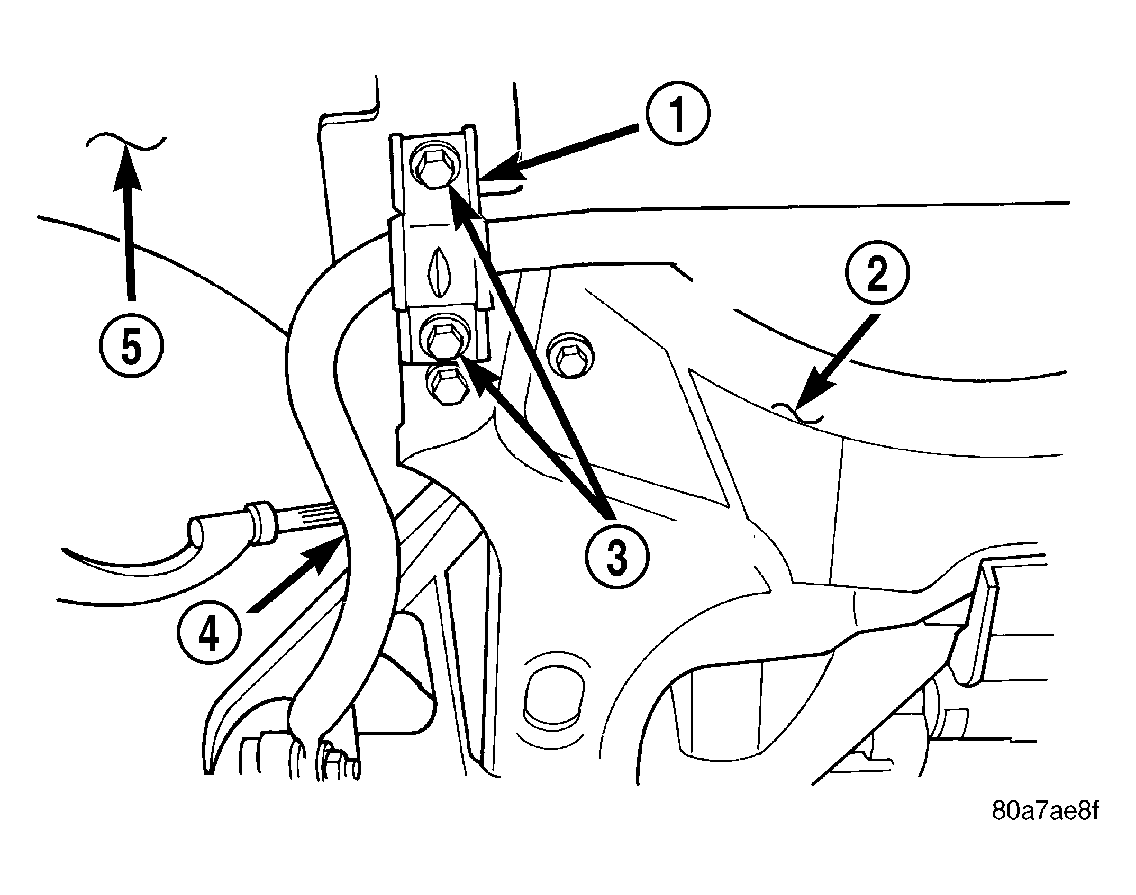
- Remove nut attaching stabilizer bar link to lower control arm. See Fig 5. When removing nut, hold stud of stabilizer bar link from turning by inserting an Allen wrench in end of stud. See Fig 5.
 Courtesy of DAIMLERCHRYSLER CORP.
| 1 - ALLEN WRENCH |
| 2 - LOWER CONTROL ARM |
| 3 - WRENCH |
| 4 - STABILIZER BAR LINK ASSEMBLY |
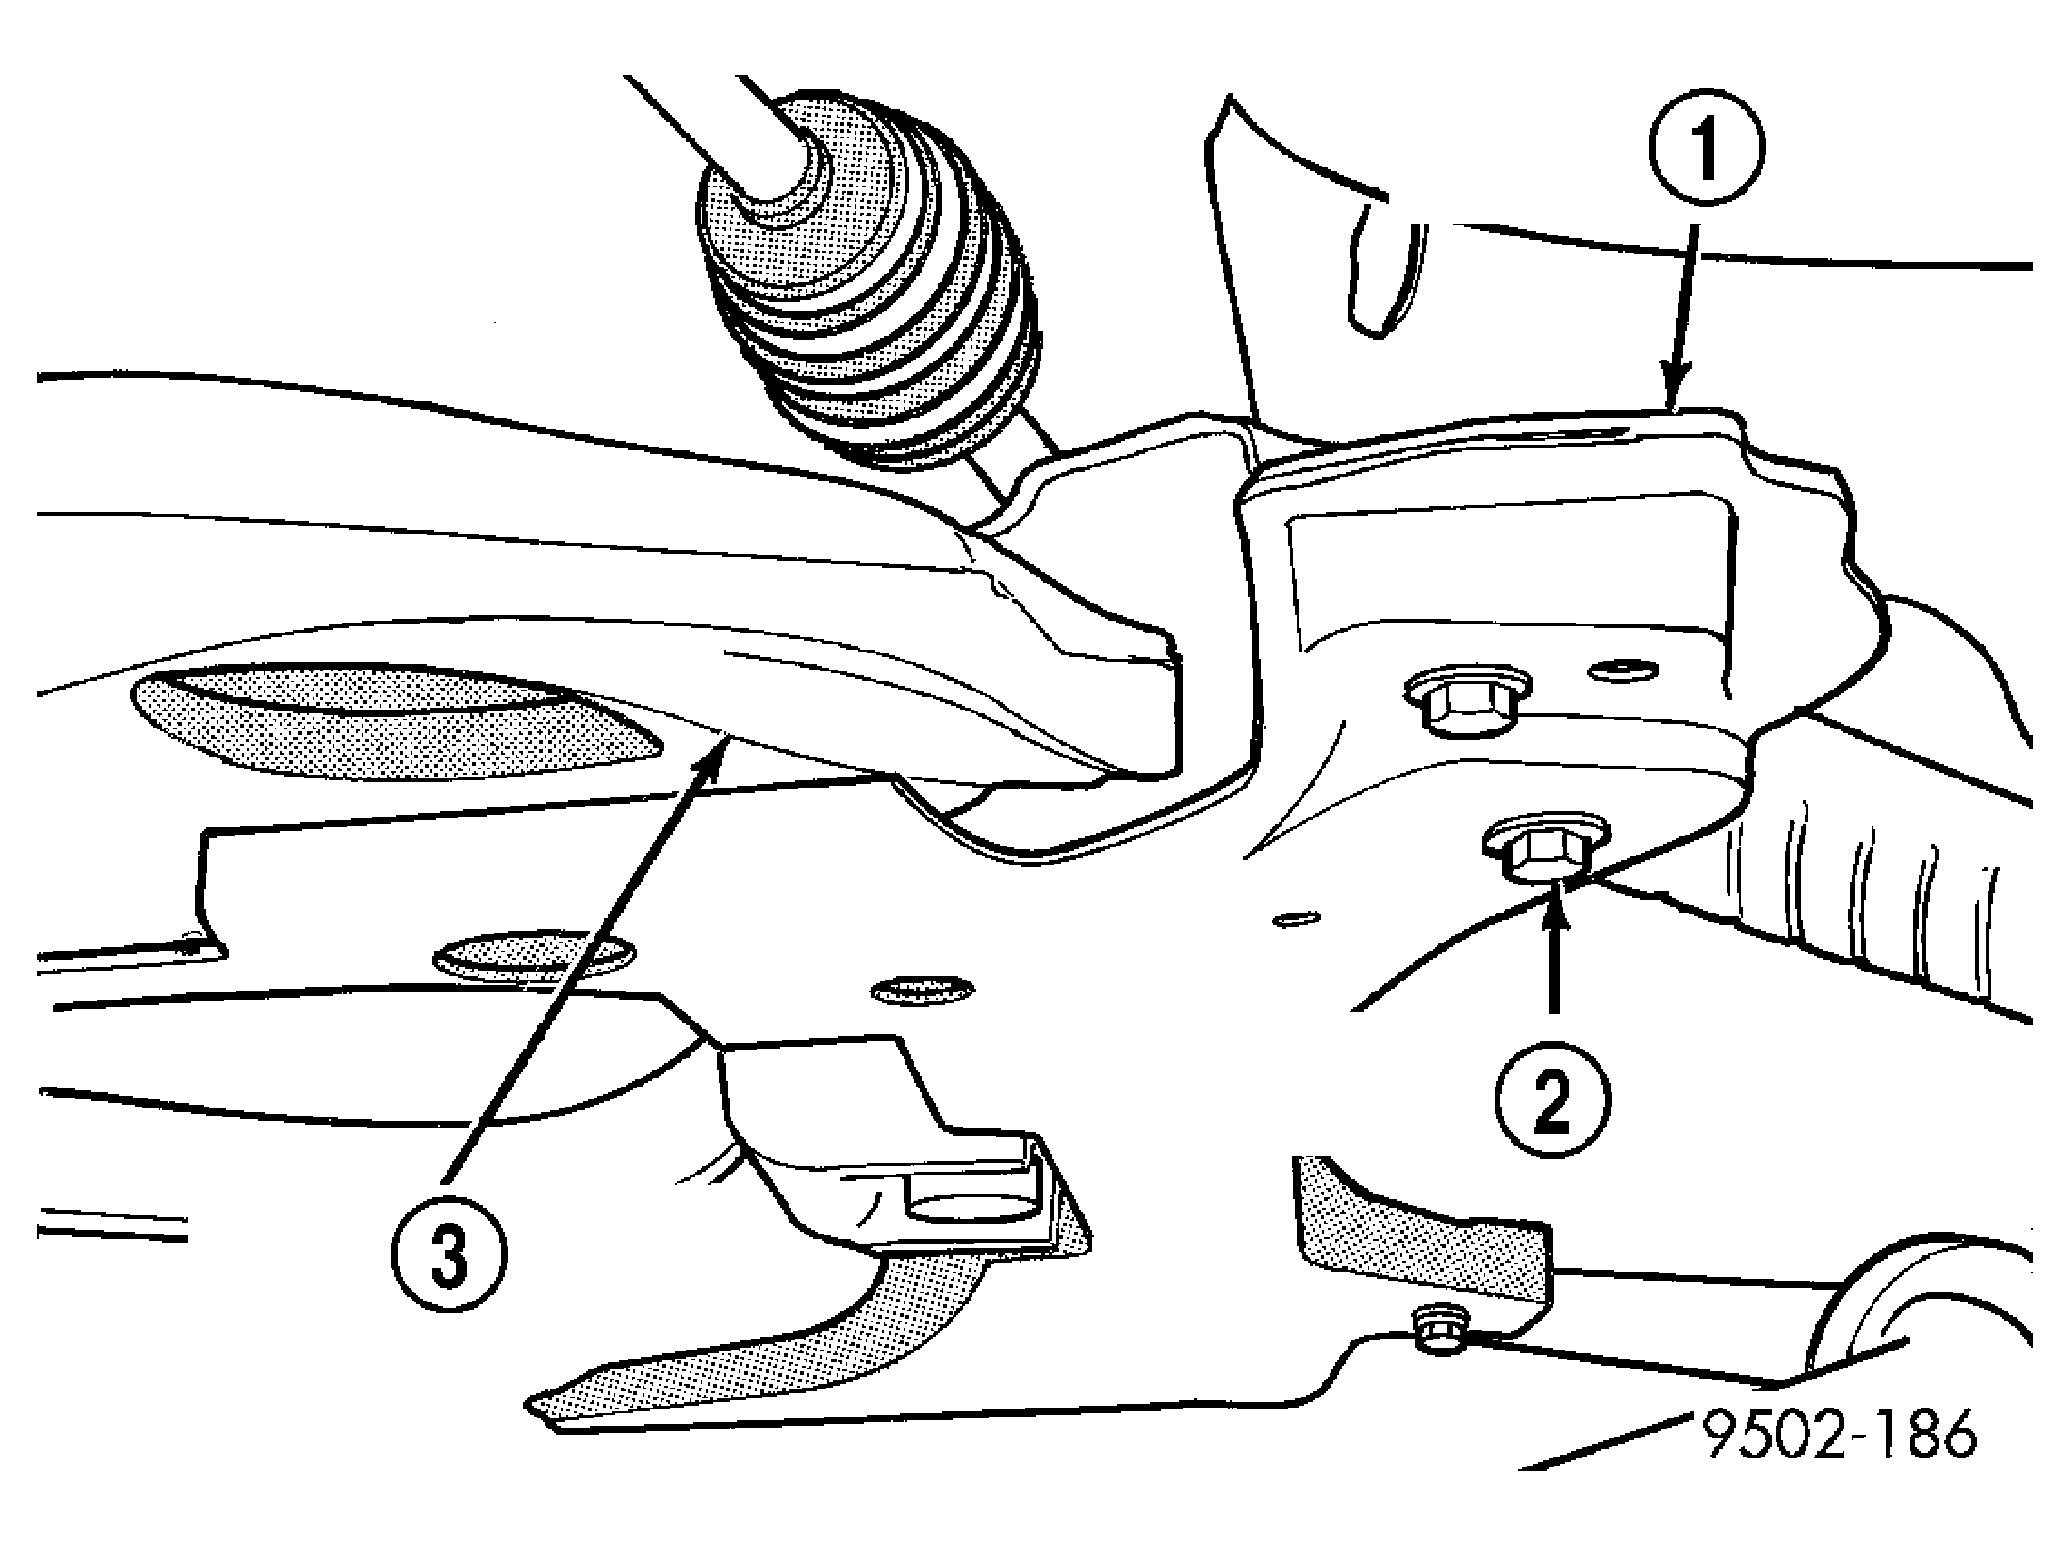
- Remove bolts attaching closest stabilizer bar bushing clamp to front suspension crossmember and body of vehicle. See Fig 6.
 Courtesy of DAIMLERCHRYSLER CORP.
| 1 - STABILIZER BAR BUSHING CLAMP |
| 2 - FRONT SUSPENSION CROSSMEMBER |
| 3 - ATTACHING BOLTS |
| 4 - STABILIZER BAR |
| 5 - VEHICLE BODY |
- Lower that side of stabilizer bar away from lower control arm and body of vehicle.
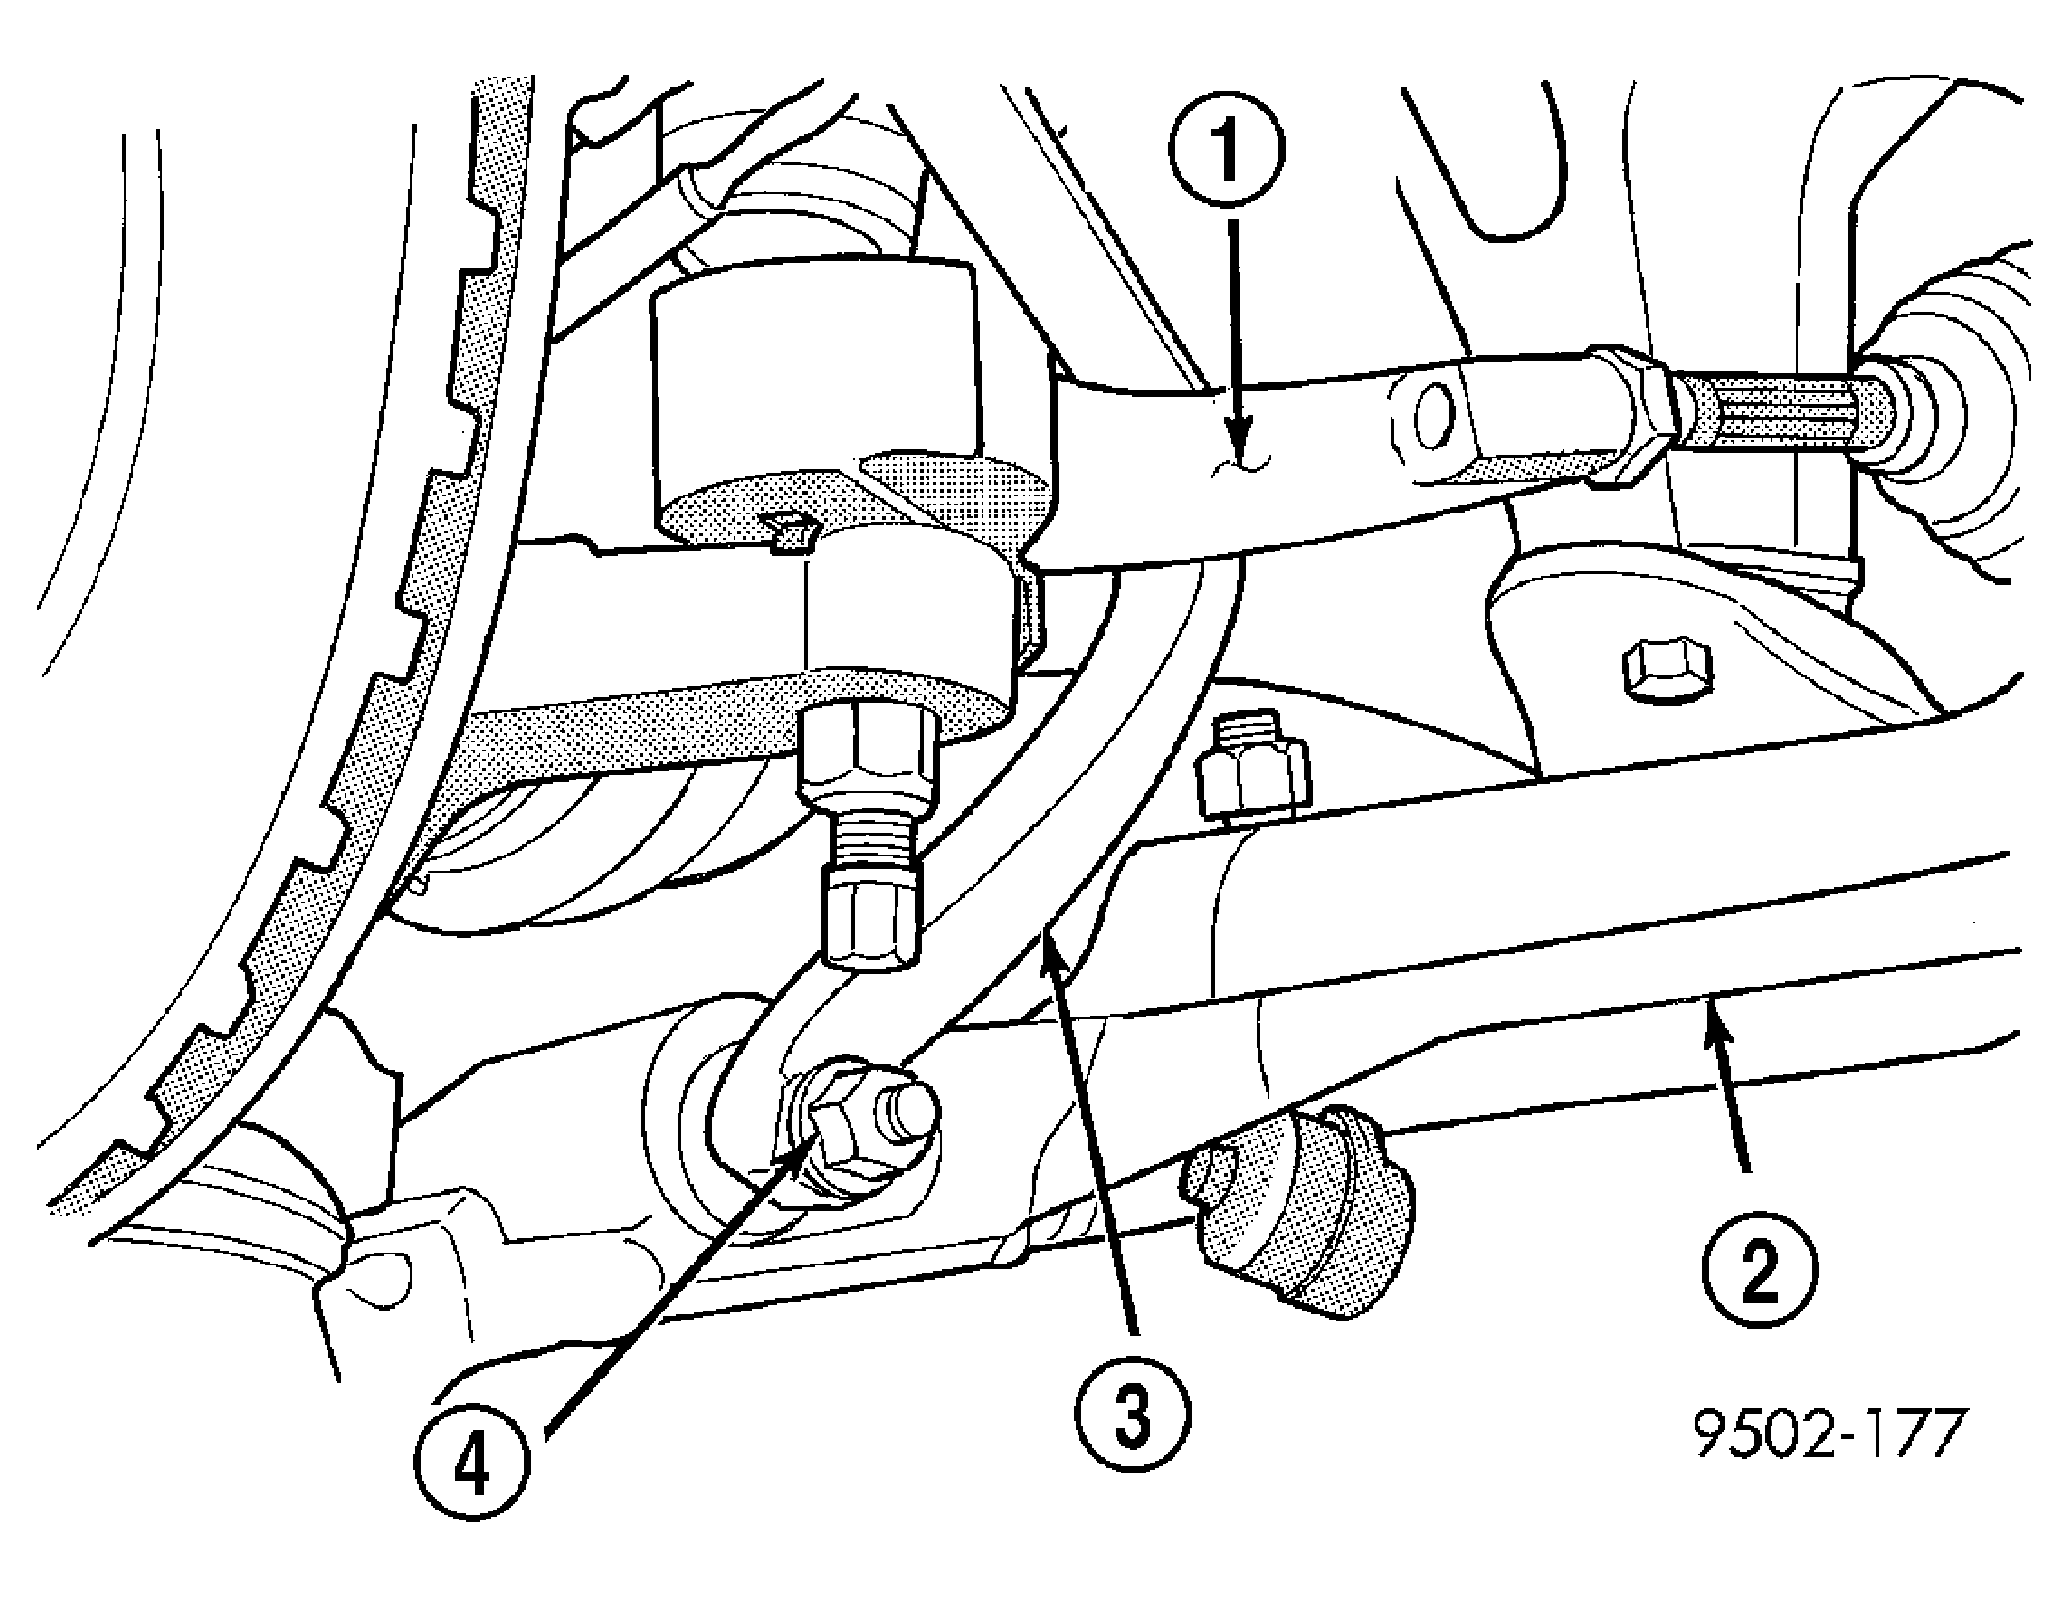
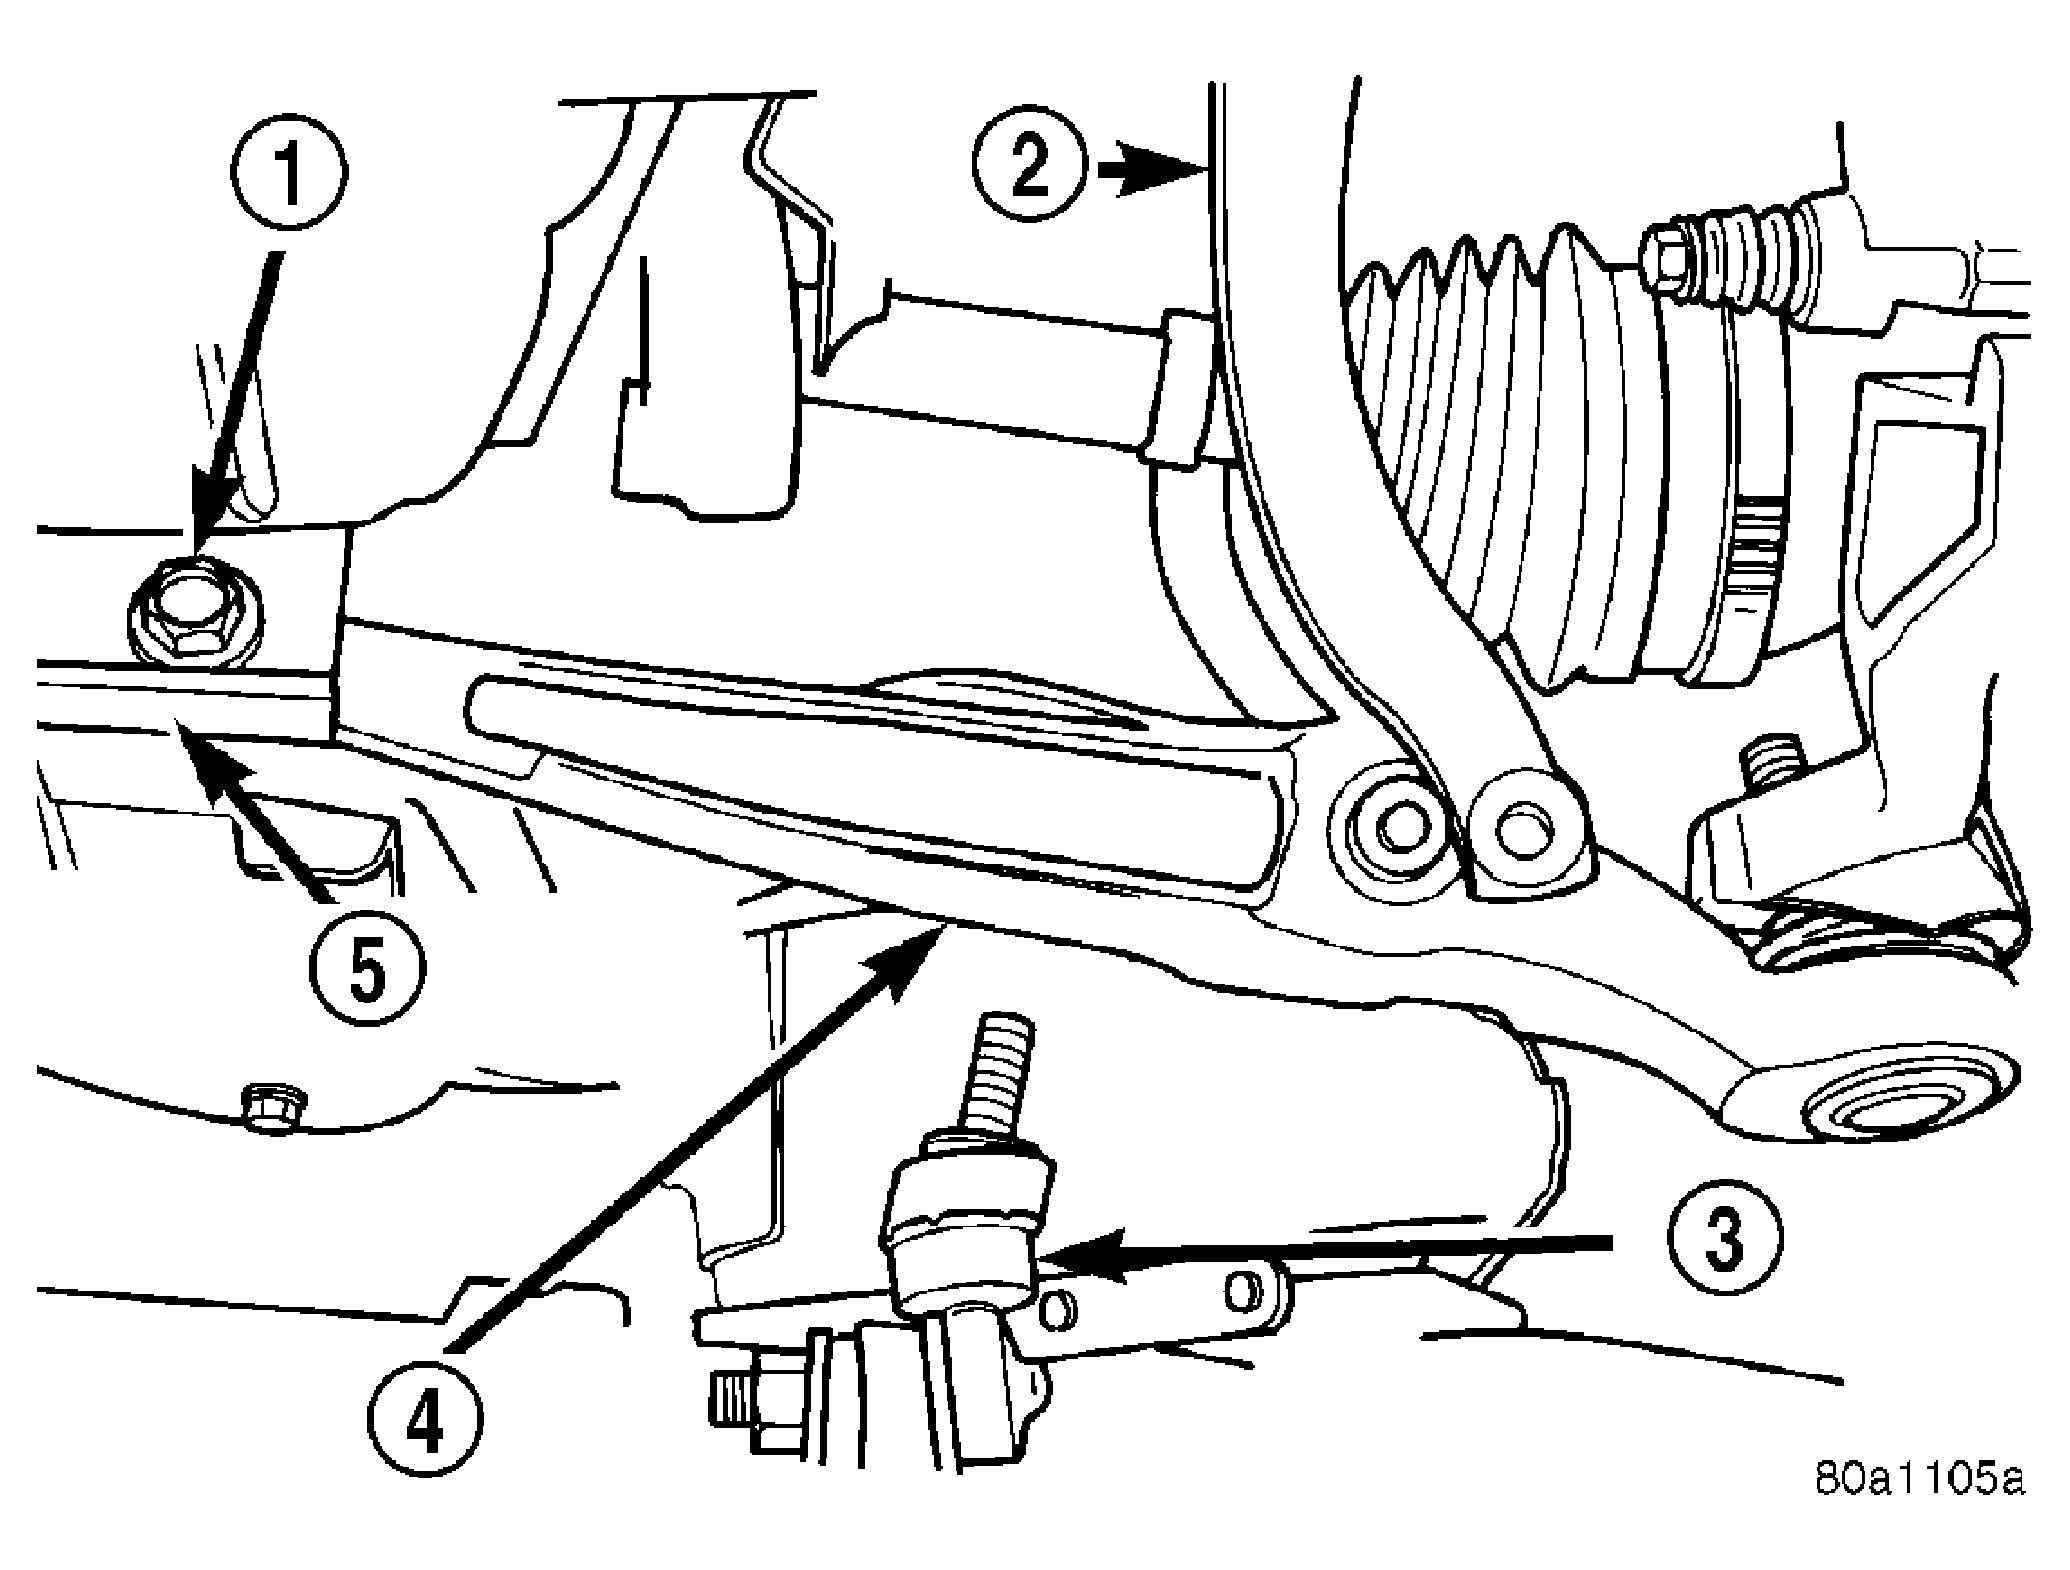
- Remove nut and bolt attaching rear of lower control arm to front suspension crossmember. See Fig 7.
 Courtesy of DAIMLERCHRYSLER CORP.
| 1 - FRONT SUSPENSION CROSSMEMBER |
| 2 - LOWER CONTROL ARM ATTACHING BOLT AND NUT |
| 3 - LOWER CONTROL ARM |
- Remove nut and bolt attaching the front of lower control arm to front suspension crossmember. See Fig 8.
 Courtesy of DAIMLERCHRYSLER CORP.
| 1 - ATTACHING BOLT AND NUT |
| 2 - SHOCK CLEVIS |
| 3 - STABILIZER BAR |
| 4 - LOWER CONTROL ARM |
| 5 - FRONT SUSPENSION CROSSMEMBER |
CAUTION:
When removing lower control arm from crossmember care must be taken to prevent hitting lower ball joint seal against steering knuckle, causing damage to the ball joint seal.
- Remove front of lower control arm from suspension crossmember first, then remove rear of lower control arm from suspension crossmember. When removing rear of lower control arm from crossmember, keep control arm as level as possible. This will keep rear bushing from binding on crossmember making it easier to remove control arm from crossmember.