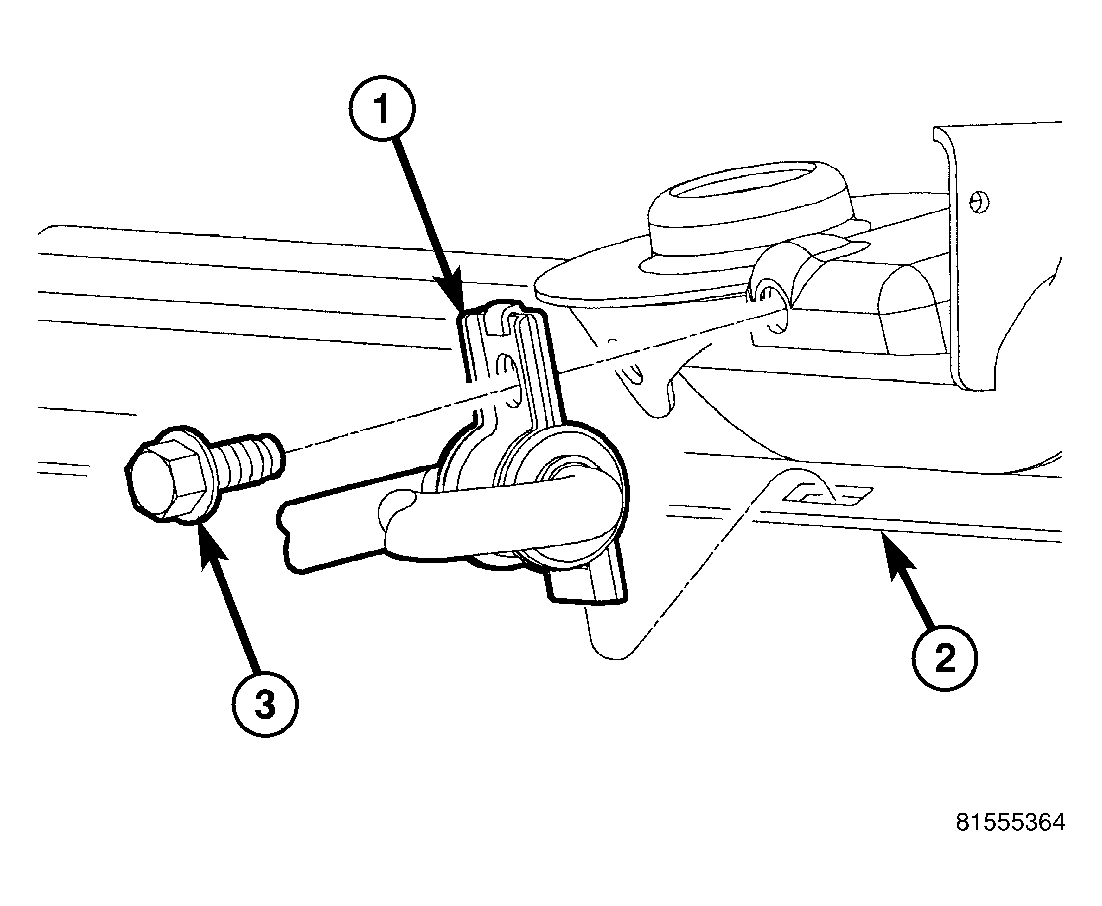
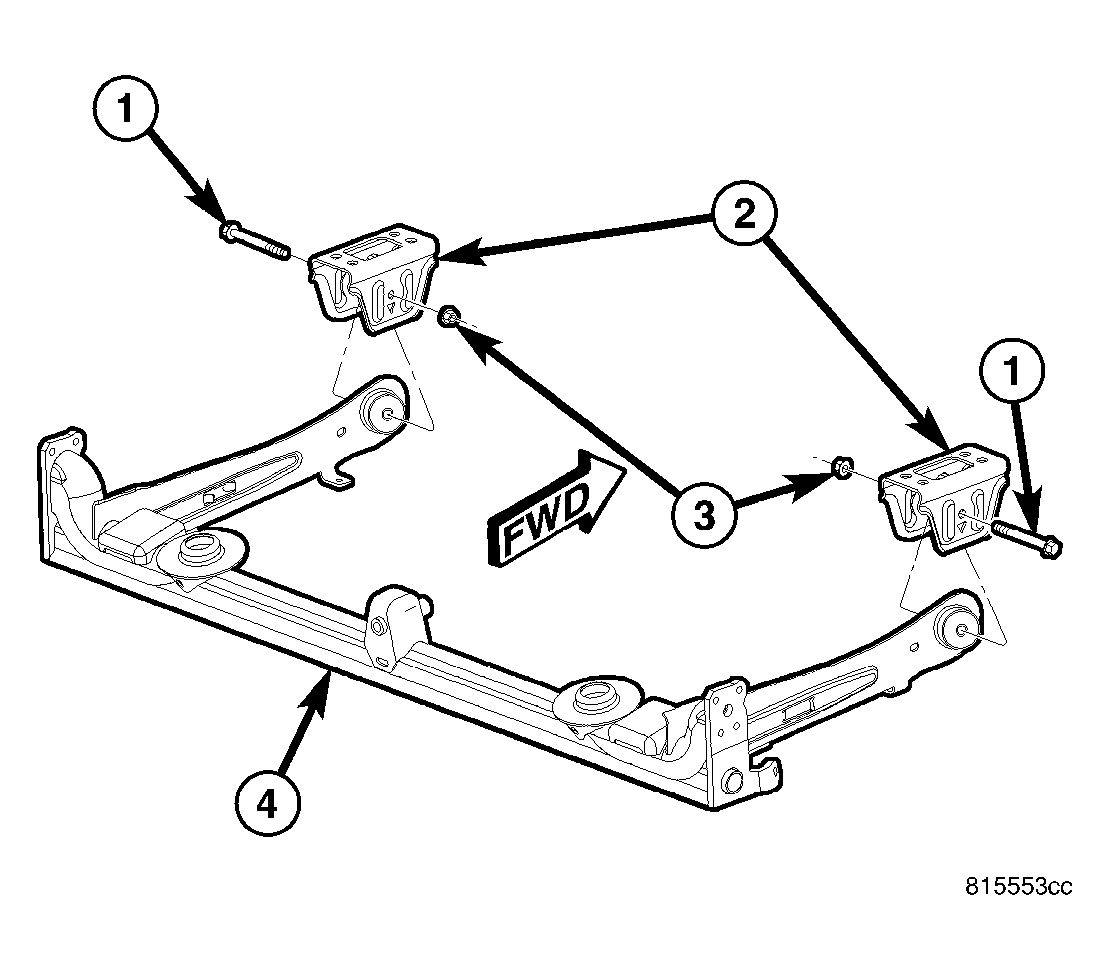
- If removed, install the trailing arm forward brackets (2) on each side of the axle in the following way:
- From above the axle (4), place the bracket (2) down over the axle trailing arm bushing aligning the hole in the bracket with the center hole in the bushing.
- From the outboard side of the axle and bracket, push the thru-bolt (1) through the bracket and bushing. The trailing arm bracket thru-bolts must be installed from the outside, in toward the center of the axle assembly, otherwise the bolt threaded ends will come in contact with the body of the vehicle upon axle installation on vehicle.
- Install the nut (3) on the inboard end of the bolt. Tighten the nut until the bracket has resistance when turned, but still moves independent of the axle bushing. Do not tighten at this time; it must be fully tightened with the vehicle at curb height.
- Center the axle beam on a transmission jack standing at axle removal height.
 Courtesy of DAIMLERCHRYSLER CORP.
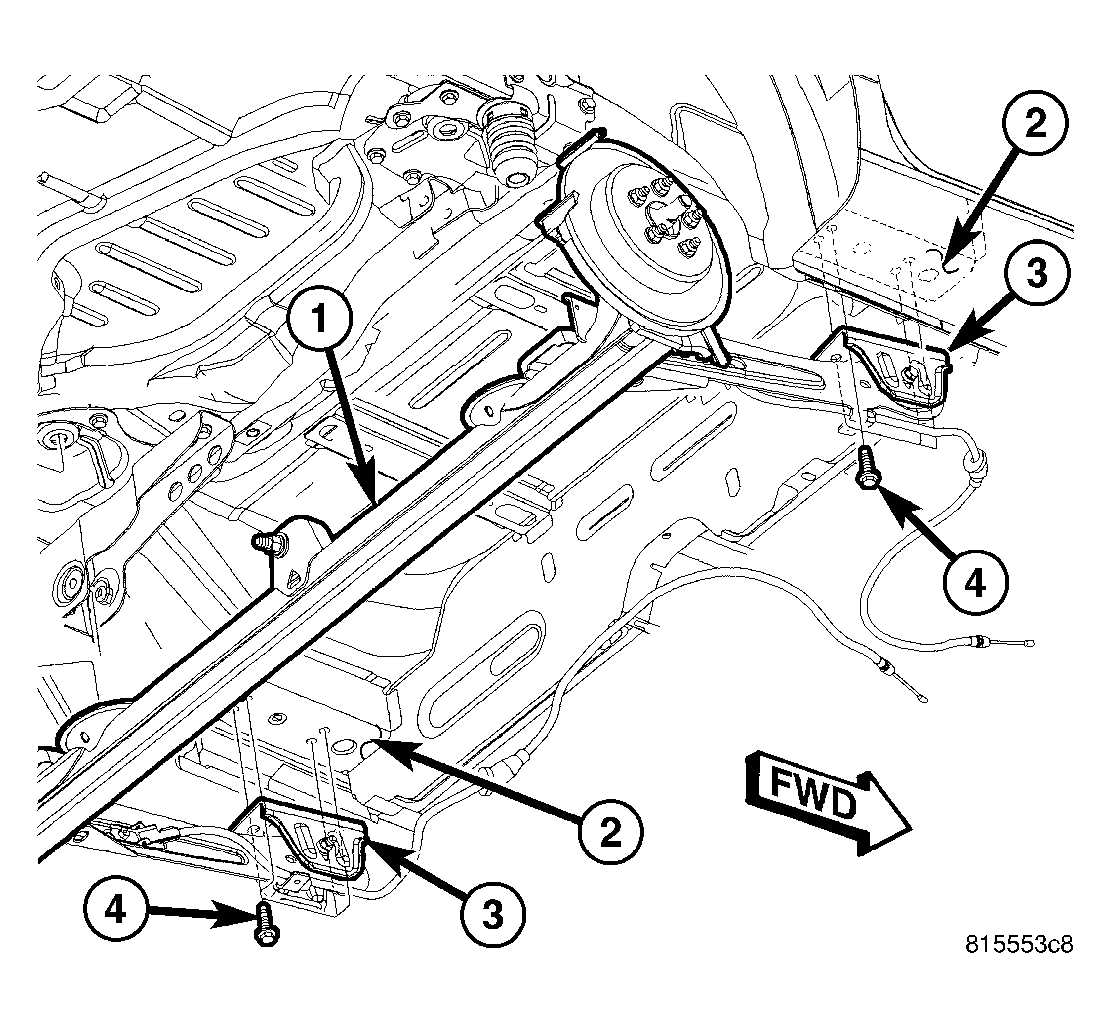
- Swing the axle trailing arms up aligning the brackets (3) with the scribed marks made upon removal.
- Install all eight (four per side) axle bracket-to-body mounting bolts (4). Thread the bolts in, but do not fully tighten at this time.
- Tap the brackets (3) as necessary to align the brackets with the scribed marks, then tighten all the bolts to 54 N.m (40 ft. lbs.).
 Courtesy of DAIMLERCHRYSLER CORP.
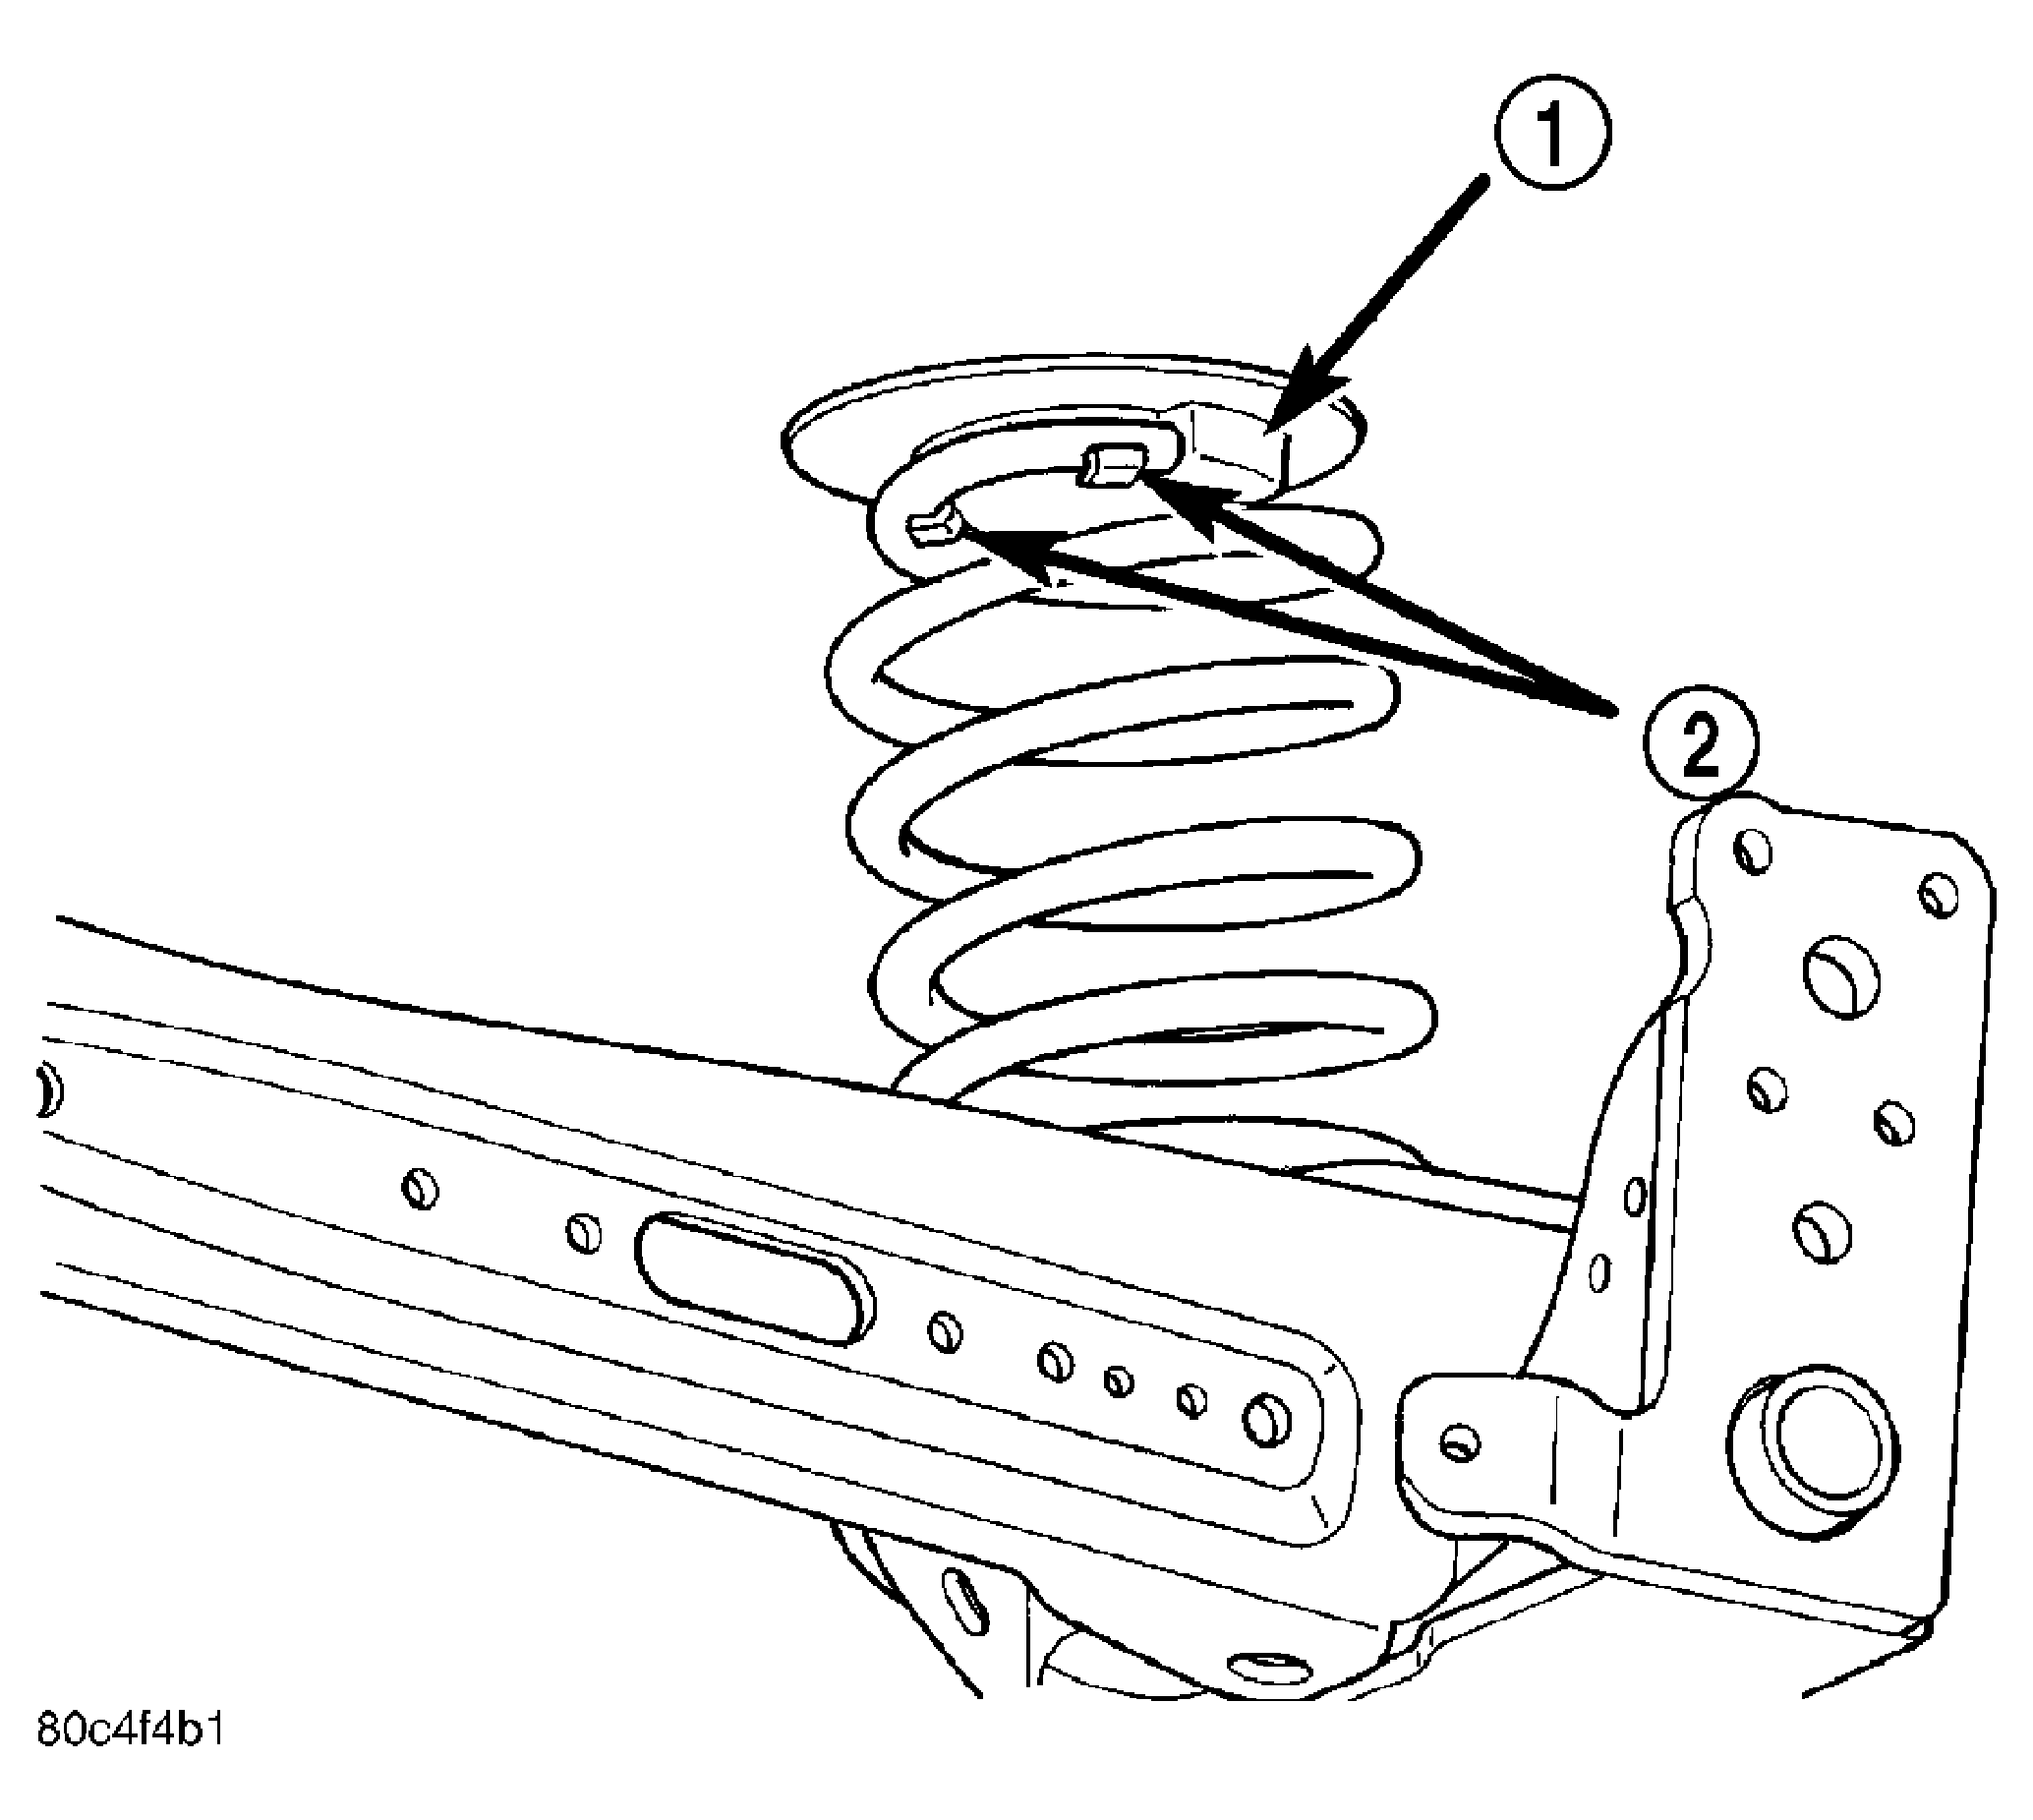
| 1 - ISOLATOR ABUTMENT |
| 2 - FINGERS |
- Install a rubber isolator on each end of the coil springs wrapping the rubber fingers around the coil (2). Turn each isolator until the rubber abutment (1) butts up against the flat end of the spring coil.
 Courtesy of DAIMLERCHRYSLER CORP.
NOTE:
Both ends of the coil spring are identical. Either end of the spring can be the top or bottom.
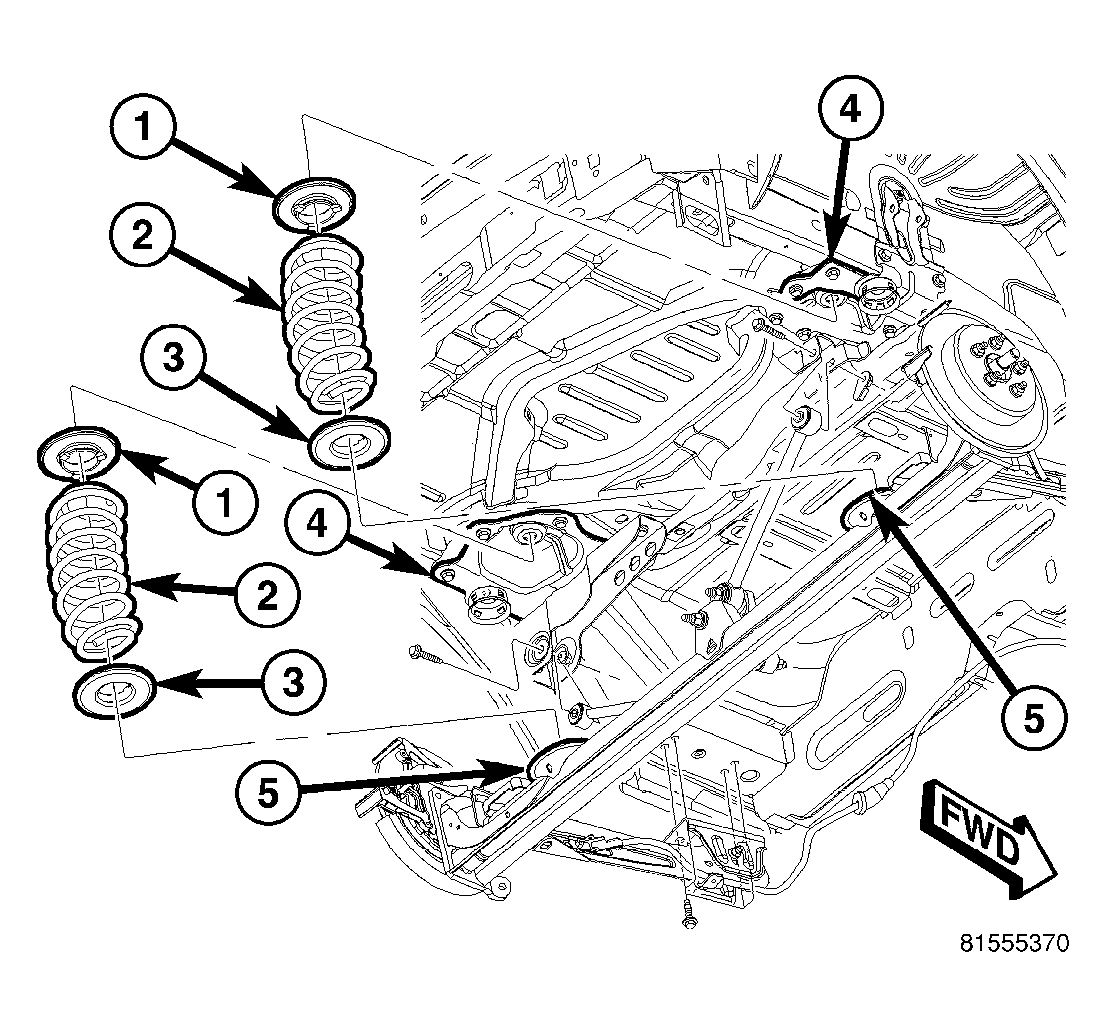
- Place the coil springs (2) on top of the axle spring perches (5).
 Courtesy of DAIMLERCHRYSLER CORP.
NOTE:
The coil springs require proper orientation to the body when installed.
- Rotate the coil springs (along with the rubber isolators) until the flat end of each upper spring coil lines up with an imaginary line (1) running parallel with the axle beam as shown. Also, make sure that each upper coil ends near the outboard sides of the vehicle (as shown) and not 180 degrees of that location.
Courtesy of DAIMLERCHRYSLER CORP.
- Raise the transmission jack guiding the coil springs (2) into the spring mounting brackets (4) on the body of the vehicle. Raise the jack until the shock absorber lower mounting bolts can be installed though the axle brackets and shock absorber lower mounting eyes.
 Courtesy of DAIMLERCHRYSLER CORP.
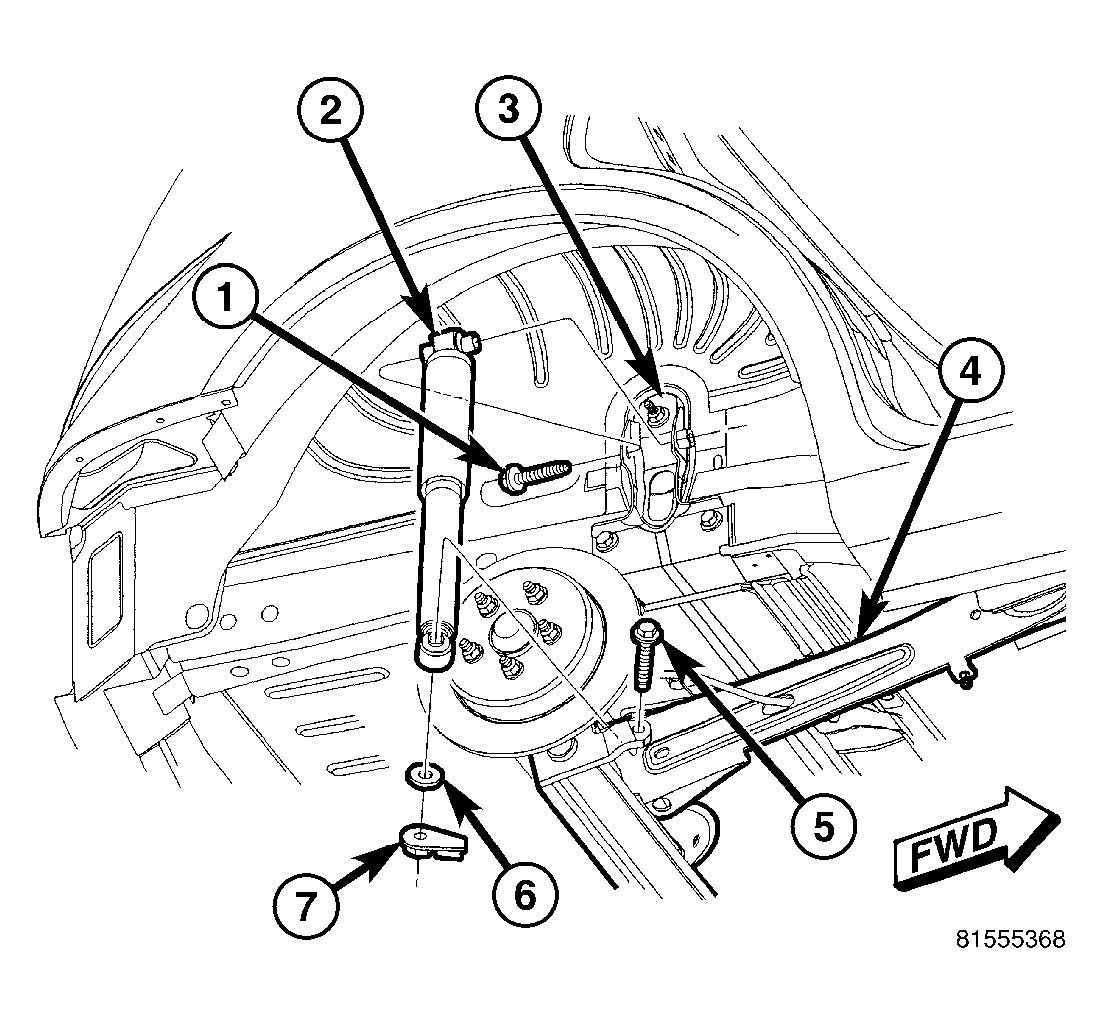
- Continue to raise the jack until the shock absorber (2) lower mounting bolts (5) can be inserted though the axle brackets and shock absorber lower mounting eyes.
- Install the washer (6) and nut (7) on the end of each shock absorber lower mounting bolt. Tighten the mounting bolts to 88 N.m (65 ft. lbs.).
- Remove the jack.
 Courtesy of DAIMLERCHRYSLER CORP.
- If equipped with a rear stabilizer bar, hook the lower ends of both stabilizer bar cushion retainers (1) into the slots in the rear of the axle (2), then rotate the opposite end of the retainers upward so the mounting bolts (3) can be installed. Install the mounting bolts and tighten each to 61 N.m (45 ft. lbs.).
 Courtesy of DAIMLERCHRYSLER CORP.
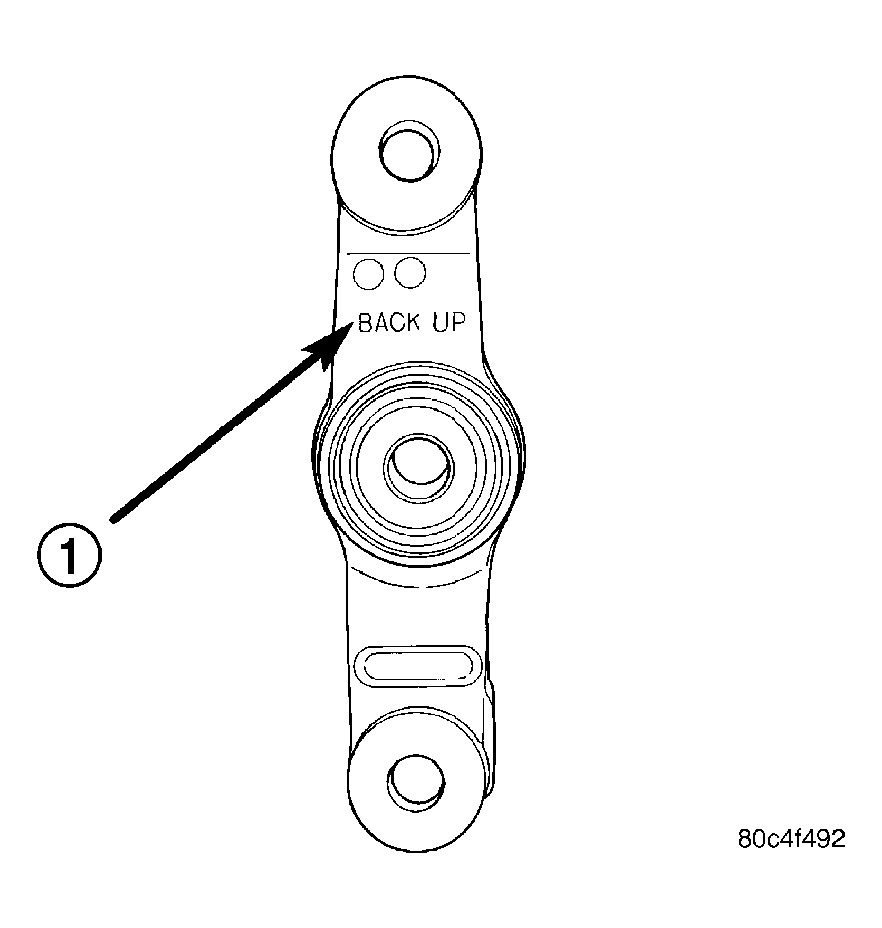
| 1 - INSTALLATION DIRECTION |
CAUTION:
When installing the watts links and bell crank to the axle, make sure the bell crank is right-side-up. When mounted properly, the words "BACK UP" (1) should be able to be read from the rear over the top of the axle.
 Courtesy of DAIMLERCHRYSLER CORP.
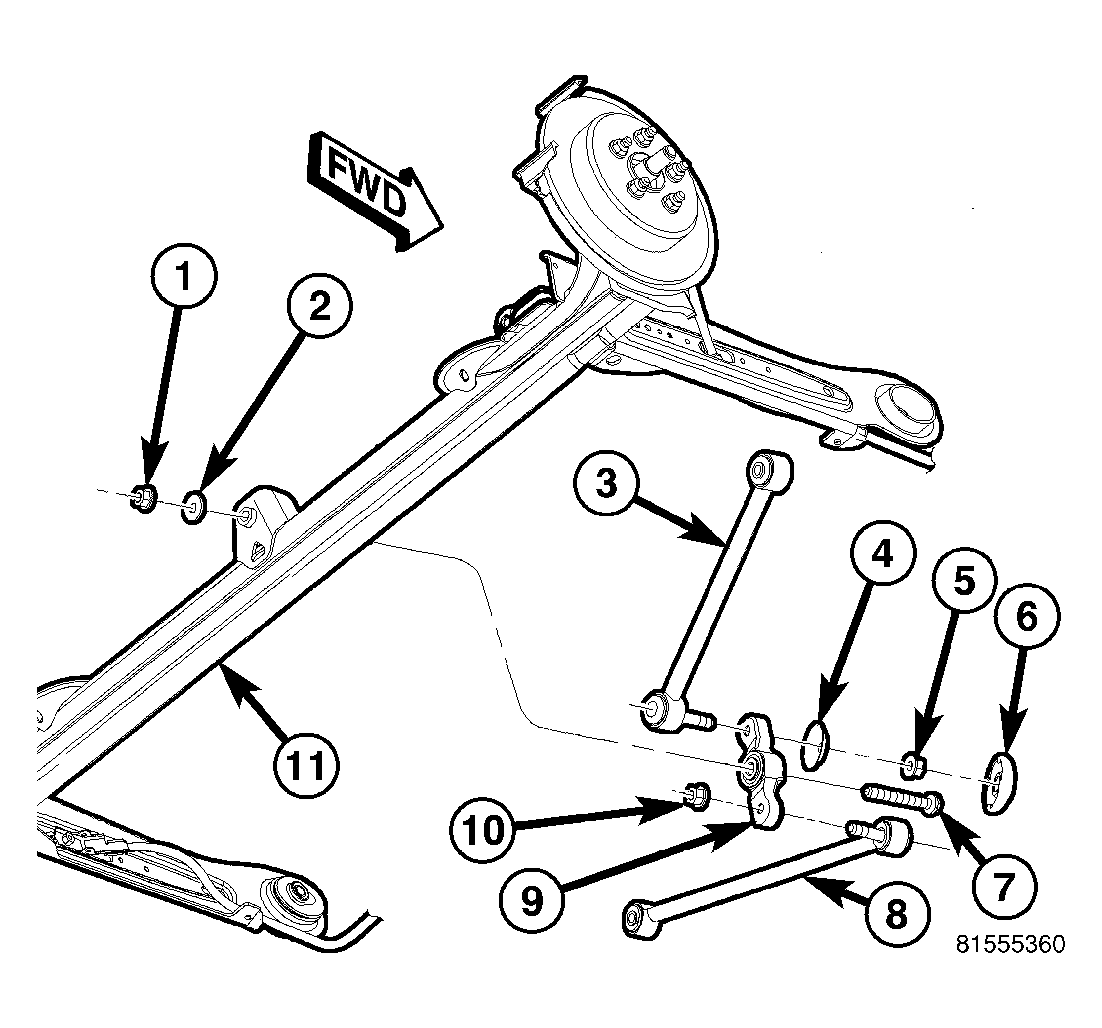
- Install the bolt (7) from the front securing the watts link bell crank (9) to the center of the axle (11). Place the washer (2) and nut (1) on the end of the mounting bolt and tighten it to 149 N.m (110 ft. lbs.).
NOTE:
Perform step 15. through step 32. on each side of the vehicle.
 Courtesy of DAIMLERCHRYSLER CORP.
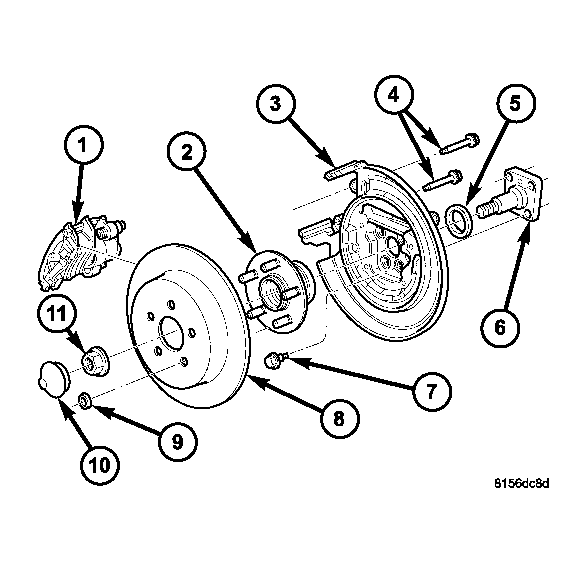
- Position the spindle (6), seal (5) and disc brake adapter (3) on the end of the axle.
- Clean the threads of the bolts used to mount the disc brake adapter and spindle to the axle, then apply Mopar® Stud & Bearing Mount Adhesive or equivalent to the bolt threads or replace with new mounting bolts.
- Install the four bolts (7) securing the disc brake adapter and spindle to the axle. Tighten the mounting bolts to 95 N.m (70 ft. lbs.).
 Courtesy of DAIMLERCHRYSLER CORP.
- On vehicles equipped with antilock brakes, install the wheel speed sensor head in the disc brake adapter.
- On vehicles equipped with antilock brakes, install the mounting screw (3) securing the wheel speed sensor in place. Tighten the mounting screw to 12 N.m (105 in. lbs.).
 Courtesy of DAIMLERCHRYSLER CORP.
- On vehicles equipped with antilock brakes, install the routing clips (2) securing the wheel speed sensor to the axle (1) and its trailing arm (3).
 Courtesy of DAIMLERCHRYSLER CORP.
| 1 - CABLE |
| 2 - ARM |
| 3 - FASTENERS |
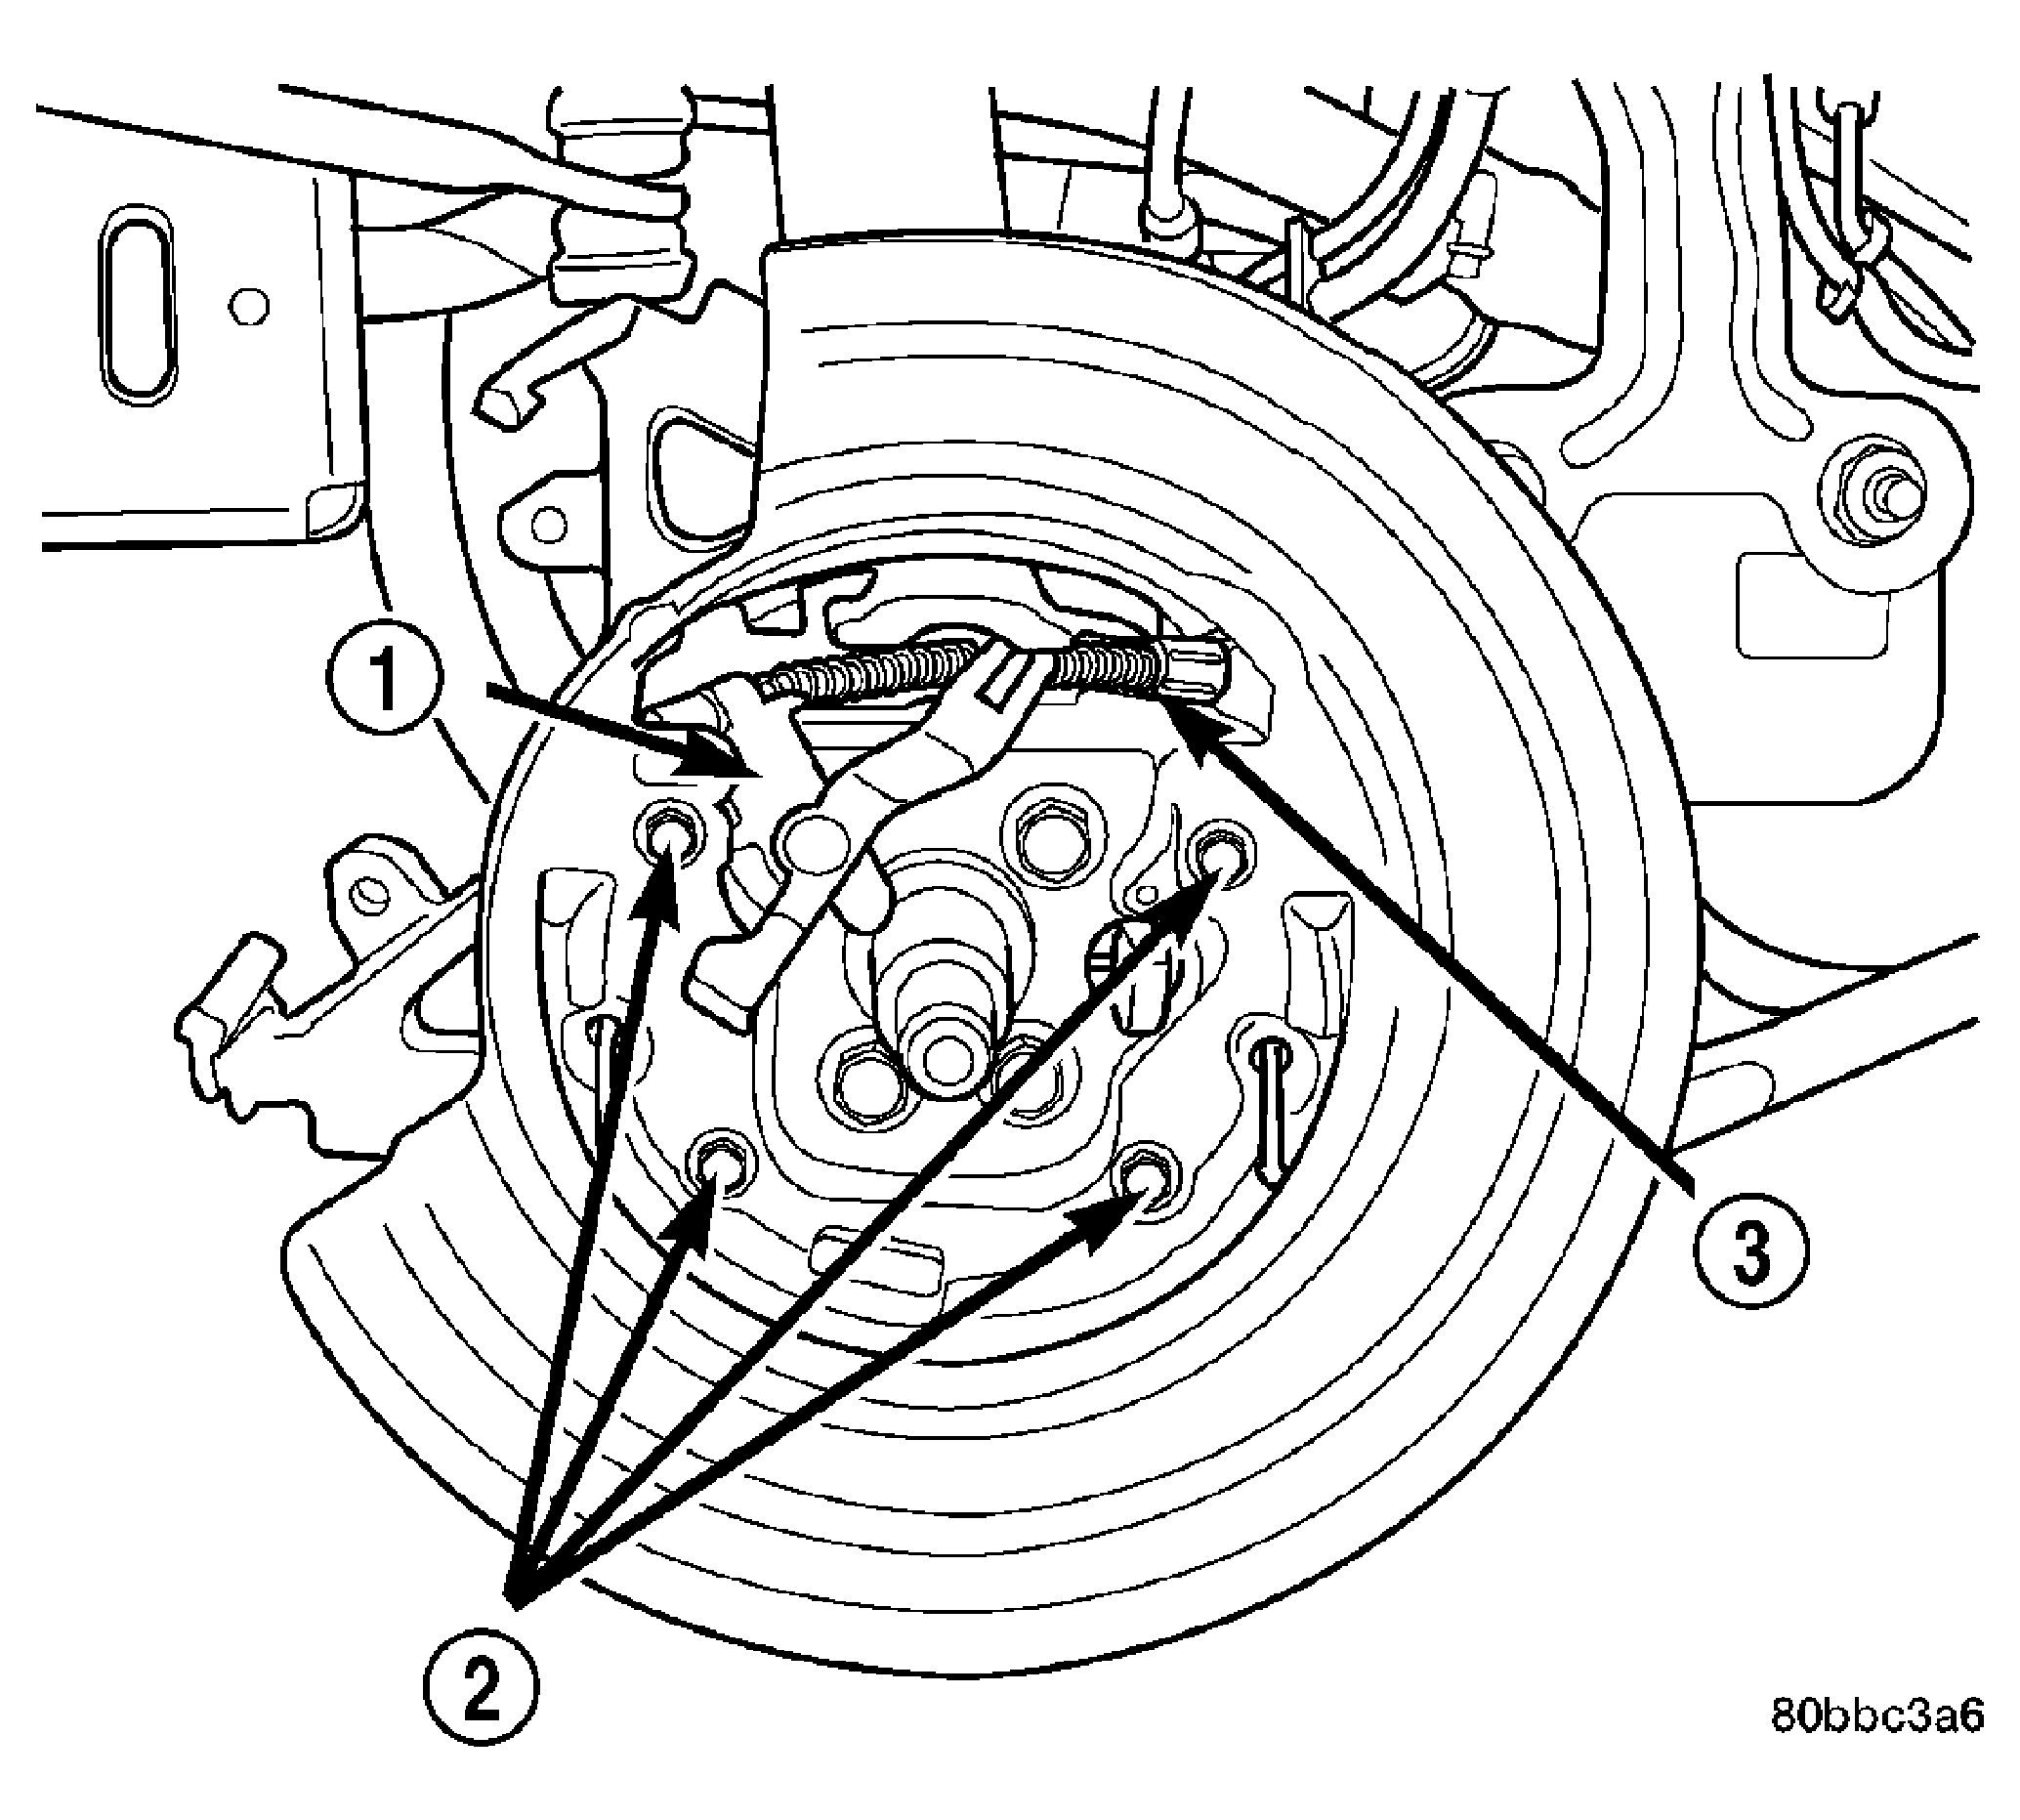
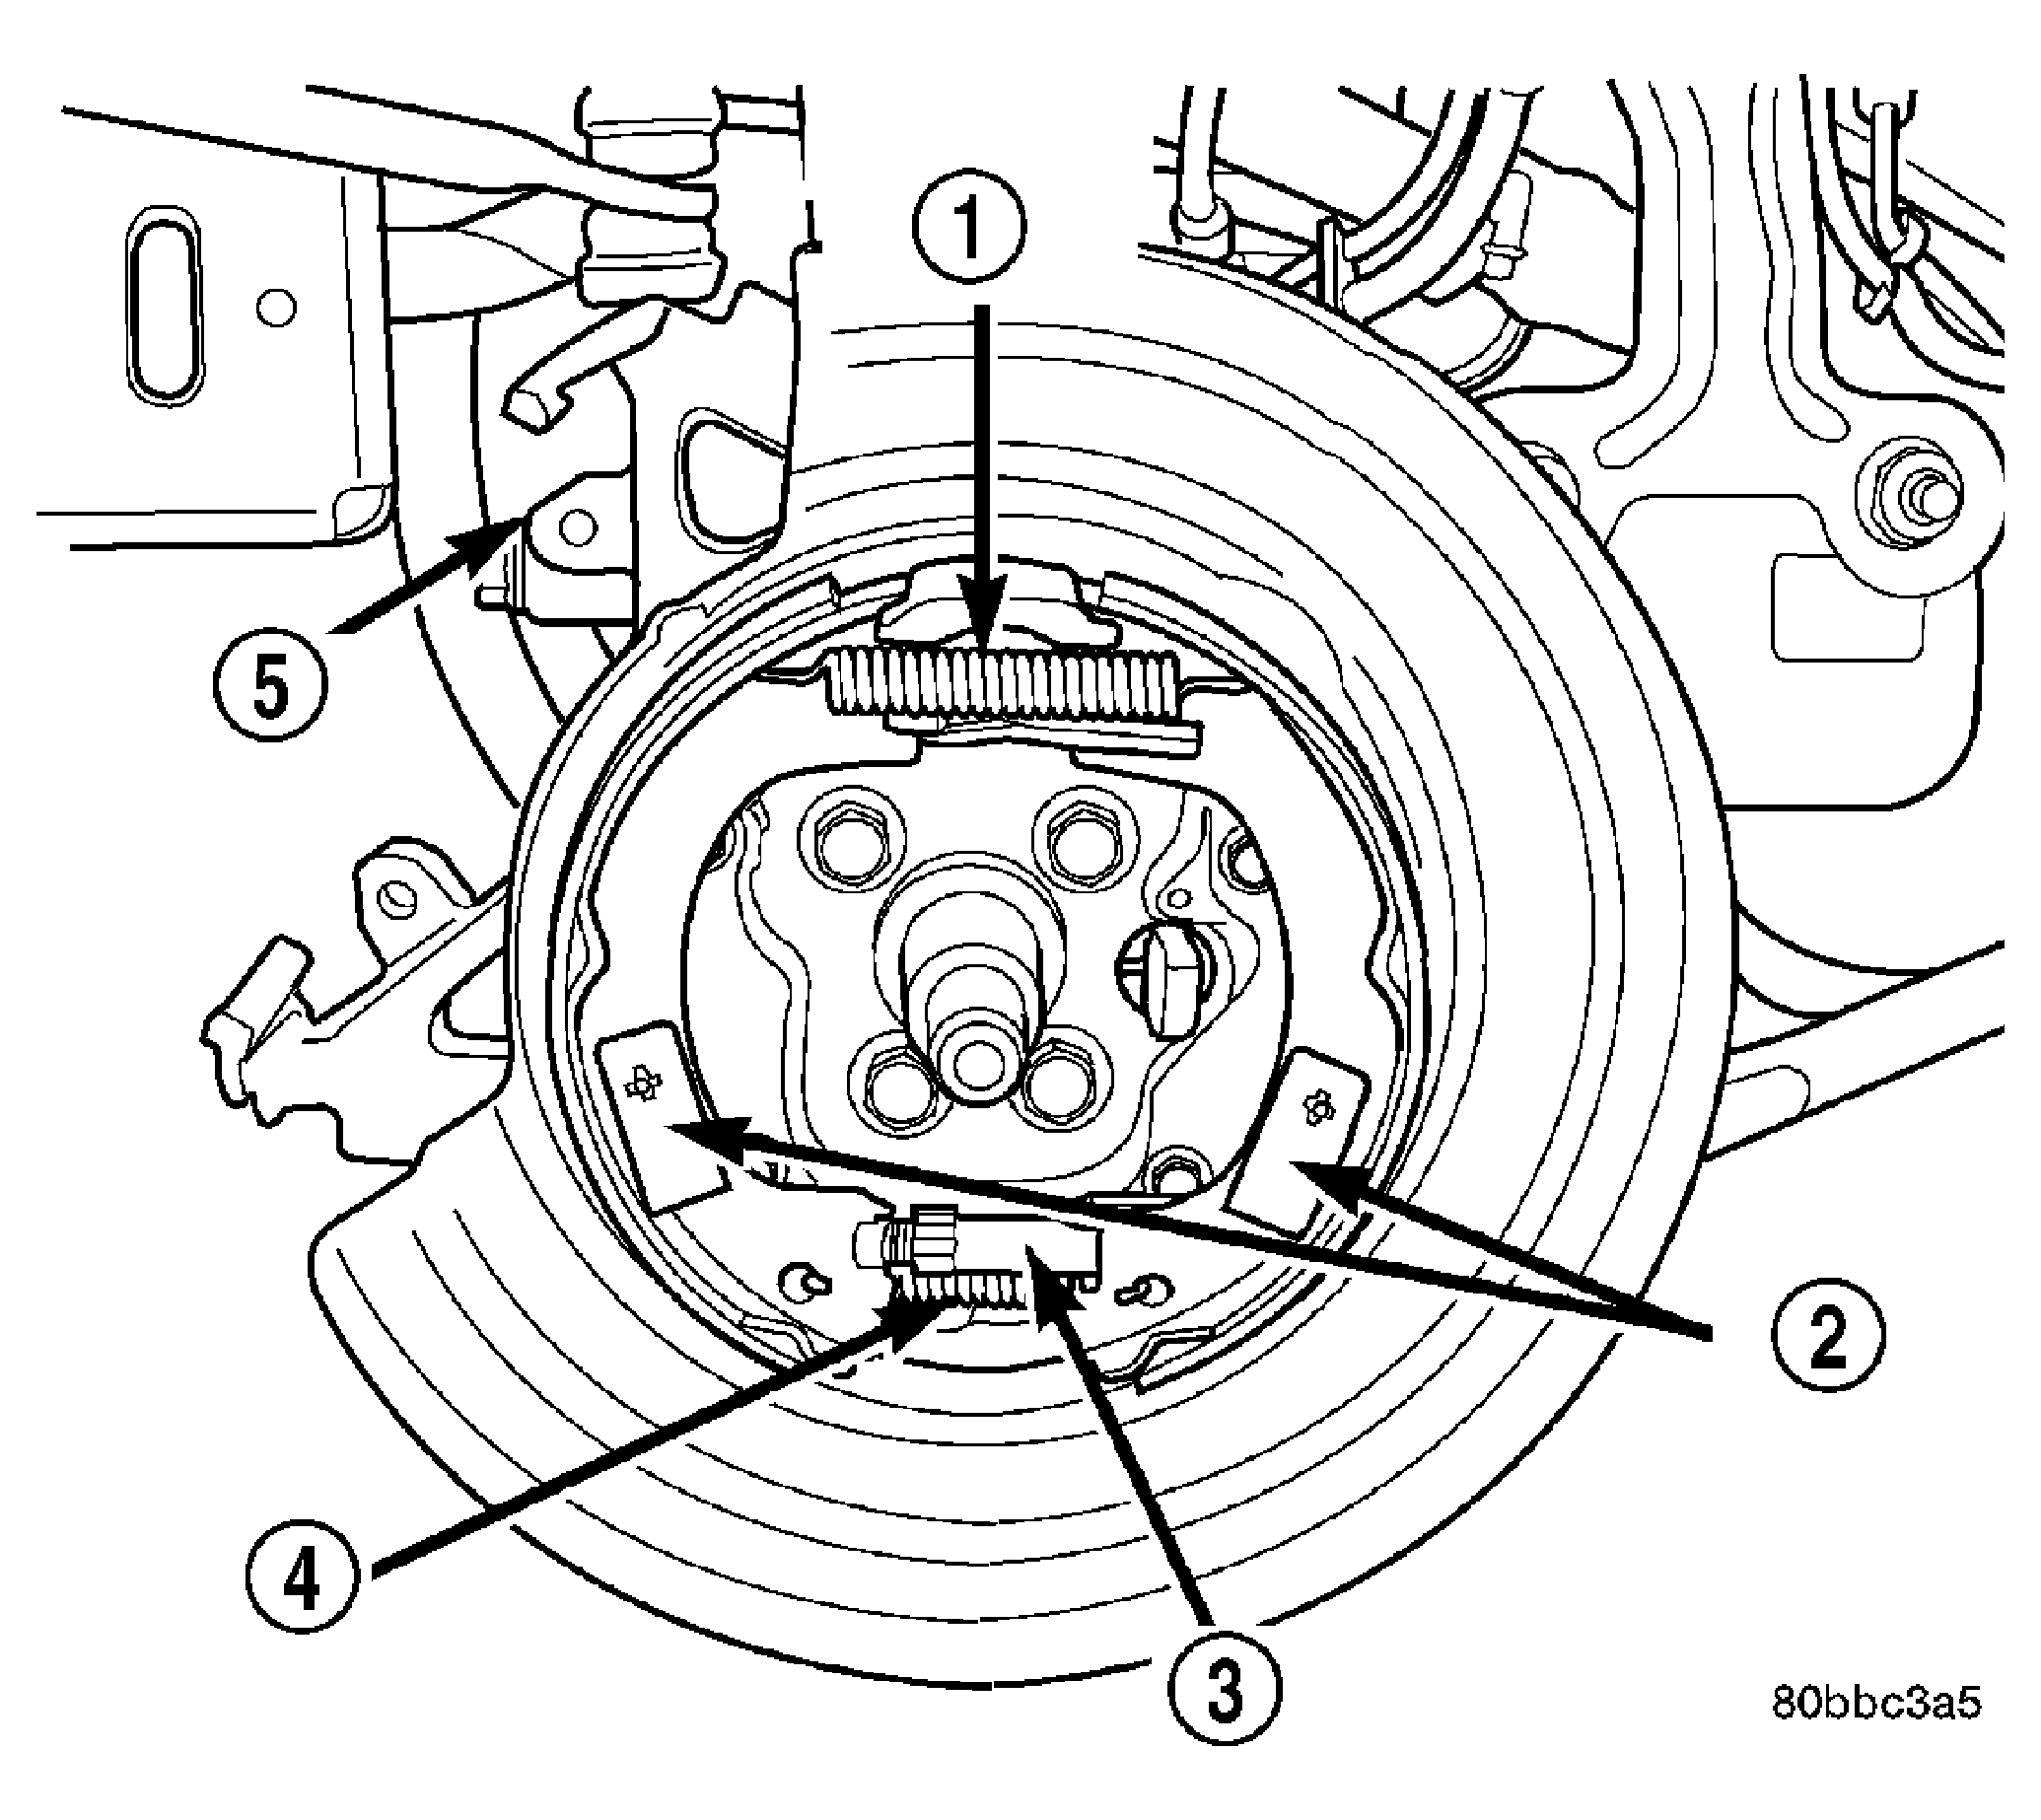
- Guide the end of each parking brake cable (1) through hole in the trailing arm (2) towards the wheel brake.
- Align the cable routing brackets with their mounts on the trailing arm. Install the two bolts (3) securing the cable and routing brackets to the trailing arm (2). Tighten the mounting bolts to 11 N.m (100 in. lbs.).
 Courtesy of DAIMLERCHRYSLER CORP.
| 1 - SHOE ACTUATOR LEVER |
| 2 - SHIELD MOUNTING SCREWS |
| 3 - REAR PARKING BRAKE CABLE |
- Install the parking brake cable into the disc brake adapter. Be sure the locking fingers on the cable retainer (3) are expanded once the cable is pushed all the way into the brake adapter hole to ensure the cable is securely held in place.
- Install the parking brake shoe actuator lever (1) on the parking brake cable.
 Courtesy of DAIMLERCHRYSLER CORP.
| 1 - UPPER RETURN SPRING |
| 2 - SHOE HOLD DOWN CLIPS |
| 3 - ADJUSTER |
| 4 - LOWER REAR SPRING |
| 5 - DISC BRAKE ADAPTER |
- Install the parking brake shoe assembly on the disc brake adapter (5).
- Install both shoe hold-down clips (2) and the upper return spring (1).
Courtesy of DAIMLERCHRYSLER CORP.
- Slide the hub and bearing (2) on the spindle (6).
- Install a NEW hub nut (11) on the spindle. Tighten the nut to 217 N.m (160 ft. lbs.).
- Install the hub and bearing dust cap (10).
- Install the brake rotor (8) and caliper (1). Install and tighten the caliper guide pin bolts (4) to 22 N.m (192 in. lbs.). (Refer to BRAKES/HYDRAULIC/MECHANICAL/ROTORS - INSTALLATION)
.
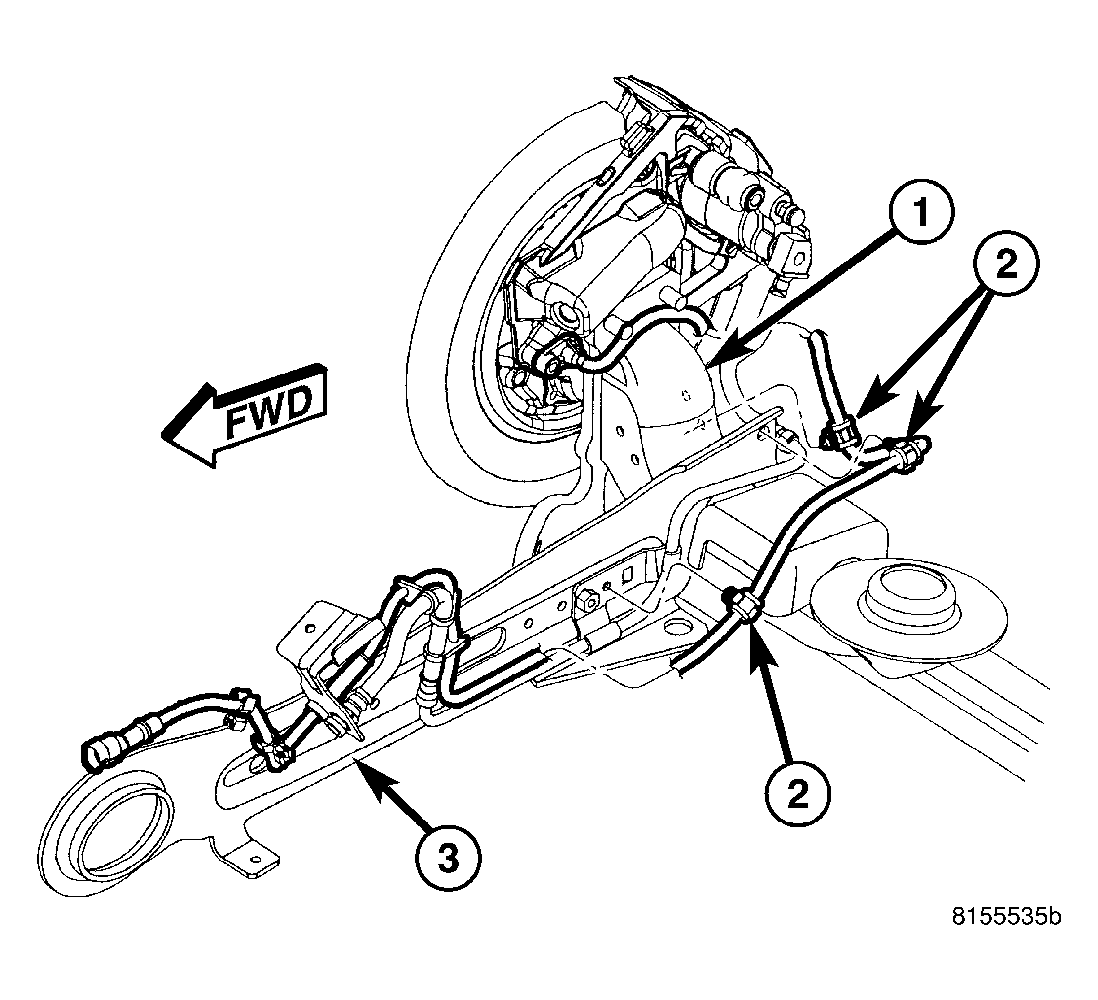
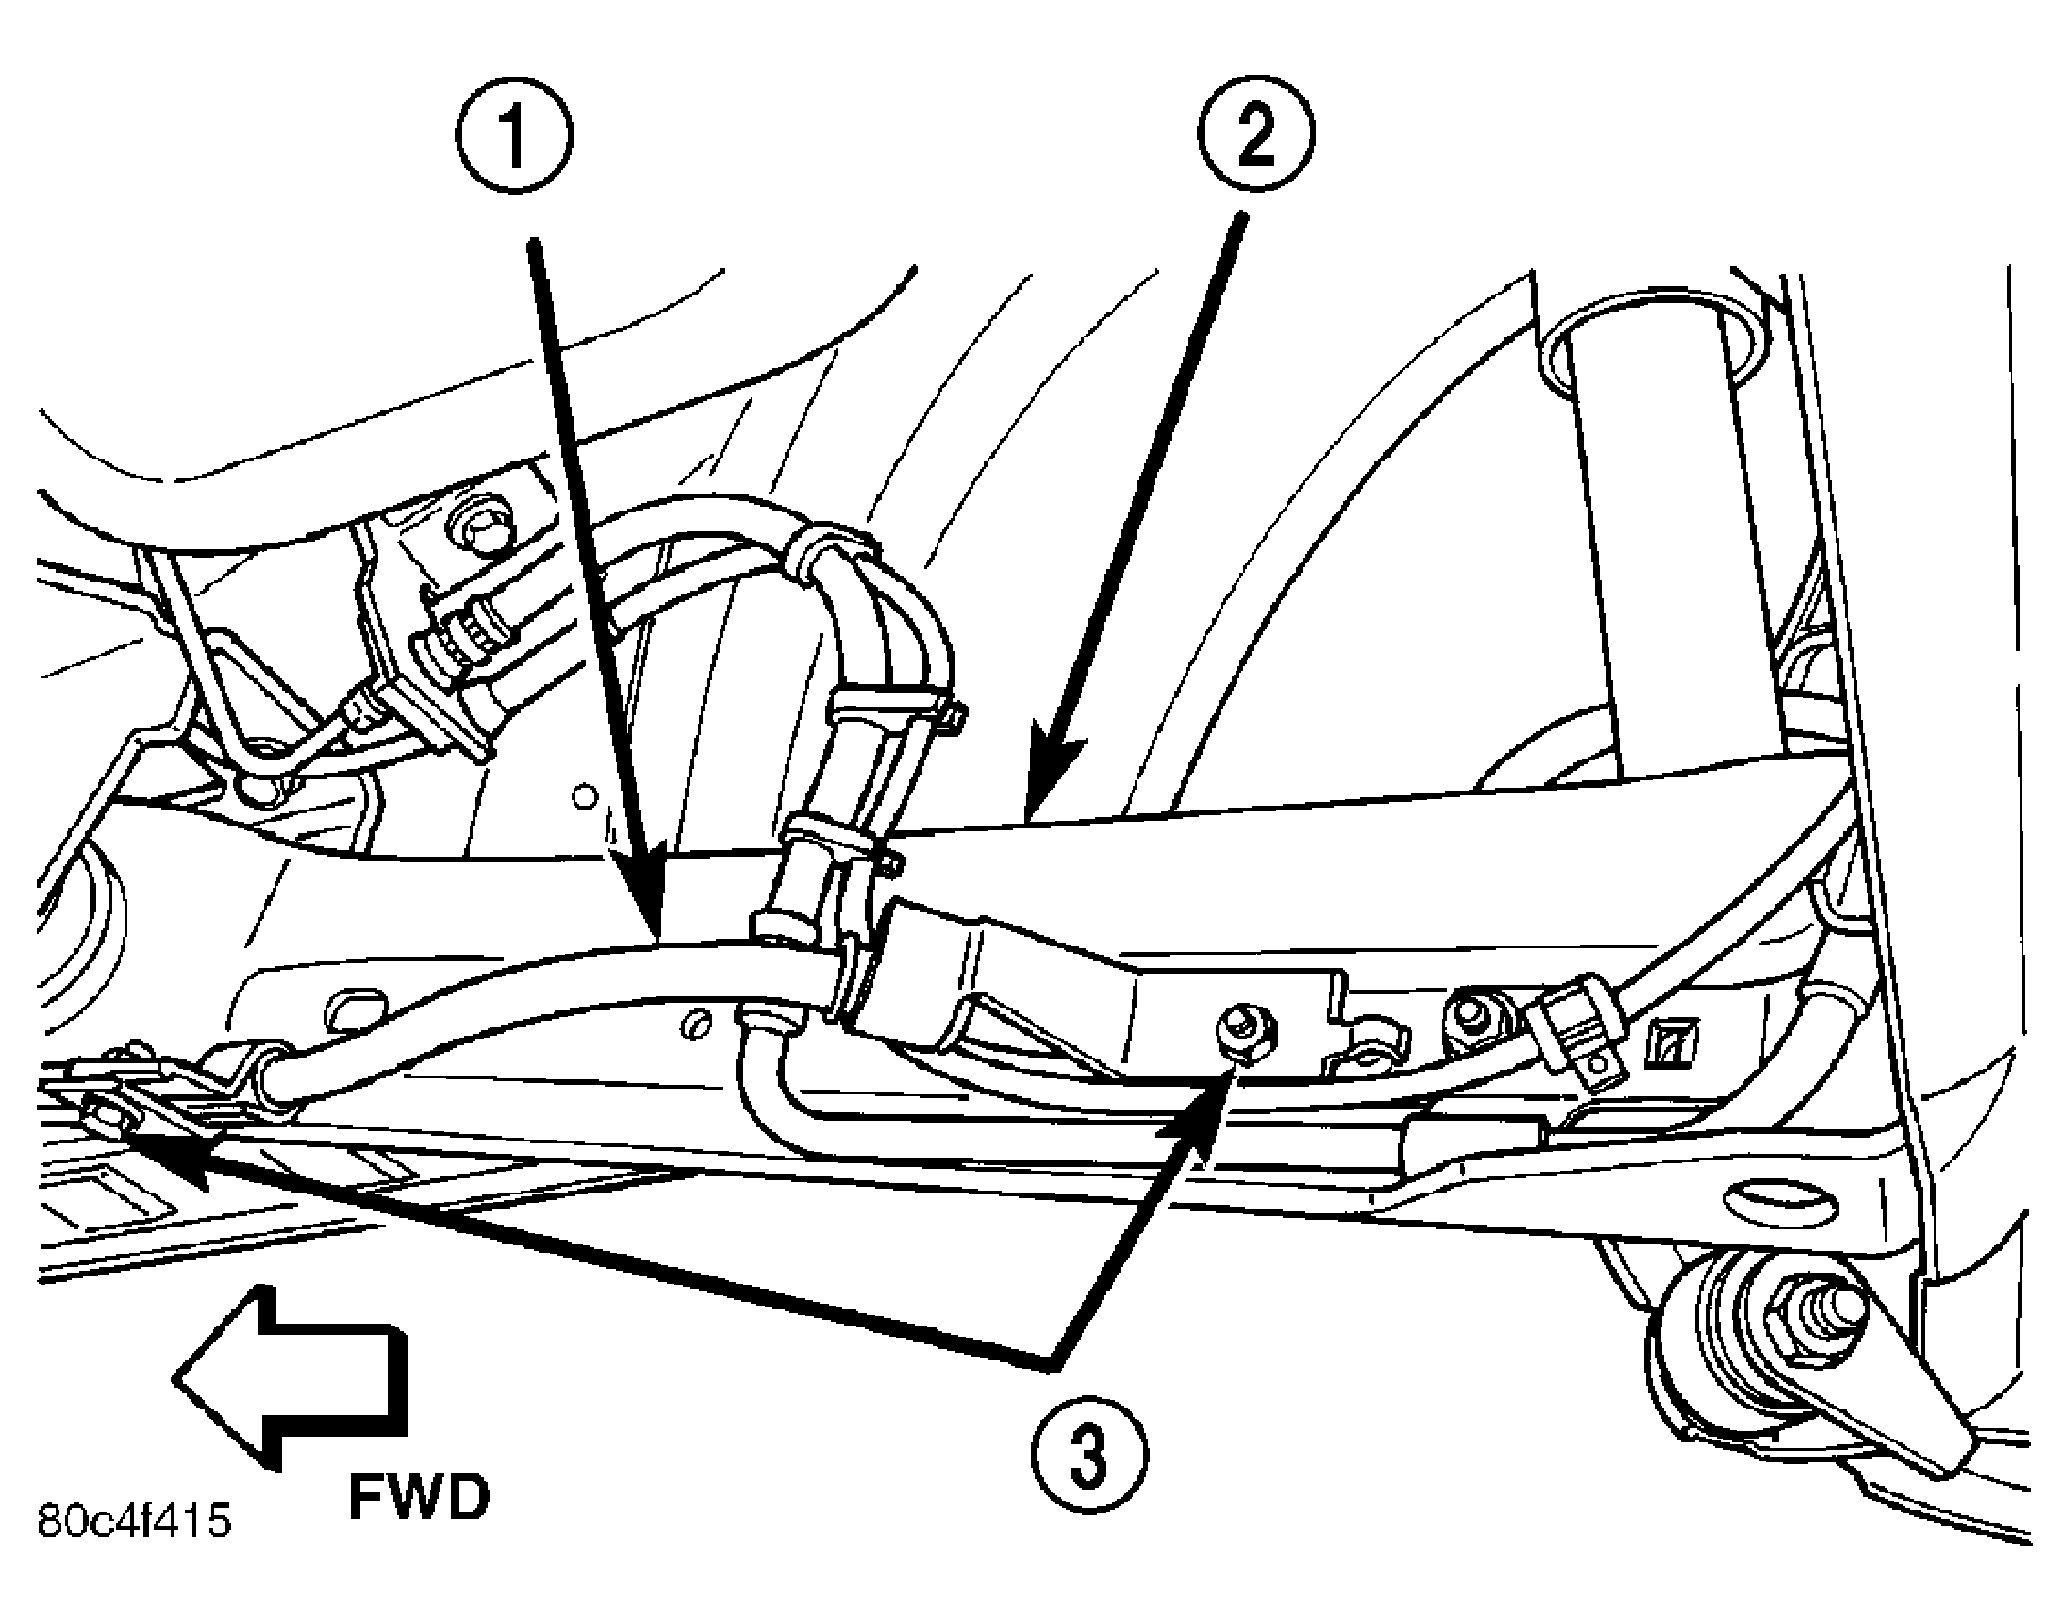
- Install the bolt securing the disc brake flex hose to the axle.
 Courtesy of DAIMLERCHRYSLER CORP.
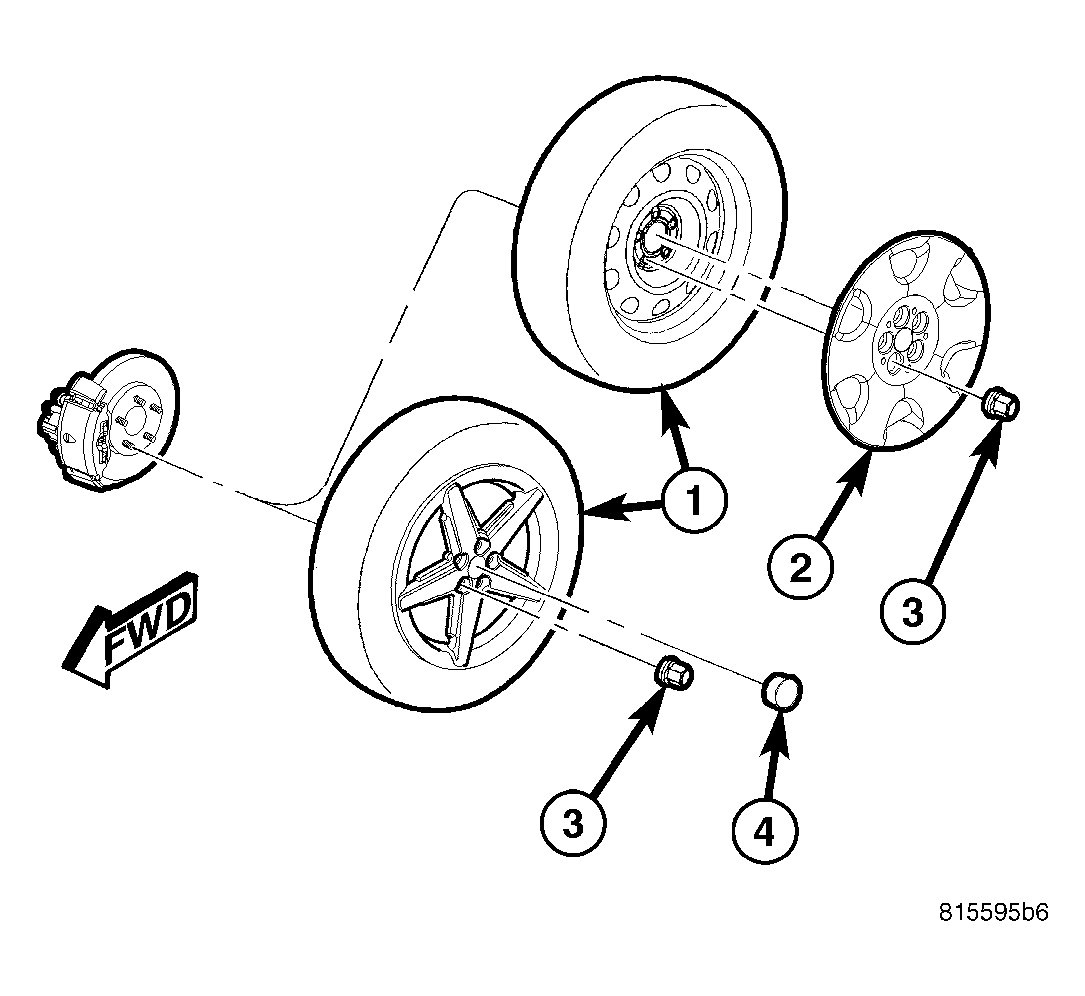
- Install tire and wheel assembly (1) (Refer to TIRES/WHEELS - INSTALLATION)
. Install and tighten wheel mounting nuts (3) to 135 N.m (100 ft. lbs.).
- Lower the vehicle to a point where the rear wheels just clear the floor.
 Courtesy of DAIMLERCHRYSLER CORP.
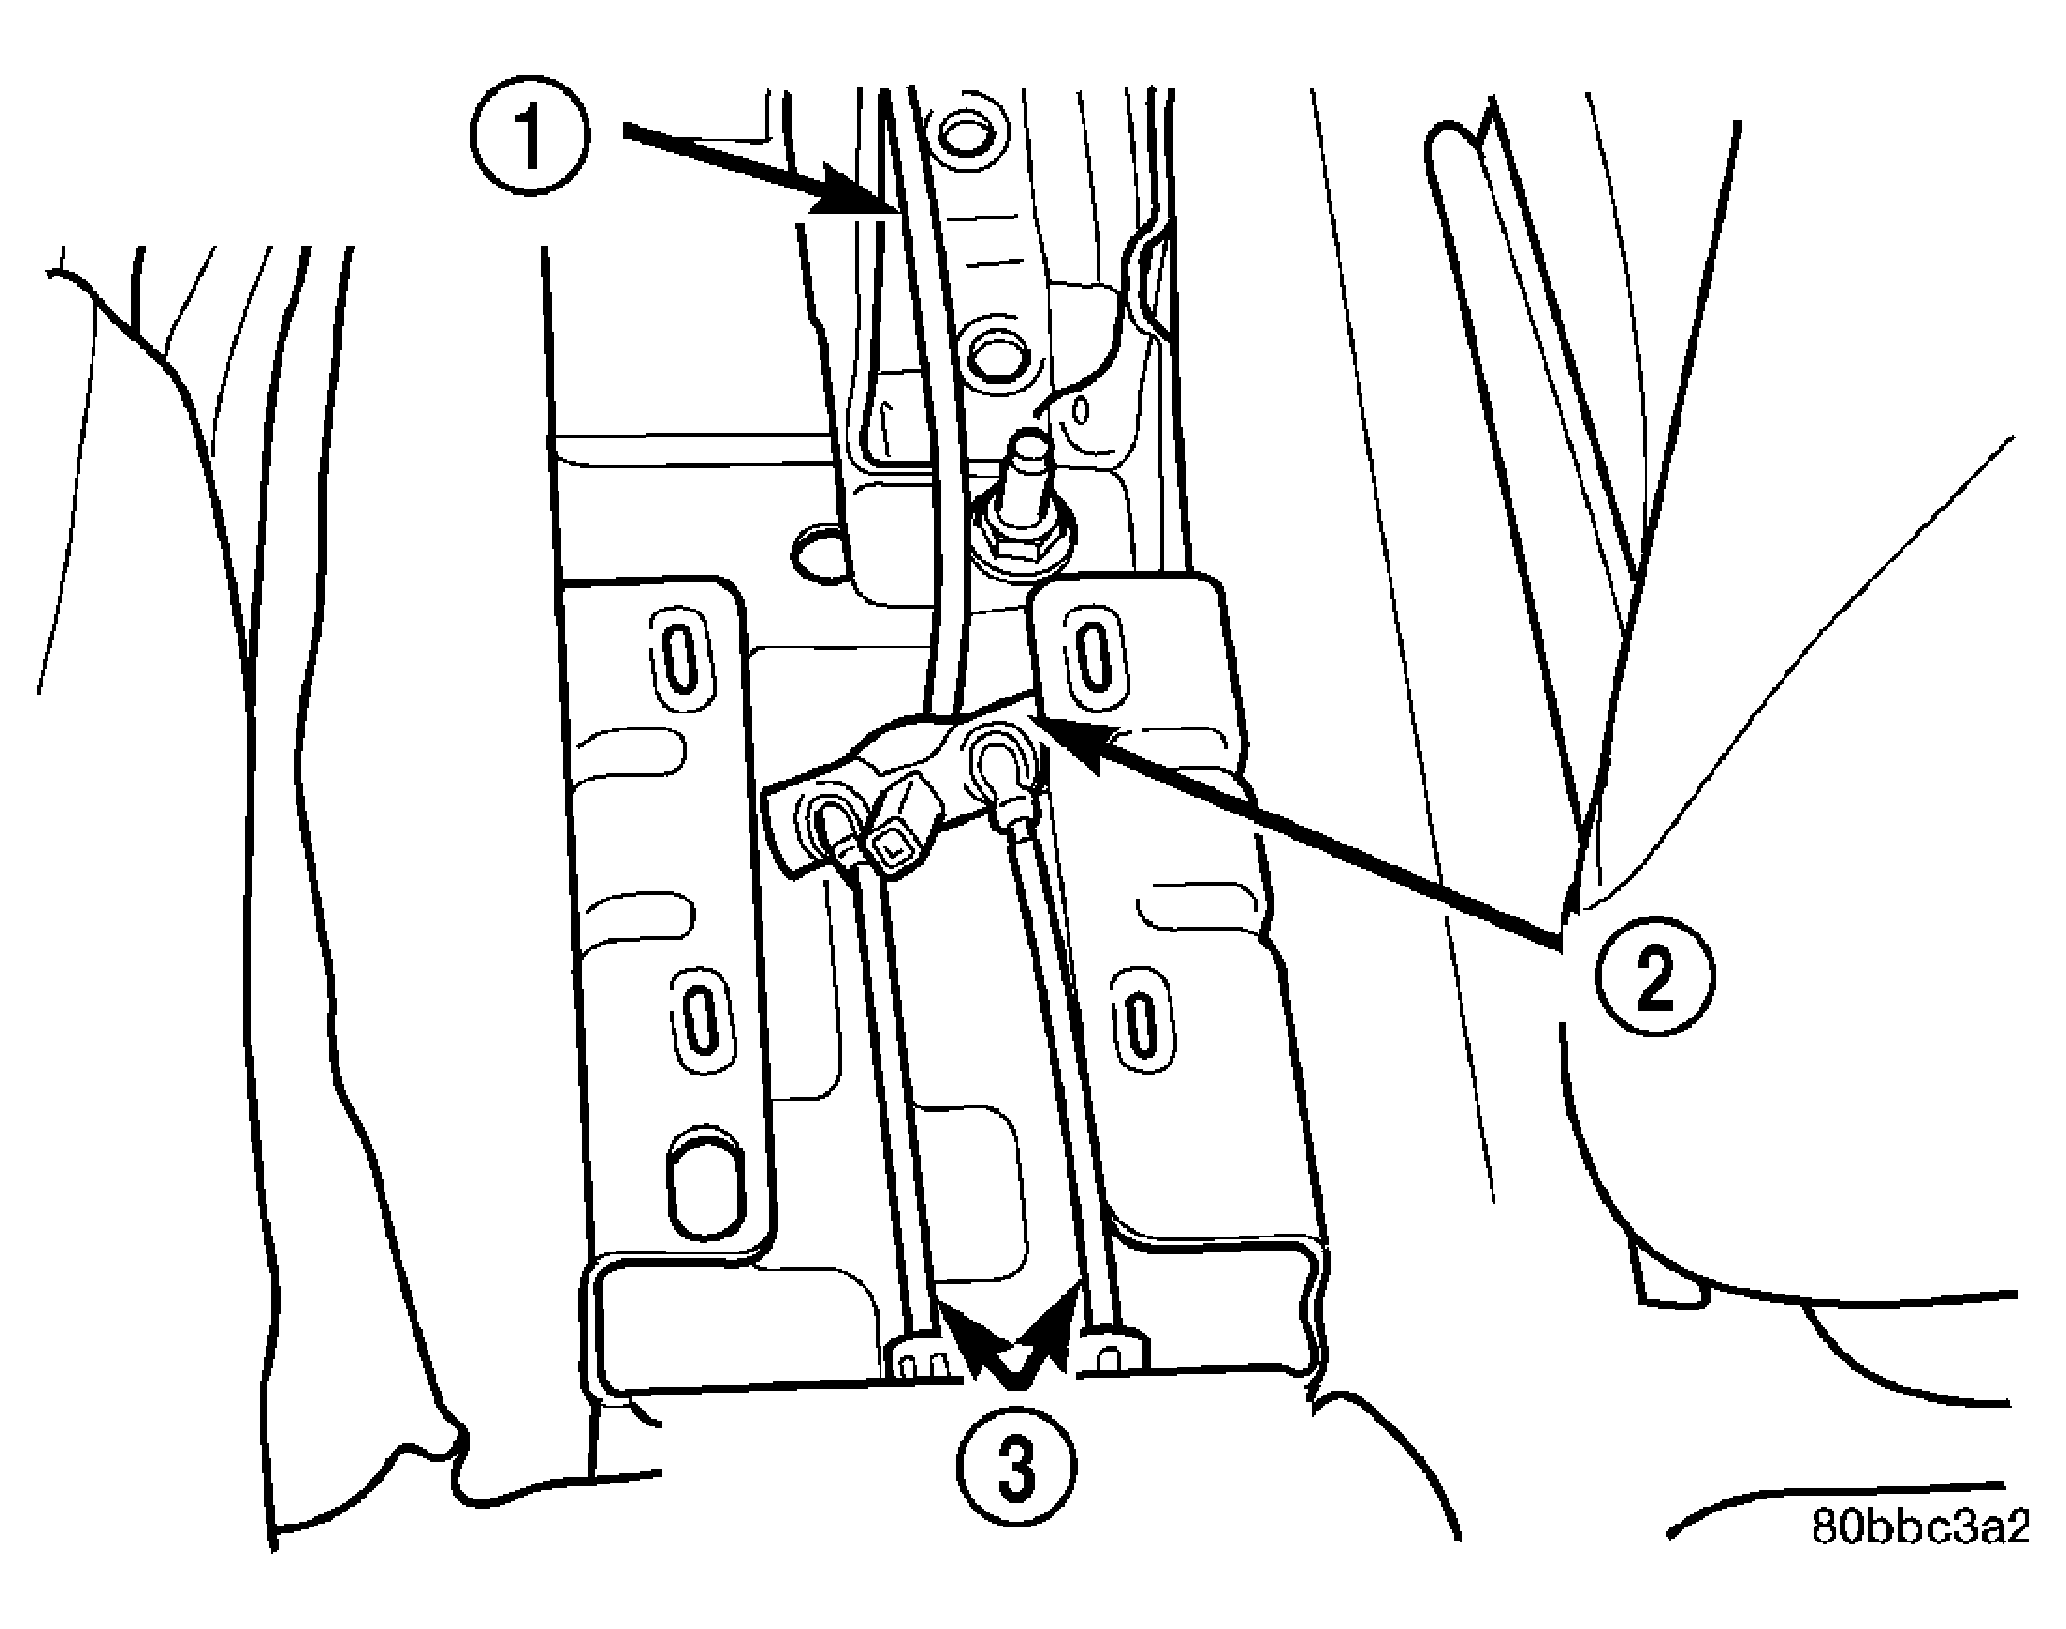
| 1 - LEVER OUTPUT CABLE |
| 2 - EQUALIZER |
| 3 - REAR PARKING BRAKE CABLES |
- Install the rear parking brake cables (3) into the equalizer (2) on the parking brake lever output cable (1).
WARNING:
The automatic adjusting feature of this parking brake lever contains a clockspring loaded to approximately 19 pounds. Do not release the automatic adjuster lockout device unless the rear parking brake cables and equalizer are connected to the lever output cable. Keep hands out of automatic adjuster sector and pawl area. Failure to observe caution in handling this mechanism could lead to serious injury.
NOTE:
The parking brake lever can only be in the released position when releasing the automatic adjuster.
 Courtesy of DAIMLERCHRYSLER CORP.
| 1 - PARKING BRAKE LEVER |
| 2 - OUTPUT CABLE |
| 3 - PIN PUNCH |
- Ensure that the parking brake cables are correctly installed on the equalizer and aligned with the cable track on the parking brake lever (1).
- Keeping hands clear of the automatic adjuster sector and pawl area, firmly grasp the pin punch (3) (drill bit or locking pin) installed in the parking brake lever (1), then quickly remove it from the lever mechanism. This will allow the parking brake lever mechanism to automatically adjust the parking brake cables.
- Cycle the parking brake lever once to position the parking brake cables, then return the parking brake lever its released position.
- Check the rear wheels of the vehicle. They should rotate freely without excessive dragging with the lever in the released position.
- Lower the vehicle.
 Courtesy of DAIMLERCHRYSLER CORP.
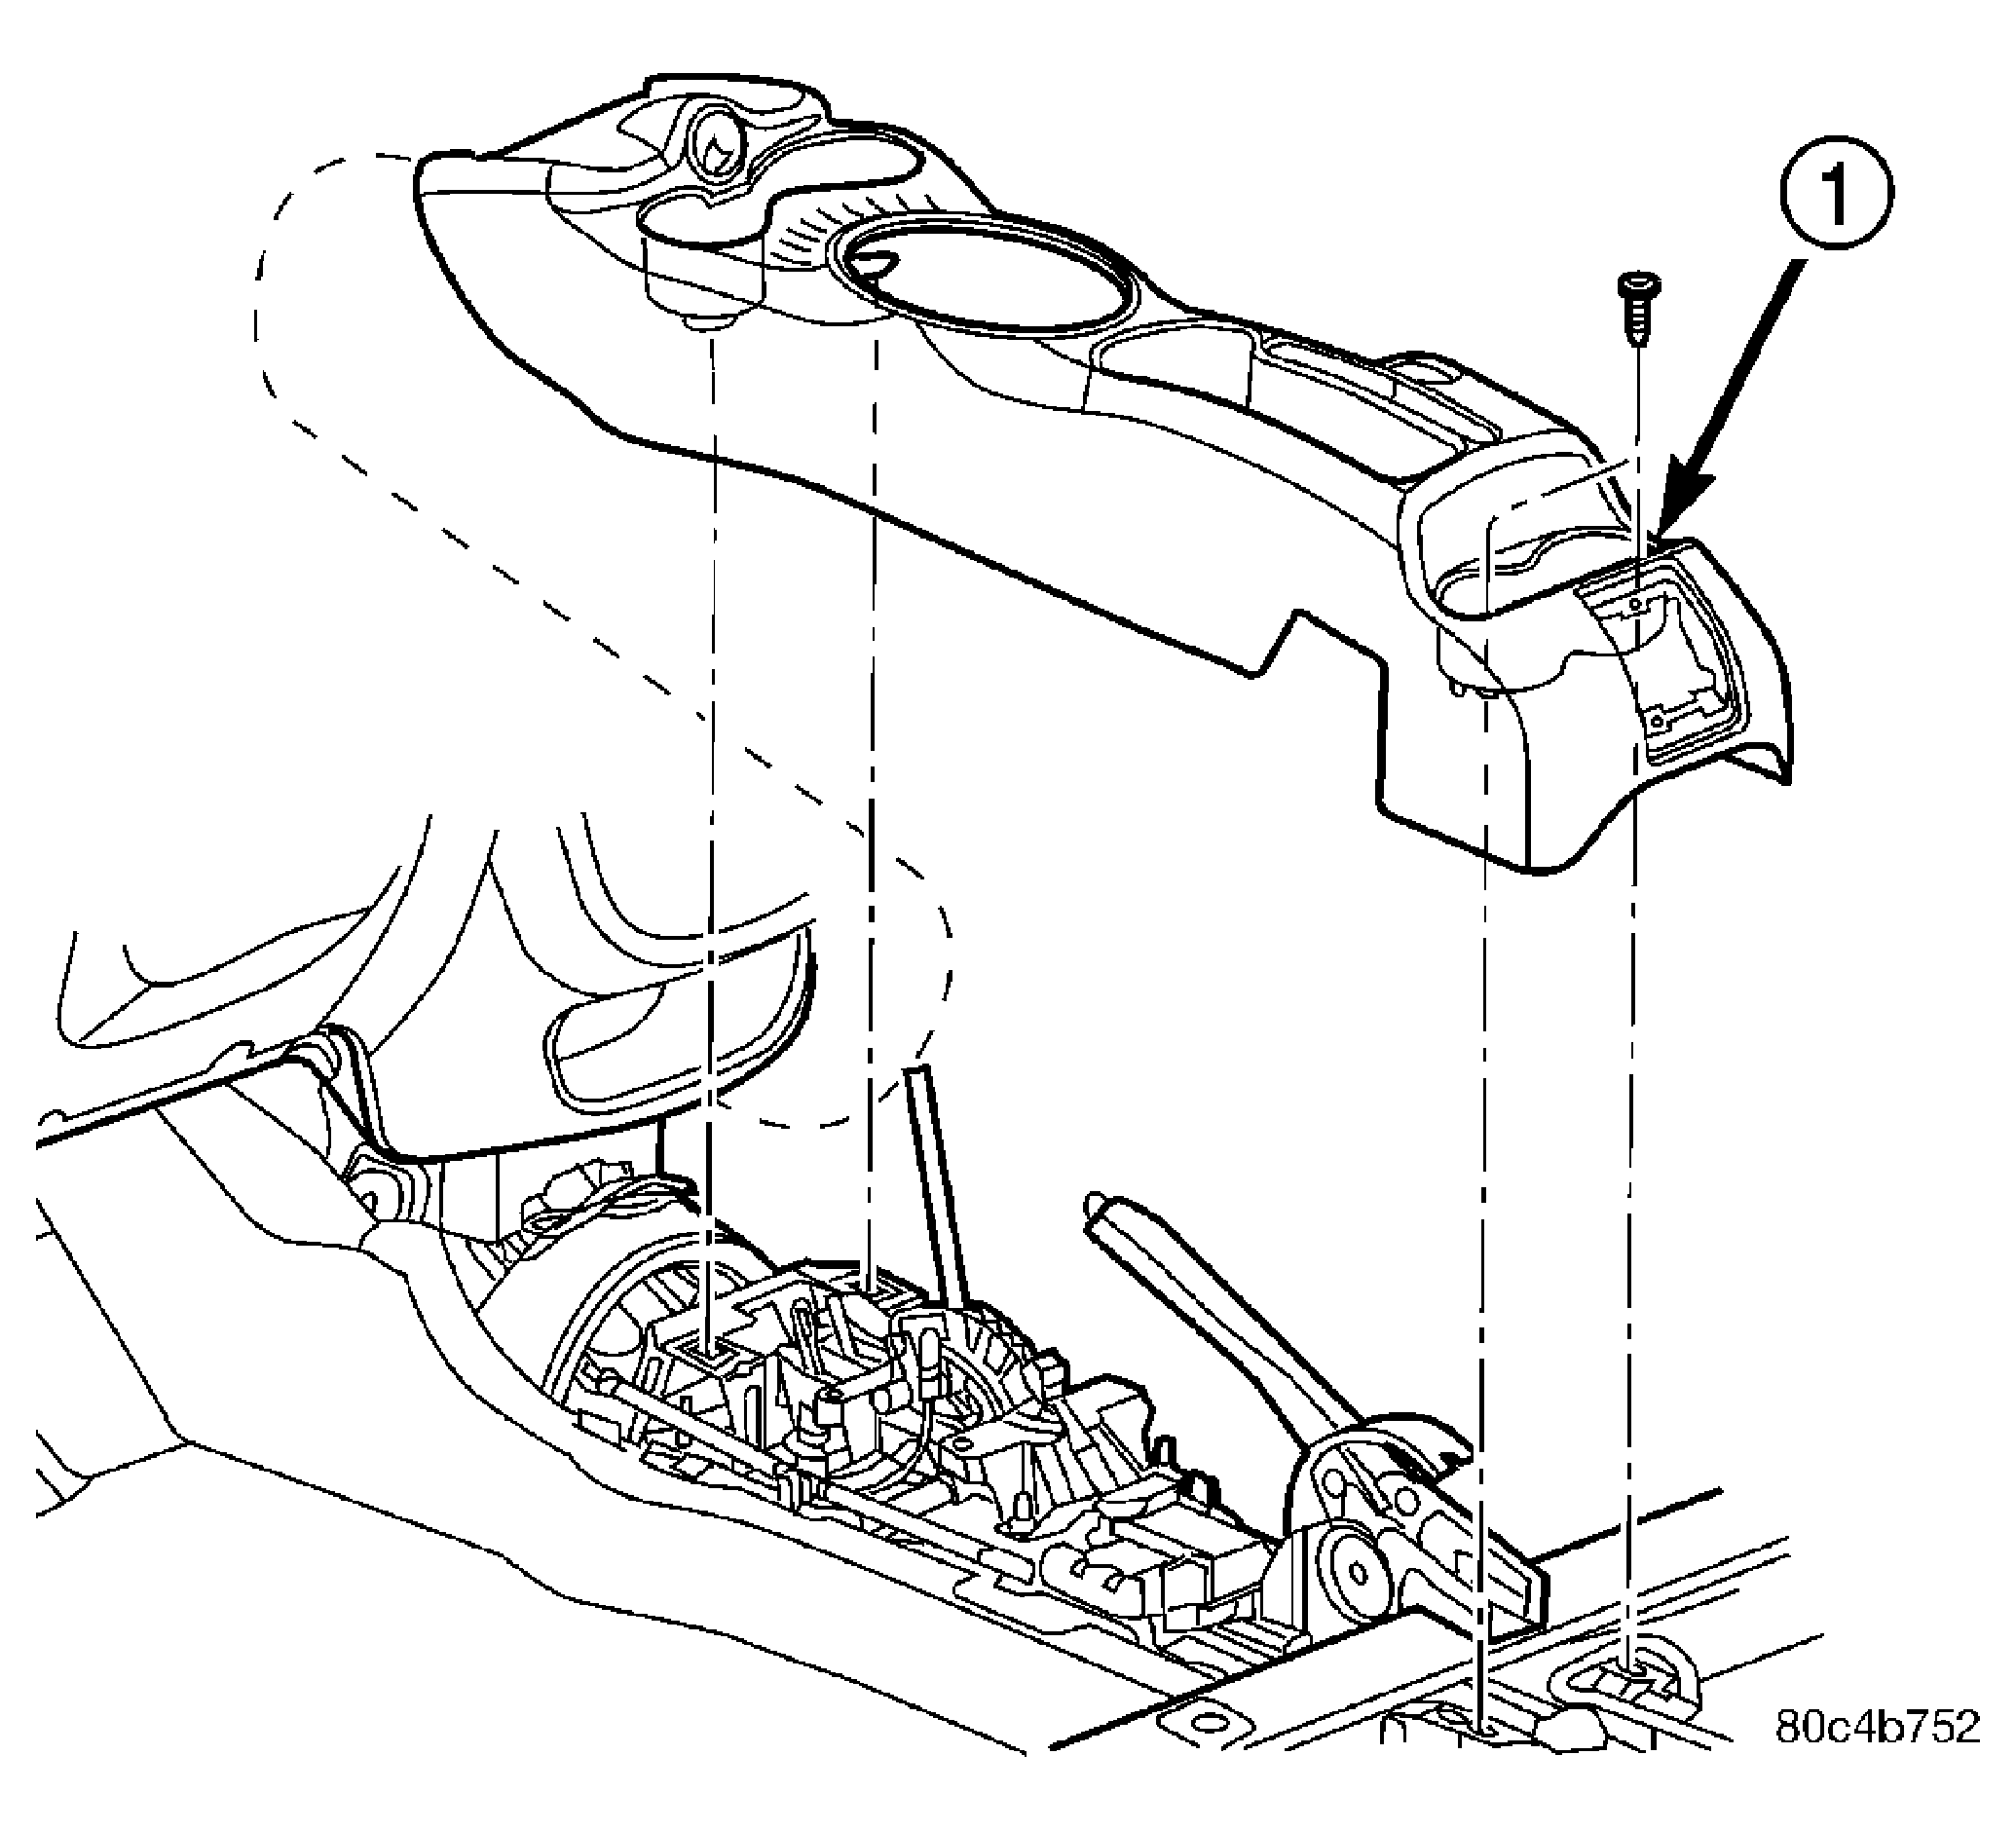
- Install the center console.
(Refer to BODY/INTERIOR/CENTER CONSOLE - INSTALLATION)
.
- Apply the parking brake.
- Remove the blocks from the tires and wheels.
 Courtesy of DAIMLERCHRYSLER CORP.
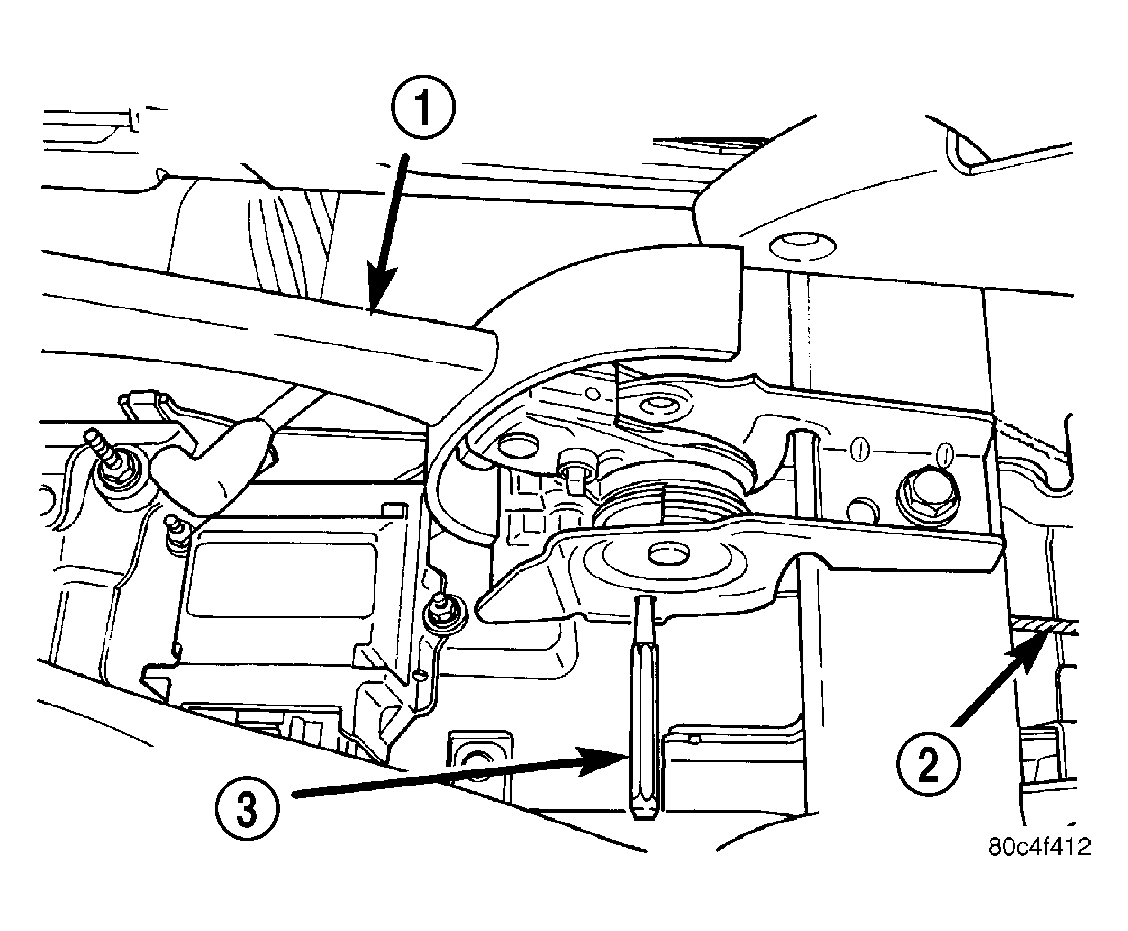
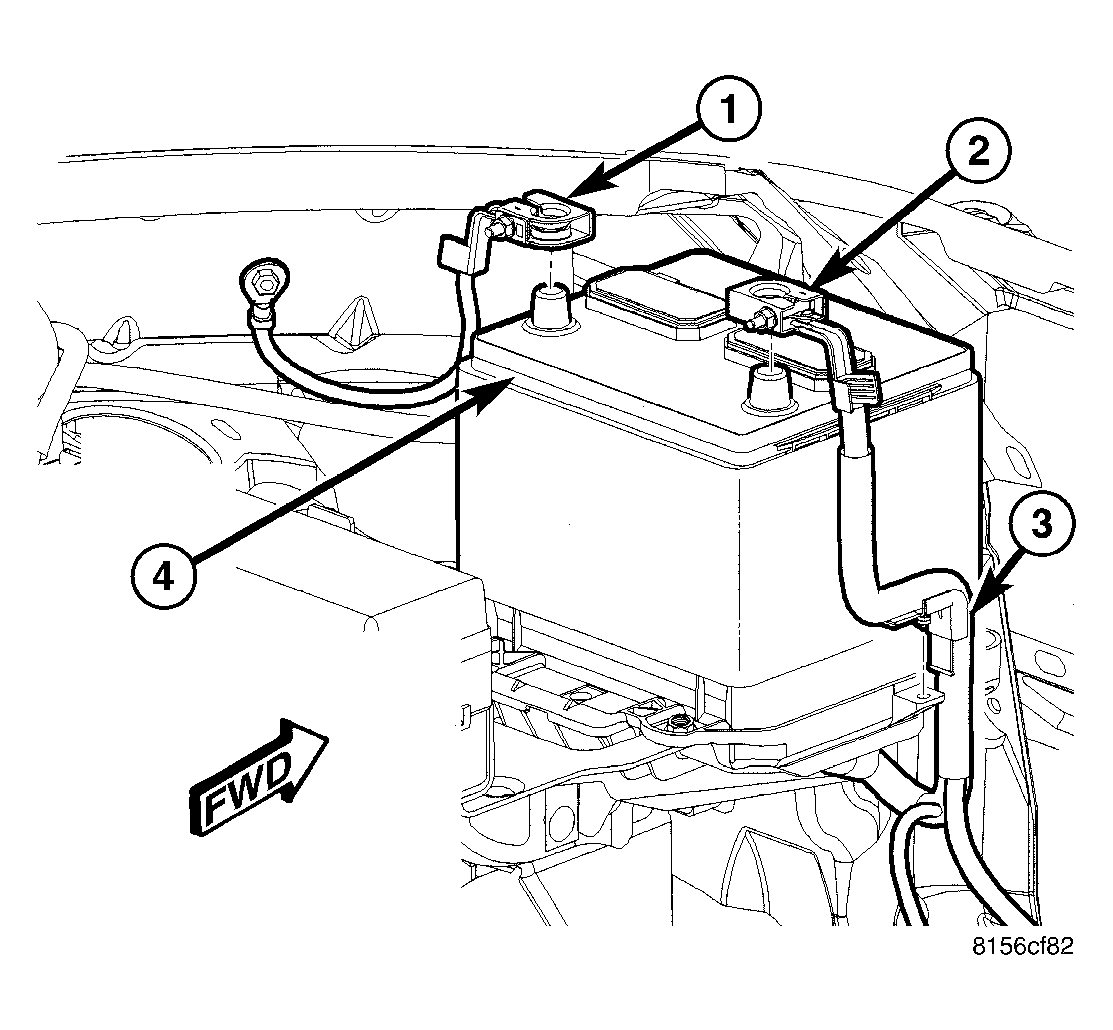
- Connect the battery negative cable (1) to its post on the battery (4).
 Courtesy of DAIMLERCHRYSLER CORP.
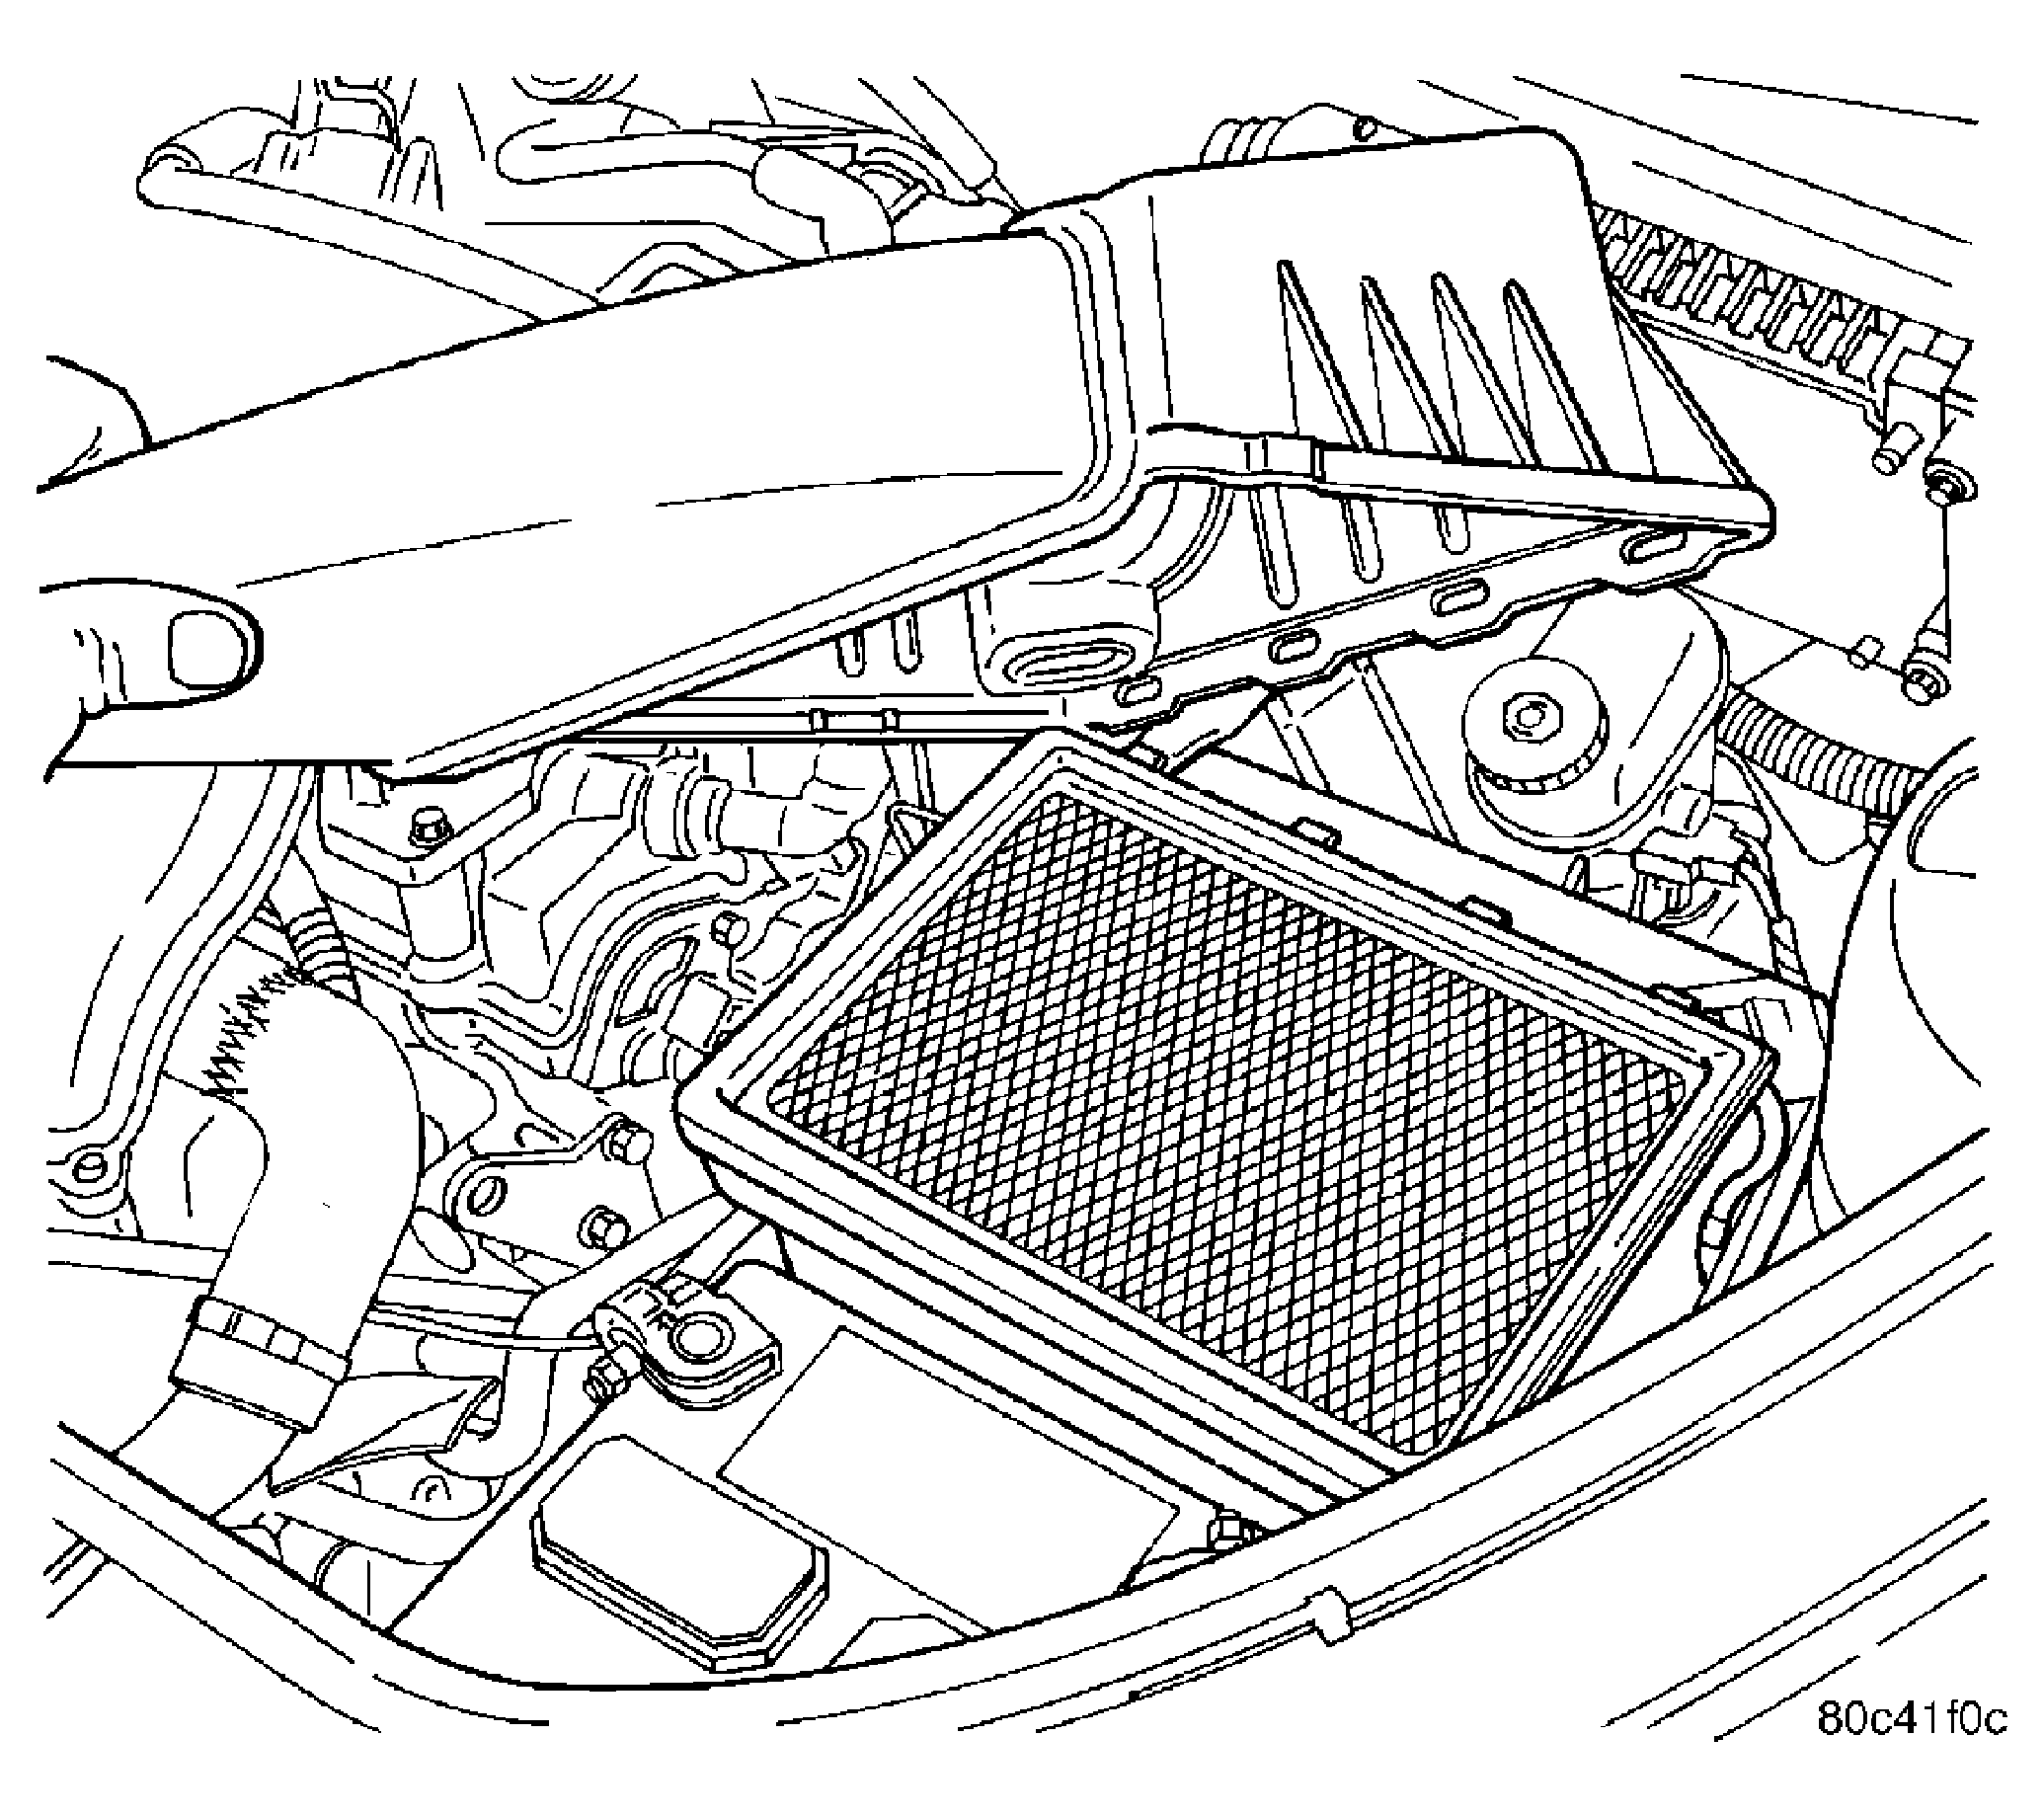
- Install the air cleaner cover.
- Pump the brake pedal several times to ensure the vehicle has a firm brake pedal before moving the vehicle.
- Place the vehicle on an alignment rack or drive-on hoist.
 Courtesy of DAIMLERCHRYSLER CORP.
- With the vehicle at curb height, tighten both trailing arm to mounting bracket pivot thru-bolts (1) to 122 N.m (90 ft. lbs.).
Courtesy of DAIMLERCHRYSLER CORP.
- Perform a rear wheel alignment (Refer to SUSPENSION/WHEEL ALIGNMENT - STANDARD PROCEDURE) . If necessary, thrust angle may be adjusted by loosening the axle trailing arm bracket bolts (4) and shifting the axle (1) forward or rearward, then retightening the bolts to 54 N.m (40 ft. lbs.).