Test A: Starter Solenoid Does Not Click
- If diagnostic system check was not performed, go to ENGINE ELECTRICAL DIAGNOSTIC SYSTEM CHECK
under SELF-DIAGNOSTIC SYSTEM. If diagnostic system check was performed, go to next step.
- Turn ignition switch to START position. If engine cranks, check wiring system for intermittent or poor connections. If intermittent or poor connection is found, repair as necessary. If engine does not crank, go to next step.
- Connect scan tool to Data Link Connector (DLC). Turn ignition switch to RUN position. Using scan tool, observe CRANK REQUEST SIGNAL parameter in PCM data list. Turn ignition switch to START position. If scan tool indicates ON, go to next step. If scan tool does not indicate ON, go to step 11
.
- Locate starter relay in right front of engine compartment mounted to core support, near battery. Turn ignition switch to START position. If starter relay clicks, go to step 8
. If starter relay does not click, go to next step.
- Turn ignition switch to LOCK position. Remove starter relay. Ensure transmission is in Park. Turn ignition switch to RUN position. Connect test light between ground and starter relay coil ignition supply circuit (Orange/Black wire) at starter relay harness connector. See WIRING DIAGRAMS
. If test light illuminates, go to next step. If test light does not illuminate, leave test light connected and go to step 7
.
- Connect test light between starter relay coil voltage supply circuit (Orange/Black wire) and starter relay coil control circuit (Yellow/Black wire) at starter relay harness connector. See WIRING DIAGRAMS
. Turn ignition switch to START position. If test light illuminates, go to step 16
. If test light does not illuminate, go to step 13
.
- Turn ignition switch to LOCK position. Disconnect Park Neutral Position (PNP) switch harness connector C1. Connect a 10-amp fused jumper wire between Pink wire terminal and Orange/Black wire terminal at PNP switch harness connector C1. See WIRING DIAGRAMS
. Turn ignition switch to RUN position. If test light illuminates, go to step 15
. If test light does not illuminate, go to step 22
.
- Turn ignition switch to LOCK position. Remove starter relay. Connect a test light between ground and starter relay positive battery voltage circuit (Red wire) at starter relay harness connector. If test light illuminates, go to next step. If test light does not illuminate, go to step 20
.
- Connect a 30-amp fused jumper between starter relay positive battery voltage circuit (Red wire) and starter relay starter solenoid voltage supply circuit (Purple wire) at starter relay harness connector. See WIRING DIAGRAMS
. If engine cranks, go to step 16
. If engine does not crank, go to next step.
- If fuse in jumper wire blows, go to step 21
. If fuse in jumper does not blow, go to step 14
.
- Turn ignition switch to LOCK position. Disconnect PCM harness connectors. Connect a test light between ground and terminal No. 23 (Purple wire) at PCM harness connector C2. See Fig 1
. Turn ignition switch to START position. If test light illuminates, go to step 18
. If test light does not illuminate, go to next step.
- Check for an open, short to ground or high resistance in Purple wire between ignition switch and PCM. See WIRING DIAGRAMS
. If problem exists, repair as necessary and go to step 28
. If problem does not exist, go to step 17
.
- Check for an open or high resistance Yellow/Black wire between starter relay and PCM. See WIRING DIAGRAMS
. If problem exists, repair as necessary and go to step 28
. If problem does not exist, go to step 18
.
- Check for and open or high resistance in Purple wire between starter relay and starter. See WIRING DIAGRAMS
. If problem exists, repair as necessary and go to step 28
. If problem does not exist, go to step 19
.
- Check PNP switch adjustment. See appropriate ELECTRONIC CONTROLS article in AUTOMATIC TRANSMISSIONS. Check PNP switch harness connector for poor connection. If problem exists, repair as necessary and go to step 28
. If problem does not exist, go to step 23
.
- Check starter relay for poor connections. If problem exists, repair as necessary and go to step 28
. If problem does not exist, go to step 24
.
- Check for poor connection at ignition switch harness connector. If problem exists, repair as necessary and go to step 28
. If problem does not exist, go to step 25
.
- Check for poor connection at PCM harness connector. If problem exists, repair as necessary and go to step 28
. If problem does not exist, go to step 26
.
- Check for poor connection at starter solenoid. If problem exists, repair as necessary and go to step 28
. If problem does not exist, go to step 27
.
- Repair open, short to ground or high resistance in Red wire between starter relay and battery. See WIRING DIAGRAMS
. After repairs, go to step 28
.
- Repair short to ground in Purple wire between starter relay and starter. See WIRING DIAGRAMS
. After repairs, go to step 28
.
- Repair open, short to ground or high resistance in Pink wire between fuse block and PNP switch, or between PNP switch and starter relay. See WIRING DIAGRAMS
. After repairs, go to step 28
.
- Replace PNP switch. See appropriate ELECTRONIC CONTROLS article in AUTOMATIC TRANSMISSIONS. After repairs, go to step 28
.
- Replace starter relay. After repairs, go to step 28
.
- Replace ignition switch. See appropriate STEERING COLUMN SWITCHES article in ACCESSORIES & EQUIPMENT. After repairs, go to step 28
.
- Replace PCM. After replacement, reprogram PCM. See appropriate REMOVAL, OVERHAUL & INSTALLATION article in ENGINE PERFORMANCE. After repairs, go to step 28
.
- Replace starter. See STARTER
under REMOVAL & INSTALLATION. After repairs, go to step 28
.
- Operate system and verify repair. If condition is corrected, test is complete. If condition is not found and corrected, go to step 2
.
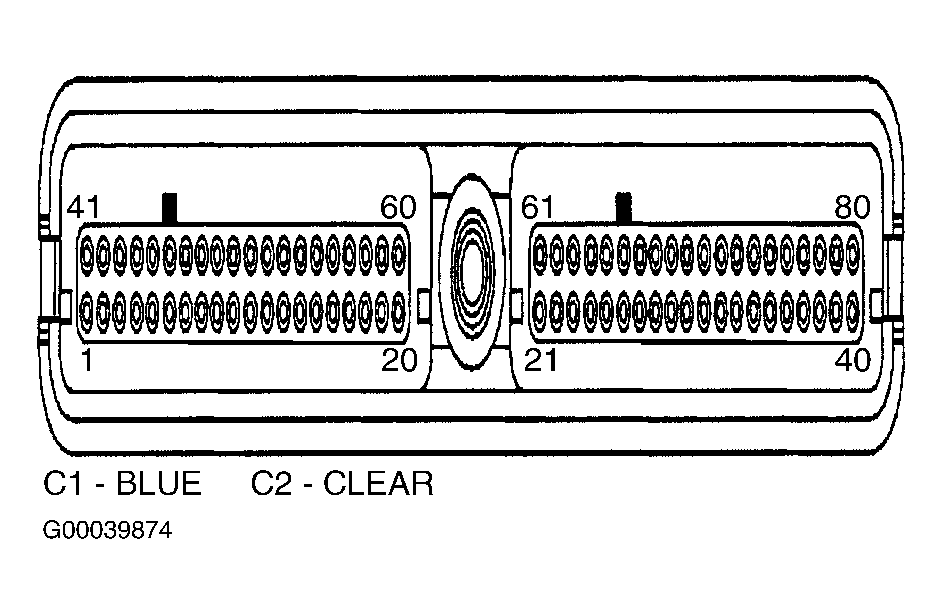 Courtesy of GENERAL MOTORS CORP.