Engine Does Not Crank, Starter Solenoid Does Not Click
- Turn ignition switch to START position. If engine cranks, check for intermittent problem. If engine does not crank, go to next step.
- Locate starter relay. See COMPONENT LOCATIONS
. Listen for a "click" from starter relay while turning ignition switch to START position. If a "click" sound is heard from starter relay while turning ignition switch to START position, go to next step. If no "click" sound is heard from starter relay while turning ignition switch to START position, go to step 6
.
- Turn ignition off. Disconnect starter relay. Connect test light between ground and starter relay switch feed circuit cavity A6 (Red wire). See WIRING DIAGRAMS
. If test light illuminates, go to next step. If test light does not illuminate, go to step 12
.
- Connect 30-amp fused jumper between starter relay switch feed circuit cavity A6 (Red wire) and starter relay switch output circuit cavity B4 (Purple wire). If engine cranks, go to step 9
. If engine does not crank, go to next step.
- If 30-amp fuse in jumper goes open, go to step 13
. If 30-amp fuse in jumper does not go open, go to step 7
.
- Turn ignition off. Disconnect starter relay. Connect test light between starter relay coil feed circuit cavity B6 (Yellow wire) and starter relay ground circuit cavity A4 (Black wire). See WIRING DIAGRAMS
. Turn ignition switch to START position. If test light illuminates, replace starter relay and retest operation. If test light does not illuminate, connect test light between a known-good ground and starter relay coil feed circuit cavity B6 (Yellow wire). If test light illuminates, repair open in Black wire between ground and starter relay ground circuit cavity A4 (Black wire). Retest operation. If test light does not illuminate, go to step 8
.
- Disconnect Purple wire from starter solenoid "S" terminal. Connect test light between ground and starter solenoid "S" terminal. Ensure 30-amp fused jumper is still connected between starter relay switch feed circuit cavity A6 (Red wire) and starter relay switch output circuit cavity B4 (Purple wire). If test light illuminates, go to step 10
. If test light does not illuminate, go to step 14
.
- Locate and disconnect Park/Neutral Position (PNP) switch. Connect 30-amp fused jumper between PNP switch connector terminals "G" (Yellow wire) and "E" (Purple wire). Ensure test light is still connected between ground and starter relay coil feed circuit cavity B6 (Yellow wire). Turn ignition switch to START position. If test light illuminates, go to step 11
. If test light does not illuminate, check for open in Yellow wire between PNP switch connector terminal "G" and starter relay coil feed circuit cavity B6. Repair as necessary and retest operation. If Yellow wire checks okay, go to step 15
.
- Check for poor connection to starter relay. Repair as necessary and retest operation. If connections to starter relay check okay, replace starter relay and retest operation.
- Check for poor connections at starter solenoid. Repair as necessary and retest operation. If starter solenoid connections are okay, replace starter. See STARTER
under REMOVAL & INSTALLATION.
- Check operation and adjustment of PNP switch. See appropriate AUTOMATIC TRANSMISSION SERVICING article in AUTOMATIC TRANSMISSIONS. Check for poor connection to PNP switch. Repair as necessary and retest operation. If PNP switch connection and adjustment are okay, replace PNP switch and retest operation.
- Repair open, short to ground or high resistance in Red wire between crank relay switch feed circuit cavity A6 and IGN-A fuse (40-amp) located in underhood fuse/relay center. Retest operation.
- Repair short to ground in supply voltage circuit to starter solenoid (Purple wire). Retest operation.
- Repair open or high resistance in supply voltage circuit to starter solenoid (Purple wire). Retest operation.
- Remove CRANK fuse (10-amp), located in instrument panel fuse block. Using test light connected to ground, probe both CRANK fuse terminals inside instrument panel fuse block. If test light does not illuminate on either terminal, go to next step. If test light illuminates on one terminal, repair open or high resistance in Purple wire between PNP switch connector terminal "E" and appropriate CRANK fuse terminal. Retest operation.
- Locate Black 48-pin in-line harness connector at base of steering column. Connect test light (backprobe) between ground and ignition switch side of Black 48-pin in-line harness connector terminal D1 (Yellow wire). See Fig 1
. Turn ignition switch to START position. If test light illuminates, repair open in Yellow wire between Black 48-pin in-line harness connector terminal D1 and appropriate CRANK fuse terminal. Retest operation. If test light does not illuminate, go to next step.
- Connect test light (backprobe) between ground and harness side of Black 48-pin in-line harness connector terminal D5 (Red wire). If test light does not illuminate, go to next step. If test light illuminates, replace ignition switch. See appropriate STEERING COLUMN SWITCHES article in ACCESSORIES & EQUIPMENT. Retest operation.
- Repair open in Red wire between Black 48-pin in-line harness connector terminal D5 and IGN-A (40-amp) fuse located in underhood fuse/relay center. Retest operation.
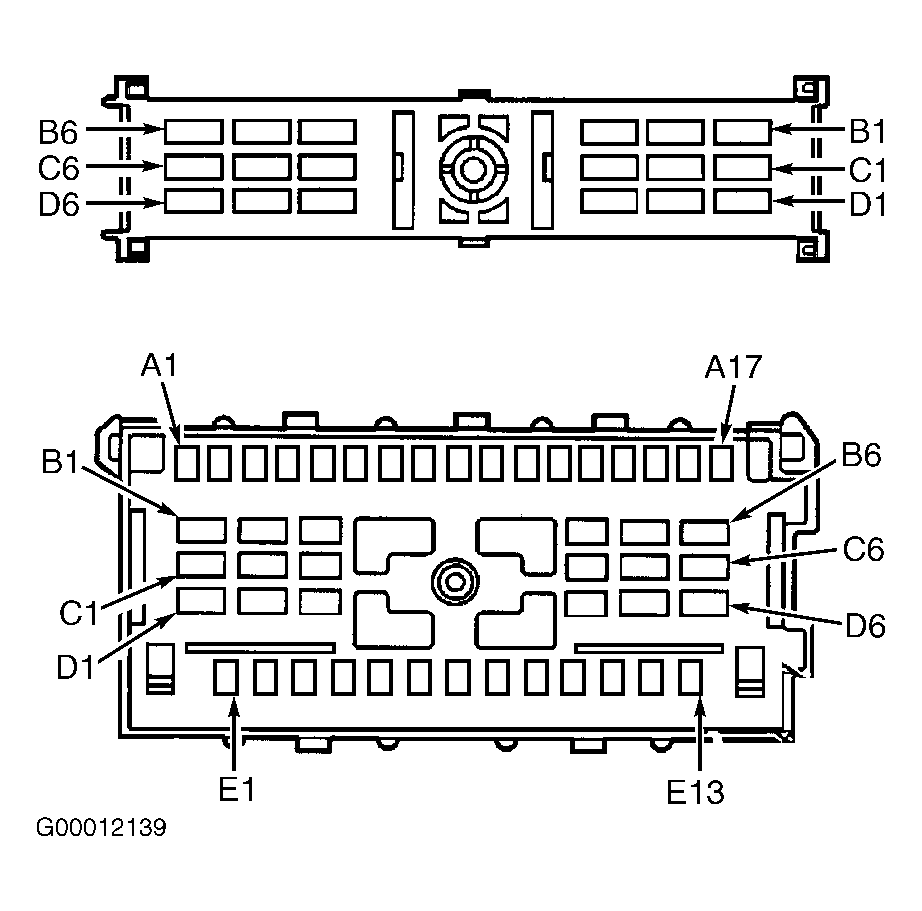 Courtesy of GENERAL MOTORS CORP.