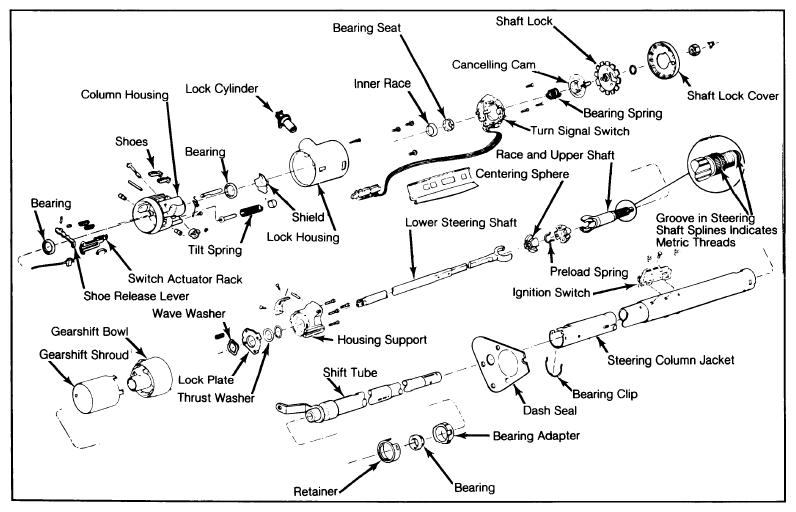
- Apply a thin coat of lithium grease or equivalent to all friction surfaces. If bearing was not disassembled, proceed to step 4). To reassemble bearing housing, press bearings into housing (if removed). Use a socket, being careful not to damage housing or bearings. Install lock shoe springs, lock shoes, and shoe pin in housing.
NOTE:
Use a 0.180" diameter rod to line up shoes for pin installation.
- Install shoe release lever, spring and pin. If necessary to relieve load on release lever, hold shoes inward and wedge a block between top of shoes (over slots) and bearing housing. Install sector drive shaft into housing and lightly tap sector onto shaft far enough to allow installation of snap ring. Install snap ring.
- Install lock bolt and engage it with sector cam surface. Install rack and spring while noting that the block tooth on rack should engage block tooth on sector. install external tilt release lever. Install lock bolt spring and retaining screw and tighten.
 Courtesy of GENERAL MOTORS COMPANY
- Wind up shift lever spring with pliers and push into housing. Install plunger on floor shift models. Slide gearshift lever housing onto mast jacket. On all models, install bearing support lock plate wave washer. Install lock plate and work it into notches by tipping plate toward hub at 12 o'clock position and sliding under jacket opening. Slide lock plate into notches in jacket.
- Install shift tube into lower end of mast jacket, then align keyway of tube with key in shift lever housing. Install wobble plate end of special tool (J-23073) into upper end of shift tube (far enough to reach enlarged portion of tube). Install adapter over end of tool and seat against lock plate. Install nut on end of tool and pull shift tube into housing.
CAUTION:
Do not push or tap on end of shift tube and make sure shift tube lever is aligned with slotted opening at lower end of mast jacket or damage may result.
- Pull shift lever housing up far enough to compress wave washer, then install bearing support thrust washer and retaining ring. Install bearing support while ensuring "V in support is in line with "V" in jacket.
- Install attaching screws through support and into lock plate, then tighten. Align lower bearing adapter with notches in jacket and push adapter into lower end of mast jacket. Install lower bearing, bearing reinforcement and retaining clip.
NOTE:
Clip must be aligned with slots in reinforcement, jacket and adapter.
- Install centering spheres and anti-lash spring into upper shaft. Install lower shaft from same side of spheres that spring ends protrude. Install steering shaft assembly into shift tube from upper end and carefully guide shaft through shift tube and bearing.
- Install ignition switch actuator rod through shift lever housing and insert into slot in bearing support. Extend rack downward from bearing housing, then assemble bearing housing over steering shaft and engage rack over end of actuator rod. Install tilt release lever, then hold lock shoes in disengaged position and position bearing housing over steering shaft until pivot pin holes line up. Install pivot pins.
- Place bearing housing in full up position, then install tilt lever spring guide, spring and spring retainer. Using a Phillips screwdriver, push retainer in and turn clockwise to engage in housing. Install upper bearing inner race and race seat, then install tilt lever opening shield. Remove tilt release lever, then install directional signal housing and tighten screws.
- Install tilt release lever and shift lever, then drive shift lever pin in. Install lock cylinder, directional signal switch, and ignition switch. Install intermediate shaft assembly to upper shaft after aligning groove across upper end of pot joint with flat on steering shaft. Install and tighten clamp while noting that clamp bolt must pass through shaft undercut.
- Install neutral safety switch or back-up switch. Install dash panel bracket-to-column attaching screws and tighten. The slotted openings in bracket must face upper end of steering column.