Overview - Bevel Box Components
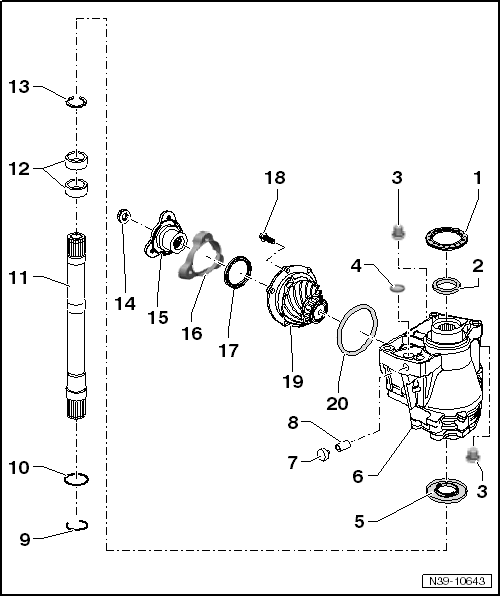 Courtesy of AUDI OF AMERICA, LLC
- Seal
- Seal
- Plug
- 15 Nm
- Replace after removing
- With permanent seal
- Cap
- Drive in until stop using the Holding Fixture - Spacers: VW540/1B
- Seal
- For the stub shaft to drive axle
- The seal can be replaced with the bevel box installed
- Replacing. Refer to RIGHT SEAL, REPLACING .
- Bevel Box
- Removing and Installing. Refer to BEVEL BOX
.
- Cap
- For bleeding the bevel box
- Bleed Pipe
- For bleeding the bevel box
- Press it in all the way
- Circlip
- Replace after removing
- Insert in the groove all around the stub shaft
- O-Ring
- Replace after removing
- Insert in the groove all around the stub shaft
- Stub Shaft
- Needle Bearing (Polygon Bearing)
- The needle bearings (polygon bearings) are difficult to move when the stub shaft is removed. Difficulty in movement is not an indication of faulty bearings. An acoustic test can only be performed while installed.
- Check for damage on the bearing, for example, cracks on outer race and replace if necessary.
- Replacing. Refer to RIGHT STUB SHAFT NEEDLE BEARING (POLYGON BEARING), REPLACING .
- Circlip
- Replace after removing.
- For the needle bearing (polygon bearing)
- Insert in the groove all around the stub shaft
- Nut
- 480 Nm
- Replace after removing.
- Install with Locking Fluid: D 000 600
.
- Output Flange
- Cap
- Replace the output flange after removal if damaged
- Not equipped on all bevel boxes
- Lock with the output flange
- Seal
- Bolt
- 25 Nm
- Tighten in a diagonal sequence
- Pinion Housing
- With shaft bevel gear and inner race/tapered roller bearing
- Components are not replacement parts
- Carefully pry out from side to side
- Note the fastening holes; the pinion housing only fits in one position.
- O-Ring
- Replace after removing the pinion housing
- To replace, remove the bolts -Item : Bolt and carefully pry the pinion housing out at the tabs protruding all the way around.
- Do not remove the hex nut -Item : Nut and output flange -Item : Output Flange.