Steering Column Removal and Installation: Removal
- Adjust the steering column to the full tilt down position, and to the full telescopic out position.
- Do the battery terminal disconnection procedure (see
BATTERY TERMINAL DISCONNECTION AND RECONNECTION
).
- Remove the driver's dashboard undercover (see
DRIVER'S DASHBOARD UNDERCOVER REMOVAL/INSTALLATION
).
- Remove the driver's dashboard lower cover (see
DRIVER'S DASHBOARD LOWER COVER REMOVAL/INSTALLATION
).
- Remove the driver's airbag (see
DRIVER'S AIRBAG REPLACEMENT
) and the steering wheel (see STEERING WHEEL REMOVAL
).
- Remove steering joint cover A.
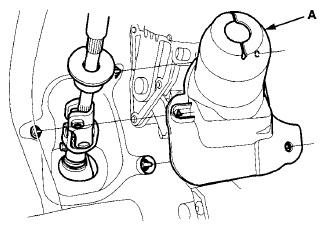 Courtesy of AMERICAN HONDA MOTOR CO., INC.
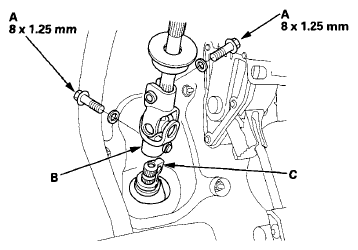
- Remove the steering joint bolts (A), then disconnect the steering joint (B) from the pinion shaft and the steering shaft.
NOTE:
- If the center guide (C) is in place and has not moved, leave it in place.
- If the center guide has come off, discard it.
 Courtesy of AMERICAN HONDA MOTOR CO., INC.
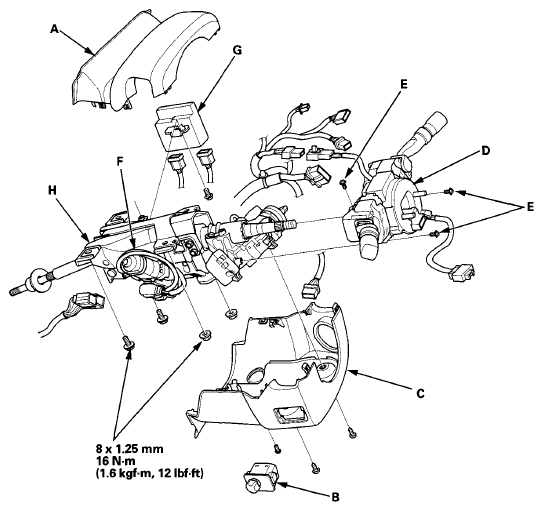
- Remove the upper column cover (A), and disconnect the connectors from the power tilt/telescopic steering switch (B) on the lower column cover (C).
 Courtesy of AMERICAN HONDA MOTOR CO., INC.
- Disconnect the wire harness connectors from the combination switch assembly/cable reel (D).
- Remove the combination switch assembly/cable reel from the steering column shaft by removing the three screws (E).
- Disconnect the connector from the ignition switch, and release the wire harness clips from the steering column.
- Disconnect the connectors from the tilt/telescopic motors (F).
- Disconnect the connectors from the power tilt/telescopic steering control unit (G).
- Remove the steering column (H) by removing the attaching nuts and bolts, and carefully guide it out of the dashboard.