- Before installing the steering gearbox, make sure that no grease is on the mating surface of the steering gearbox and the front subframe To prevent the gearbox mounting bolts from loosening after the installation, remove any grease from the bolt holes
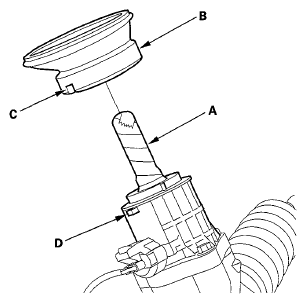
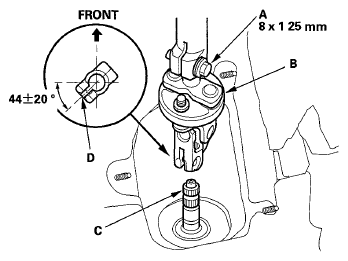
- Wrap vinyl tape around the splines on the pinion shaft (A)
 Courtesy of AMERICAN HONDA MOTOR CO., INC.
- Install the pinion shaft grommet (B) Align the cutout (C) in the pinion shaft grommet with the lug portion (D) on the torque sensor The grommet must not have a gap at the mating surface of the grommet and torque sensor
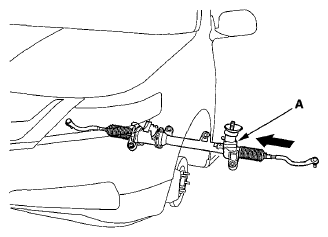
- Slide the steering gearbox (A) between the front subframe and the body from the driver's side
 Courtesy of AMERICAN HONDA MOTOR CO., INC.
- Carefully move the steering gearbox (A) toward the passenger's side until the pinion shaft clears the wheel well opening on the body
 Courtesy of AMERICAN HONDA MOTOR CO., INC.
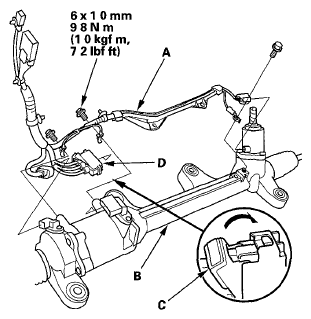
- Install the EPS subharness (A) to the steering gearbox (B)
NOTE:
Pull up the lever (C) of the EPS motor 3P connector (D), then confirm the connector is fully seated
 Courtesy of AMERICAN HONDA MOTOR CO., INC.
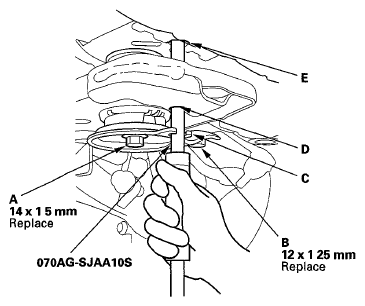
- Loosely tighten the new right-rear subframe mounting bolt (A) and the new stiffener mounting bolt(B), insert the 15 7 mm side of the subframe alignment pin (070AG-SJAA10S) through the positioning slot (C) on the rear stiffener, through the positioning hole (D) on the subframe, and into the positioning hole (E) on the body
 Courtesy of AMERICAN HONDA MOTOR CO., INC.
- Loosely tighten the new left-rear subframe mounting bolt and the new stiffener mounting bolt with the same procedure as the right rear using the subframe alignment pin
- Loosely tighten the new front side subframe mounting bolt (A) and the stiffener mounting bolt (B) on both sides
 Courtesy of AMERICAN HONDA MOTOR CO., INC.
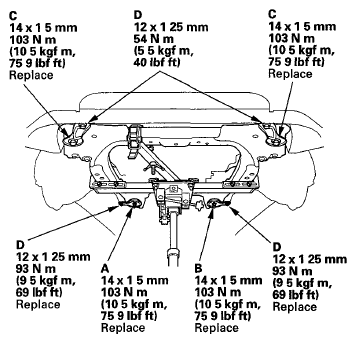
- Tighten the right-rear subframe mounting bolt (A) to the specified torque
 Courtesy of AMERICAN HONDA MOTOR CO., INC.
- Tighten the left-rear subframe mounting bolt (B) to the specified torque
- Tighten the front subframe mounting bolts (C) to the specified torque
NOTE:
Check all of the subframe mounting bolts, and retighten if necessary
- Tighten the stiffener mounting bolts (D) to the specified torque
NOTE:
Before tightening the stiffener mounting bolts, check that the positioning holes and slot are aligned using the subframe alignment pin
- Install the front subframe middle mounts (A) with new mounting bolts, and tighten them to the specified torque
 Courtesy of AMERICAN HONDA MOTOR CO., INC.
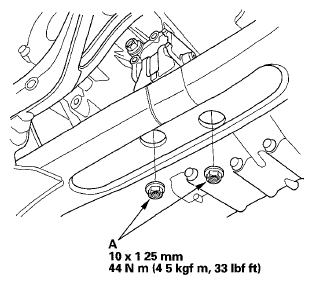
- Install the transmission lower mount nuts (A), and tighten them to the specified torque
 Courtesy of AMERICAN HONDA MOTOR CO., INC.
- Remove the transmission jack supporting the front subframe
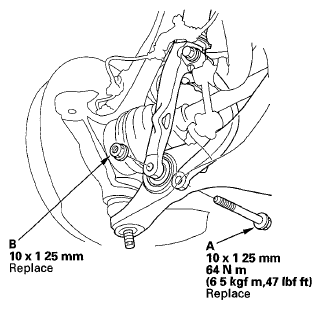
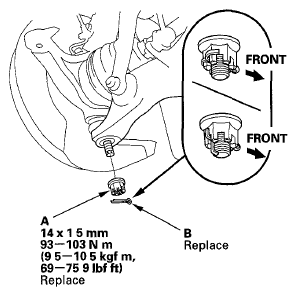
- Install the new damper fork mounting bolt (A) and new mounting nut (B), and loosely tighten the nut
 Courtesy of AMERICAN HONDA MOTOR CO., INC.
- Tighten the new castle nut (A) to the lower torque specification, then tighten it only far enough to align the slot with the ball joint pin hole Do not align the castle nut by loosening it
NOTE:
Insert the new cotter pin (B) into the ball joint pin hole from the front to the rear of the vehicle, and bend its end as shown Check the ball joint pin hole direction before connecting the ball joint
 Courtesy of AMERICAN HONDA MOTOR CO., INC.
- With SH-AWD Install the propeller shaft (see
PROPELLER SHAFT INSTALLATION
)
- Install exhaust pipe A
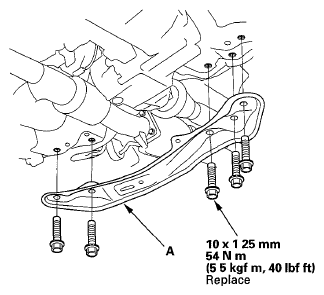
- Install the front subframe stiffener (A)
 Courtesy of AMERICAN HONDA MOTOR CO., INC.
- Install the front splash shield (see
FRONT SPLASH SHIELD REPLACEMENT
)
- Lower the vehicle
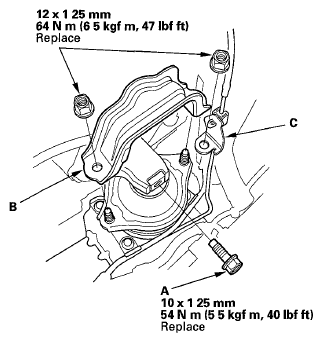
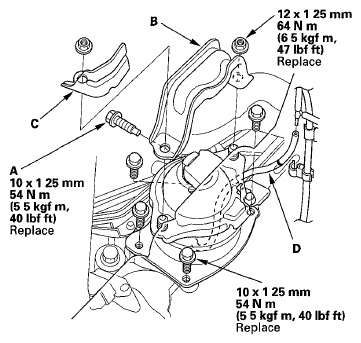
- Tighten the new front engine mount bolt (A), then install the front engine mount stop (B) and the vacuum hose bracket (C)
 Courtesy of AMERICAN HONDA MOTOR CO., INC.
- Support the engine with a jack and a wood block under the oil pan
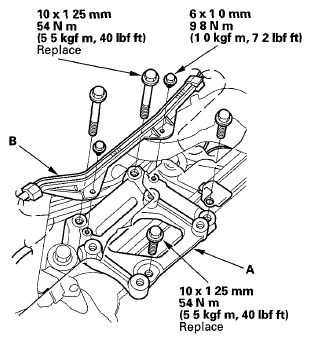
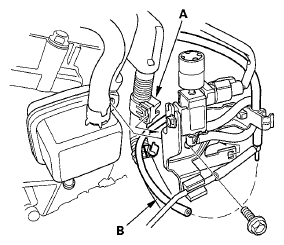
- Install the rear engine mount base (A), then install the EPS subharness (B)
 Courtesy of AMERICAN HONDA MOTOR CO., INC.
- Tighten the new rear engine mount bolt (A), then install the rear engine mount stop (B) and the heat shield (C)
 Courtesy of AMERICAN HONDA MOTOR CO., INC.
- Connect the vacuum hose (D)
- Remove the engine support hanger and the hanger adapter
- Install the connector bracket to the front cylinder head
 Courtesy of AMERICAN HONDA MOTOR CO., INC.
- Install the engine mount control solenoid valve bracket to the rear cylinder head, then install the harness clamp (A) and connect the vacuum hose (B)
 Courtesy of AMERICAN HONDA MOTOR CO., INC.
- Install the washers (A) and new steering gearbox mounting bolts (B) to the steering gearbox, then loosely tighten them
NOTE:
Make sure that the washers are in the correct position
 Courtesy of AMERICAN HONDA MOTOR CO., INC.
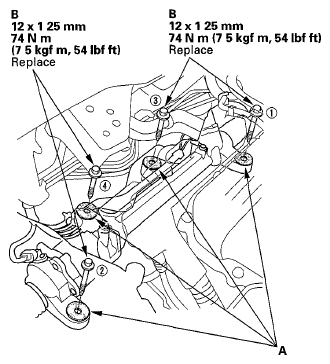
- Tighten the steering gearbox mounting bolts to the specified torque in the sequence shown
NOTE:
Check all of the steering gearbox mounting bolts, and retighten if necessary
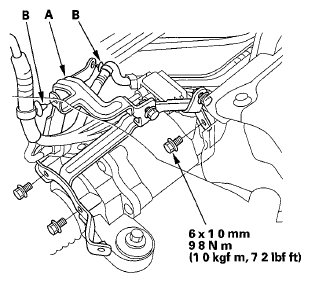
- Install the heat shield bracket (A) to the steering gearbox, then install the harness clips (B)
 Courtesy of AMERICAN HONDA MOTOR CO., INC.
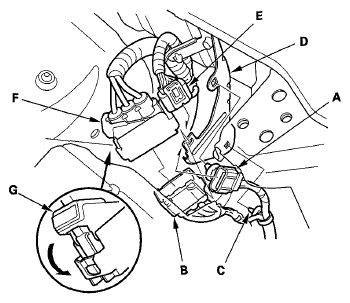
- On the steering gearbox side, install the EPS subharness 12P connector (A), the EPS subharness 3P connector (B), and the harness clip (C) to the harness bracket (D)
 Courtesy of AMERICAN HONDA MOTOR CO., INC.
- On the vehicle side, connect the EPS subharness 12P connector (E) and the EPS subharness 3P connector (F) and pull down the lever (G), then confirm the connector is fully seated
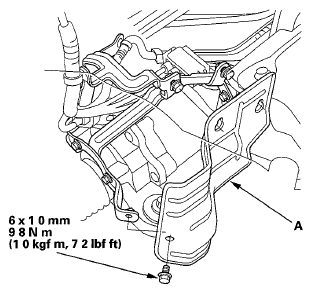
- Install the P/S heat shield (A) with the flange bolts, and tighten them to the specified torque
 Courtesy of AMERICAN HONDA MOTOR CO., INC.
- Install the strut brace (see
SUBFRAME REPLACEMENT
)
- Install the cowl cover (see
FRONT BULKHEAD BRACE COVER REPLACEMENT
) and engine compartment cover (see
ENGINE COMPARTMENT COVER REPLACEMENT
)
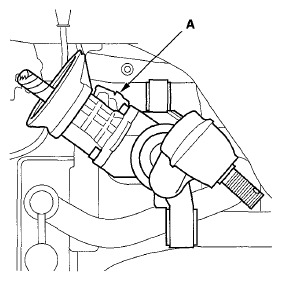
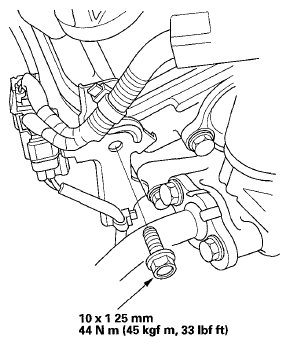
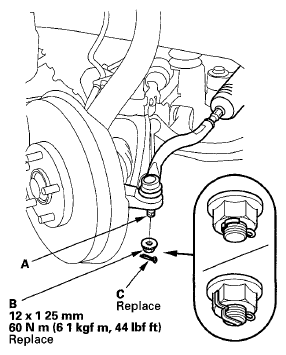
- Wipe off any grease contamination from the ball joint tapered section and threads Reconnect the tie-rod end ball joint (A) to the knuckle Install the new nut (B), and tighten it to the specified torque
 Courtesy of AMERICAN HONDA MOTOR CO., INC.
- Install a new cotter pin (C), and bend it as shown
- Install the front wheels, then set the wheels in the straight ahead position
NOTE:
Before installing the wheel, clean the mating surfaces of the brake disc and the inside of the wheel
- Remove the vinyl tape around the splines on the pinion shaft
- Loosen the upper steering joint bolt (A) and slip the lower end of the steering joint (B) onto the pinion shaft (C) taking care to align the gap (D) within the angle
 Courtesy of AMERICAN HONDA MOTOR CO., INC.
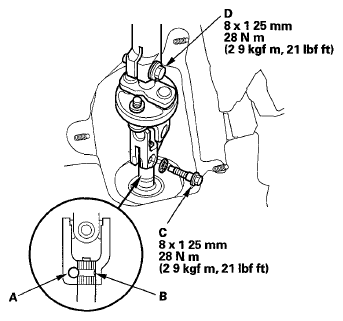
- Align the bolt hole (A) on the steering joint with the groove (B) around the pinion shaft, then loosely install the lower steering joint bolt (C) Be sure that the joint bolt is securely in the groove in the pinion shaft
 Courtesy of AMERICAN HONDA MOTOR CO., INC.
- Pull on the steering joint to make sure that the steering joint is fully seated, then tighten the lower joint bolt to the specified torque
- Tighten the upper steering joint bolt (D) to the specified torque
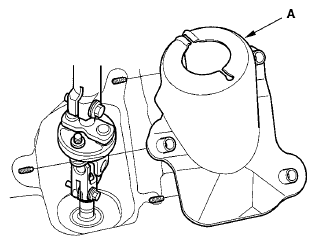
- Install the steering joint cover (A)
 Courtesy of AMERICAN HONDA MOTOR CO., INC.
- Install the steering wheel (see
STEERING WHEEL INSTALLATION ) and the driver's airbag (see
DRIVER'S AIRBAG REPLACEMENT
)
- With the tires raised off the ground, check for the following symptoms by turning the steering wheel fully to the right and left several times
SYMPTOM CHART
| Symptom |
Probable cause |
| Rubbing sound coming from the lower steering column area |
Steering column joint is contacting the cover |
| Grating sound from the lower steering column area, or a rough feeling during steering |
Poor engagement of the pinion shaft serrations |
| Noise from around the steering wheel during steering |
Poor engagement of the SRS cable reel with the steering wheel, or a damaged cable reel |
- Do the battery terminal reconnection procedure (see
BATTERY TERMINAL DISCONNECTION AND RECONNECTION
), and do these tasks
- Turn the ignition switch to ON (II), or press the engine start/stop button to select the ON mode, and check that the SRS indicator comes on for about 6 seconds and then goes off
- Make sure the horn and turn signal switches work properly
- Make sure the steering wheel switches work properly
- After installation, do these checks