- Raise the vehicle on a lift
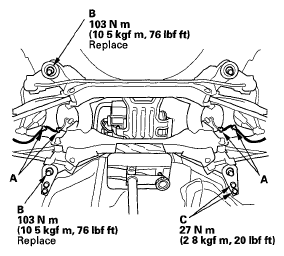
- Remove the wheel sensor harness clamps (A)
 Courtesy of AMERICAN HONDA MOTOR CO., INC.
- Support the rear subframe with a transmission jack and a wooden block as shown
- Remove the rear subframe mounting bolts (B) and (C)
- Lower the transmission jack and the rear subframe about 50 mm
NOTE:
Be careful not to damage the connecting parts
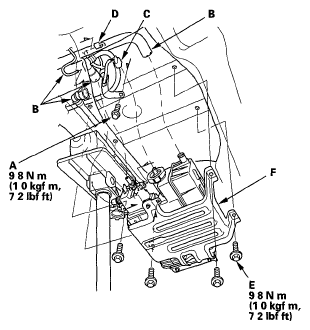
- Remove the bolt (A), and disconnect the hoses (B), the EVAP canister vent shut valve 2P connector (C), and the FTP sensor 3P connector (D)
 Courtesy of AMERICAN HONDA MOTOR CO., INC.
- Remove the bolts (E), then remove the EVAP canister assembly (F)
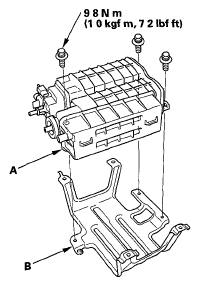
- Remove the EVAP canister (A) from the EVAP canister bracket (B)
 Courtesy of AMERICAN HONDA MOTOR CO., INC.
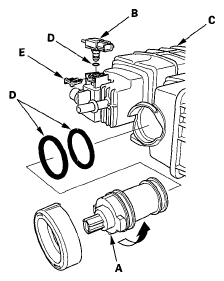
- Remove the EVAP canister vent shut valve (A) and the FTP sensor (B) from the canister (C)
 Courtesy of AMERICAN HONDA MOTOR CO., INC.
- Reassemble the EVAP canister with new O-rings (D) and a new retainer (E), then install the EVAP canister bracket
NOTE:
Do not coat the O-rings with oil
- Install the EVAP canister assembly to the body
NOTE:
Attach the bracket arm (A) to the body as shown
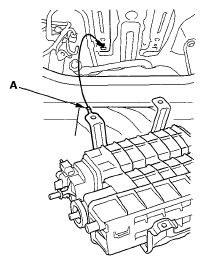 Courtesy of AMERICAN HONDA MOTOR CO., INC.
- Install the parts in the reverse order of removal Use new bolts when you install the rear subframe
- Check the wheel alignment (see
WHEEL ALIGNMENT
)