3rd Clutch Transmission Fluid Pressure Switch Replacement
- Make sure you have the anti-theft codes for the audio system and the navigation system (if equipped), then write down the audio presets.
- Disconnect the battery negative cable, then disconnect the battery positive cable.
- Remove the battery hold-down bracket, then remove the battery cover, the battery, and the battery tray.
- Remove the intake air duct and the air cleaner assembly.
- Loosen the two bolts securing the battery base from under the vehicle, and remove the two bolts securing the battery base in the engine compartment, then remove the battery base.
- Disconnect the 3rd clutch transmission fluid pressure switch connector, then remove the switch.
- Install a new 3rd clutch transmission fluid pressure switch (A) with a new sealing washer (B), and tighten the switch to the specified torque by turning the metal part, not the plastic part.
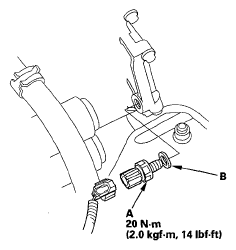 Courtesy of AMERICAN HONDA MOTOR CO., INC.
- Check the connector for rust, dirt, or oil, and clean if necessary, then connect the connector securely.
- Install the battery base, then install the air cleaner assembly and the intake air duct.
- Install the battery tray, the battery, and the battery cover, then secure the battery with its hold-down bracket.
- Clean the battery posts and cable terminals, then assemble them.
- Enter the anti-theft codes for the audio system and the navigation system (if equipped), enter the audio presets, and set the clock.