Water Passage Replacement
- Drain the engine coolant, '04-05 models (see '04-05 MODELS
), '06-08 models (see '06-08 MODELS
).
- Remove the alternator (see
ALTERNATOR REMOVAL AND INSTALLATION
).
- Remove the A/C condenser fan shroud assembly (see A/C CONDENSER REPLACEMENT
).
- Remove the splash shield (see TRANSMISSION REMOVAL
).
- Remove the A/C compressor without disconnecting the A/C hoses (see ENGINE REMOVAL
).
- Remove the intake manifold '04-05 models (see
REMOVAL ('04-05 MODELS)
), '06-08 models (see
REMOVAL ('06-08 MODELS)
).
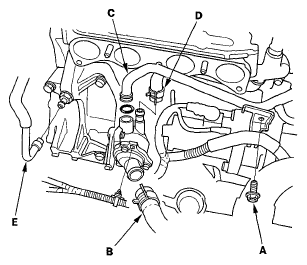
- Remove a bolt (A) securing the connecting pipe.
 Courtesy of AMERICAN HONDA MOTOR CO., INC.
- Disconnect the lower radiator hose (B), connecting pipe (C), water bypass hose (D), and positive crankcase ventilation (PCV) hose (E).
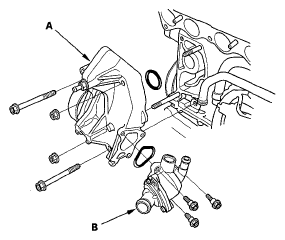
- Remove the water passage (A).
 Courtesy of AMERICAN HONDA MOTOR CO., INC.
- Remove the thermostat housing (B).
- Remove the water pump (see WATER PUMP REPLACEMENT
).
- Clean and dry the water passage mating surfaces.
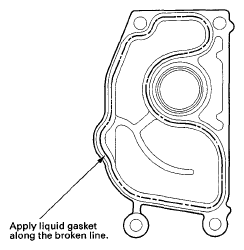
- Apply liquid gasket, P/N 08717-0004, 08718-0001, 08718-0003, or 08718-0009, evenly to the cylinder block mating surface of the water passage. Install the component within 5 minutes of applying the liquid gasket.
NOTE:
- If you apply liquid gasket P/N 08718-0012, the component must be installed within 4 minutes.
- If too much time has passed after applying the liquid gasket, remove the old liquid gasket and residue, then reapply new liquid gasket.
 Courtesy of AMERICAN HONDA MOTOR CO., INC.
- Install the water pump (see Water Pump Replacement
).
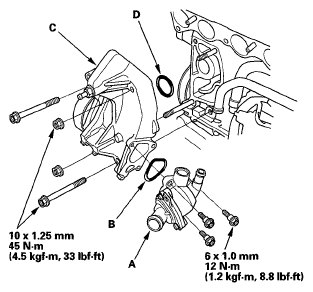
- Install the thermostat housing (A) with a new O-ring (B).
 Courtesy of AMERICAN HONDA MOTOR CO., INC.
- Install the water passage (C) with a new O-ring (D).
NOTE:
- Wait at least 30 minutes before filling the engine with coolant.
- Do not run the engine for at least 3 hours after installing the water passage.
- Install the lower radiator hose (A), water bypass hose (B), and positive crankcase ventilation (PCV) hose (C).
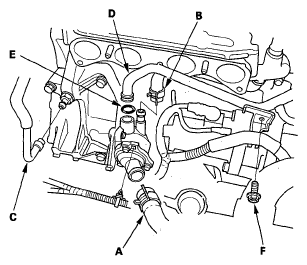 Courtesy of AMERICAN HONDA MOTOR CO., INC.
- Install the connecting pipe (D) with a new O-ring (E).
- Tighten the bolt (F) securing the connecting pipe.
- Install the intake manifold, '04-05 models (see
INSTALLATION ('04-05 MODELS)
), '06-08 models (see
INSTALLATION ('06-08 MODELS)
),
- Install the A/C compressor (see ENGINE INSTALLATION
).
- Install the splash shield (see TRANSMISSION INSTALLATION
).
- Install the A/C condenser fan shroud assembly (see A/C CONDENSER REPLACEMENT
).
- Install the alternator (see
ALTERNATOR REMOVAL AND INSTALLATION
).
- Refill the radiator with engine coolant, then bleed air from the cooling system, '04-05 models (see step 6
), '06-08 models (see step 6
).