- Using a putty knife, scrape the old adhesive smooth to a thickness of about 2 mm {0.08 in) on the bonding surface around the entire rear window opening flange.
NOTE:
- Do not scrape down to the painted surface of the body; damaged paint will interfere with proper bonding
- Mask off surrounding surfaces before painting.
- Remove the fasteners and spacers from the body.
- Clean the body bonding surface with a sponge dampened in alcohol.
NOTE:
After cleaning, keep oil, grease and water from getting on the surface.
- If the old rear window is to be reinstalled, use a putty knife to scrape off all traces of old adhesive and the rubber dam, then clean the rear window surface with alcohol where new adhesive is to be applied.
NOTE:
Make sure the bonding surface is kept free of water, oil and grease.
CAUTION:
Avoid setting the rear window on its edges; small chips may later develop into cracks.
NOTE:
Clean the shadowed area.
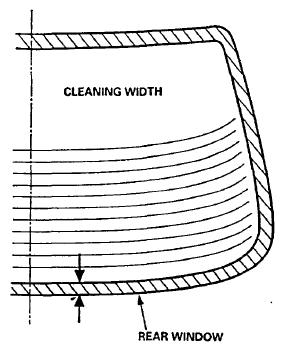 Courtesy of AMERICAN HONDA MOTOR CO., INC.
- Apply the double-faced adhesive tape to the edge of the rear window, then install the molding around the edge of the rear window as shown.
NOTE:
Be careful not to touch the rear window where adhesive will be applied.
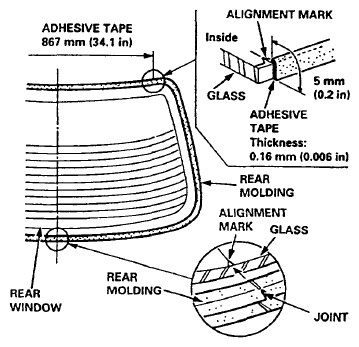 Courtesy of AMERICAN HONDA MOTOR CO., INC.
- Glue the fasteners and spacers to the inside face of the rear window as shown.
NOTE:
Be careful not to touch the rear window where adhesive will be applied.
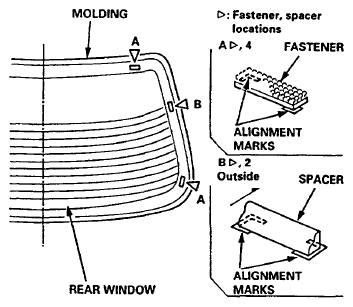 Courtesy of AMERICAN HONDA MOTOR CO., INC.
- Glue the fasteners to the body as shown.
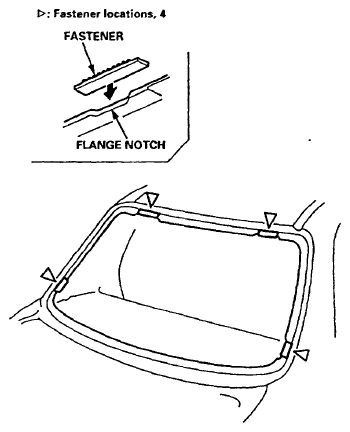 Courtesy of AMERICAN HONDA MOTOR CO., INC.
- Set the rear window in the window opening, and then center it Make alignment marks across the rear window and body with a grease pencil at the four points shown.
NOTE:
Be careful not to touch the rear window where adhesive will be applied.
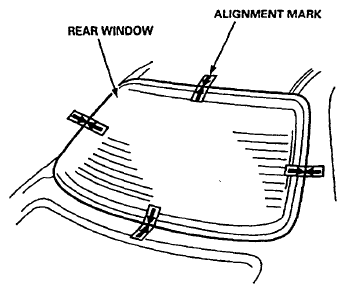 Courtesy of AMERICAN HONDA MOTOR CO., INC.
- Remove the rear window.
- With a sponge, apply a light coat of glass primer around the edge of the rear window as shown, then lightly wipe it off with gauze or cheesecloth.
NOTE:
- Do not apply body primer to the rear window, and do not get body and glass primer sponges mixed up.
- Never touch the primed surfaces with your hands. If you do, the adhesive may not bond to the rear window properly, causing a leak after the rear window is installed.
- Keep water, dust, and abrasive materials away from the primed surface.
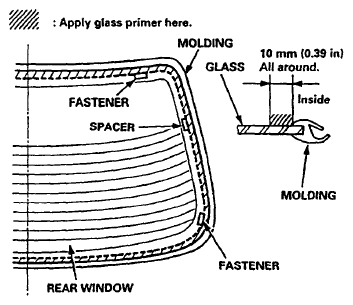 Courtesy of AMERICAN HONDA MOTOR CO., INC.
- With a sponge, apply a light coat of body primer to the original adhesive remaining around the rear window opening flange. Let the body primer dry for at least 10 minutes.
NOTE:
- Do not apply glass primer to the body, and be careful not to mix up glass and body primer sponges.
- Never touch the primed surfaces with your hands.
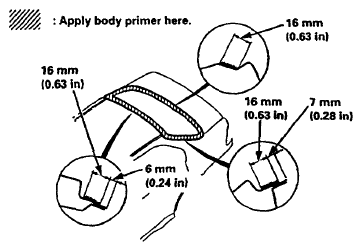 Courtesy of AMERICAN HONDA MOTOR CO., INC.
- Thoroughly mix the adhesive and hardener together on a glass or metal plate with a putty knife.
NOTE:
- Clean the plate with a sponge and alcohol before mixing.
- Follow the instructions that came with the adhesive.
- Before filling a cartridge, cut the end of the nozzle as shown.
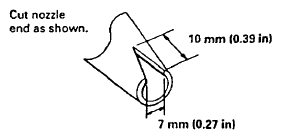 Courtesy of AMERICAN HONDA MOTOR CO., INC.
- Pack adhesive into the cartridge without air pockets to ensure continuous delivery. Put the cartridge in a caulking gun, and run a bead of adhesive around the edge of the rear window as shown.
NOTE:
Apply the adhesive within 30 minutes after applying the glass primer.
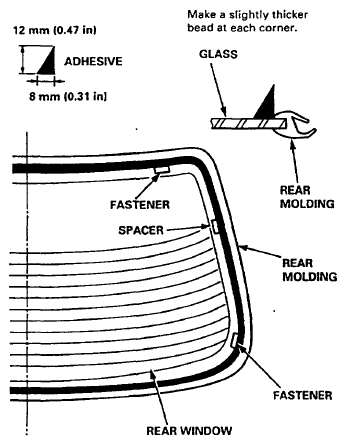 Courtesy of AMERICAN HONDA MOTOR CO., INC.
- Use suction cups to hold the rear window over the opening, align it with the alignment marks you made in step 7, and set it down on the adhesive. Lightly push on the rear window until its edges are fully seated on the adhesive all the way around.
NOTE:
Do not open or close the doors until the adhesive is dry.
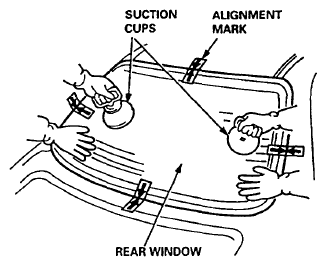 Courtesy of AMERICAN HONDA MOTOR CO., INC.
- Scrape or wipe the excess adhesive off with a putty knife or towel.
NOTE:
To remove adhesive from a painted surface or the rear window, use a soft shop towel dampened with alcohol.
- Let the adhesive dry for at least one hour, then spray water over the rear window and check for leaks. Mark the leaking areas, let the rear window dry, then seal with sealant.
NOTE:
Let the adhesive stand for at least four hours after rear window installation. If the vehicle has to be used within the first four hours, it must be driven slowly.
- Reinstall all remaining removed parts.
NOTE:
Advise the customer not to do the following things for two to three days:
- Slam the doors with all the windows rolled up.
- Twist the body excessively (such as when going in and out of driveways at an angle or driving over rough, uneven roads).