By-Pass Control Solenoid Valves
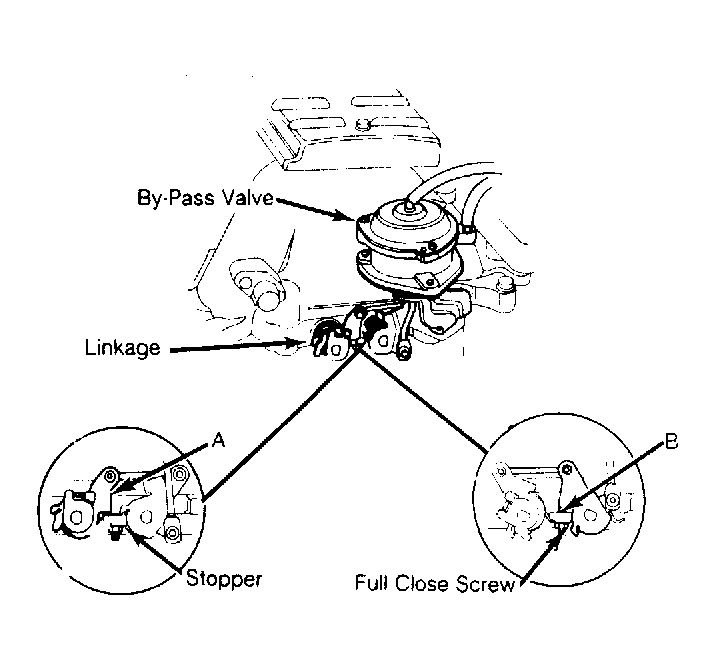
- Check by-pass valve shaft for binding, sticking and smooth movement. Ensure by-pass valve is in close contact with stopper when by-pass valve is fully open. Ensure by-pass valve is in close contact with full close screw when by-pass valve is fully closed. See Fig 1
.
 Courtesy of AMERICAN HONDA MOTOR CO., INC.
 Courtesy of AMERICAN HONDA MOTOR CO., INC.
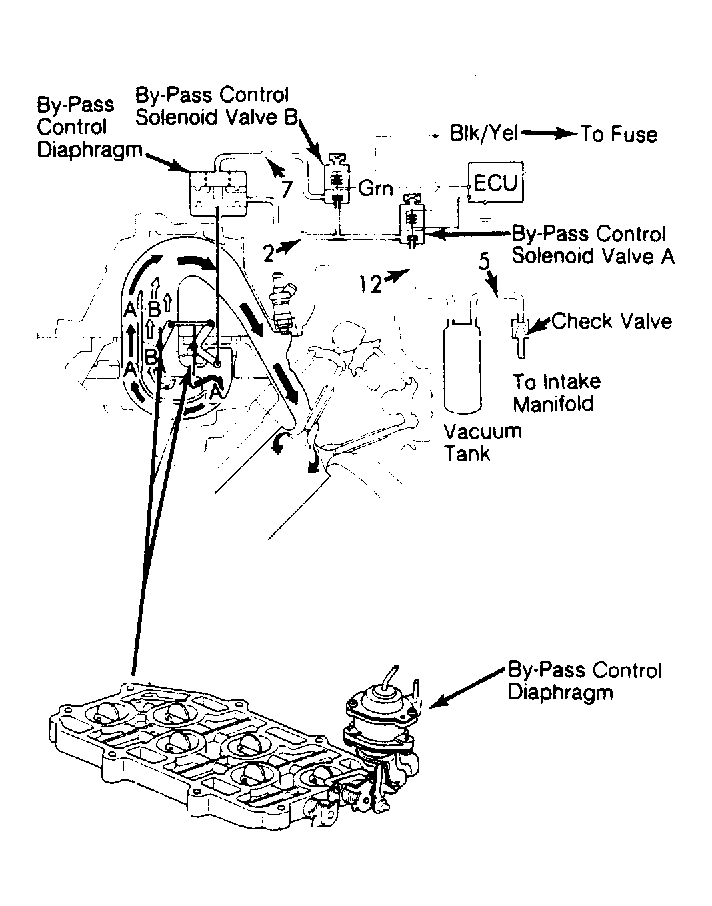
- Clean linkage and shafts with carburetor cleaner if fault is found. Start engine and allow to idle. Remove No. 2 vacuum hose from by-pass control diaphragm and attach a vacuum gauge to hose. See Fig 2
. Check for vacuum. If vacuum is present, go to step 4).
- If vacuum is NOT present, remove No. 12 vacuum hose at solenoid and check for vacuum. If vacuum is present, go to step 7). If vacuum is NOT present, check vacuum line between solenoid and intake manifold. Repair as necessary and recheck.
- Raise engine speed to 4000 RPM and check vacuum gauge. If vacuum is present, go to step 11). If vacuum is NOT present, reconnect No. 2 vacuum hose and disconnect No. 8 vacuum hose from by-pass control diaphragm. Attach vacuum gauge to No. 8 vacuum hose and check for vacuum at idle.
- If vacuum is NOT present, go to step 13). If vacuum is present, raise engine speed to 3500 RPM and check for vacuum at No. 8 hose. If vacuum is NOT present, system is okay. If vacuum is present, go to next step.
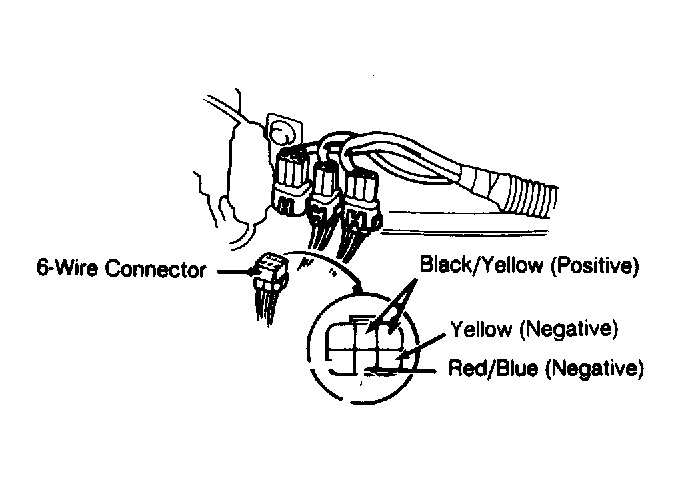
- If vacuum is present at 3500 RPM, disconnect by-pass control solenoid 6-wire connector and recheck for vacuum. See Fig 3
. If vacuum exists, check for short in Green (negative) wire between ECU terminal B3 and solenoid 6-wire connector. If wire is okay, replace by-pass control solenoid valve "B". See Fig 2
. If vacuum is NOT present, substitute a known good ECU and retest. If problem is corrected, replace original ECU.
- Disconnect 6-wire connector from by-pass control solenoid. See Fig 3
. Measure voltage between Black/Yellow (positive) wire and Red/Blue (negative) wire terminals. If battery voltage is present, replace by-pass control solenoid valve "A". See Fig 2
. If voltage is NOT present, go to next step.
- Measure voltage between Black/Yellow wire terminal and body ground. If battery voltage is NOT present, repair open in Black/Yellow wire between solenoid 6-wire connector and No. 9 fuse.
- If battery voltage is present, turn ignition off. Attach PGM-FI test harness connector between ECU and ECU harness connector. Check continuity of Red/Blue wire between ECU terminal A14 and solenoid 6-wire connector.
- If continuity is NOT present, repair open in Red/Blue wire. If continuity is present, substitute a known good ECU and retest. If symptom goes away, replace original ECU.
- Disconnect solenoid 6-wire connector. See Fig 3
. Check vacuum gauge. If vacuum is present, check for short in Red/Blue wire between ECU terminal A14 and 6-wire connector. If wire is okay, replace by-pass control solenoid valve "A".
- If vacuum is NOT present, substitute a known good ECU and retest. If problem goes away, replace original ECU.
- Disconnect solenoid 6-wire connector. See Fig 3
. Check for battery voltage between Black/Yellow (positive) wire and Green (negative) wire terminals. If battery voltage is present, replace by-pass control solenoid valve "B". See Fig 2
. If voltage is NOT present, go to next step.
- Measure voltage between Black/Yellow (positive) wire terminal and body ground. If battery voltage is NOT present, repair open in Black/Yellow wire between 6-wire connector and fuse No. 9.
- If battery voltage is present, turn ignition off. Connect PGM-FI test harness connector between ECU and ECU harness connector. Check continuity in Green wire between solenoid 6-wire connector and ECU harness connector terminal B3. If continuity is NOT present, repair open in Green wire between ECU connector terminal B3 and solenoid 6-wire connector.
- If continuity is present, substitute a known good ECU and retest. If problem goes away, replace original ECU.
 Courtesy of AMERICAN HONDA MOTOR CO., INC.